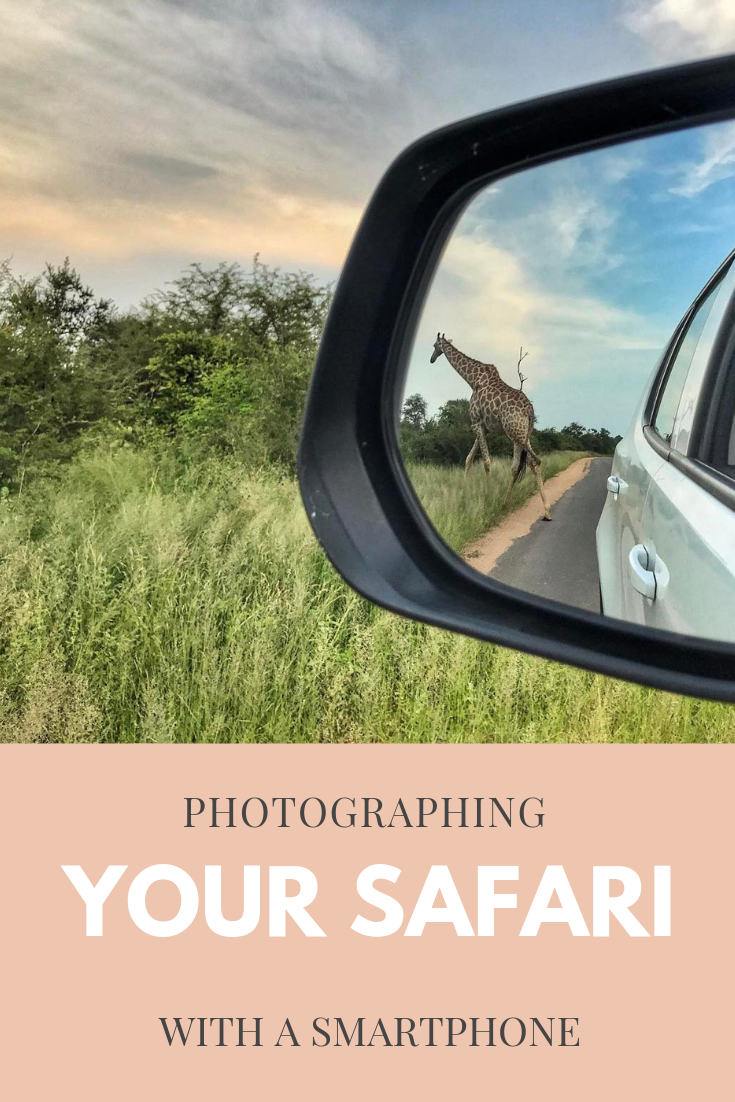
What if the only camera you own is an iPhone, Samsung of Google Pixel smartphone and you want to take safari photos? You might not see a smartphone on the best camera for wildlife photography lists, but does that mean you can’t capture great wildlife photography? Does it mean you should not go on a photo safari? Absolutely not.
With these smartphone photography tips, I’ll show you how it’s possible to photograph a safari with a smartphone. You’ll come home from your African safari trip with images you love, are proud to share and want to print.
You might be thinking that great safari photography can only be achieved with bulky and heavy dedicated cameras, long lenses, f-stop this and aperture that.
I’m here to say that the best camera for your safari is the one that is with you. Please don’t miss out on one of the most incredible experiences because you don’t have what some might consider a safari camera or wildlife photography camera or worse, don’t know how to use it.
Photographing my first South African safari
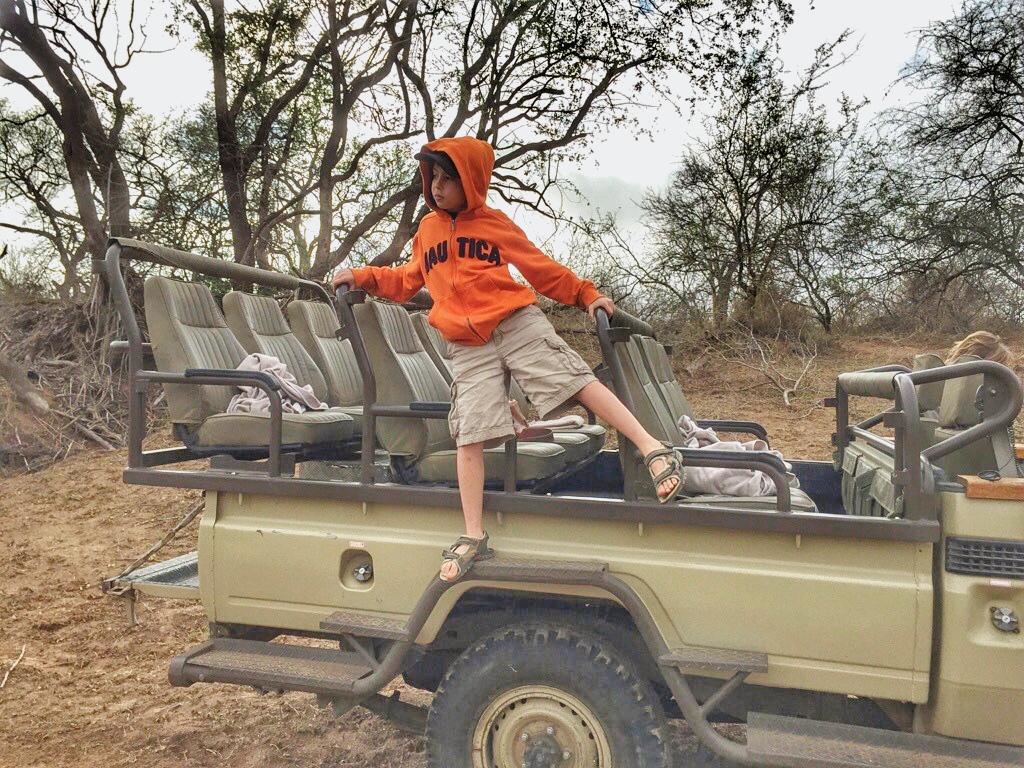
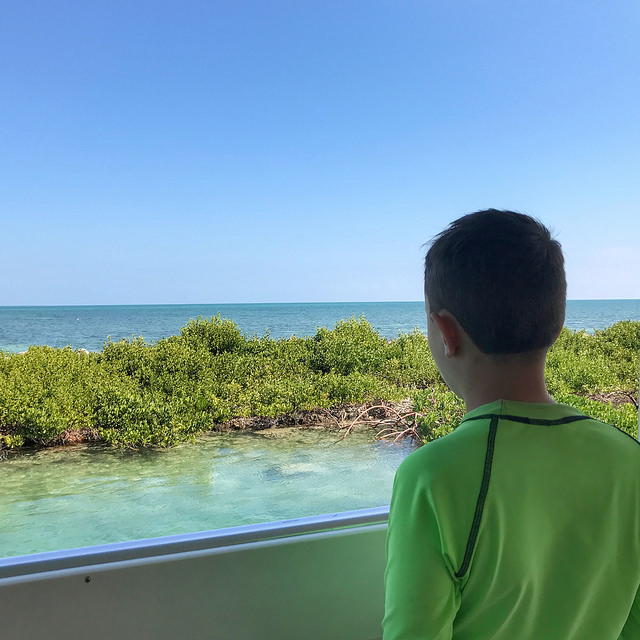
On safari with Naledi Game Lodge in South Africa. Shot on iPhone 4s.
The first time I went on a safari in 2012, I photographed the wildlife, nature, and landscapes of the Greater Kruger National Park in South Africa with an iPhone 4s. True story.
As a professional portrait photographer that worked mostly in the studio back then, I didn’t have a telephoto lens for my Nikon cameras, and I didn’t want to invest thousands of dollars for a once-in-a-lifetime experience as I wasn’t a professional wildlife photographer. The photos were only for my memories. Some of those photos are featured in this article.
Although I travel with an Olympus OM-D e-m1 mark III mirrorless camera and 40-150 mm M.Zuiko 2.8 pro lens with a teleconverter on safari these days, I always, always take photos with my iPhone too. Some of my most cherished wildlife photos have been taken with my smartphone.
Tips to photograph the wildlife, landscapes, and nature with the phone in your pocket, your smartphone.
On safari with Tours de Mornay in Kruger National Park. Shot on iPhone 11 Pro Max.
ON THIS PAGE I DISCUSS: (click on the link below to jump to the topic)
First, let’s start with some things to think about before you take the shot.
Make sure the lens on the smartphone is clean. Consider carrying a small lens cleaning cloth.
Tap your finger on the screen where you want to focus to activate the yellow square for focus and exposure (iPhone). The yellow sun icon will appear, drag up and down to adjust. For Android, tap the yellow sun icon and use the slider to change. ProTip: Purchase the ProCamera app as it will allow you to separate the focus and exposure. Tap the blue square for focus and the yellow circle for exposure.
The shutter trips after you lift your finger off (white circle button on the iPhone).
Keep steady. For sharper photos, slightly tuck in your elbows or lean against something.
Keep level and watch your horizon.
Photograph horizontally for a wider scene, photograph vertically for tall buildings, trees and close portraits (headshots). These rules can be broken.
If possible, use your feet to get closer. Zoom if you have a dual-lens (2x or 3x on iPhone) smartphone or an add-on telephoto lens for your iPhone or Android phone (see below).
ProTip: Use the + (up) volume button on your iPhone (some Android phones) to trigger the shutter.
WHAT TO PHOTOGRAPHY ON SAFARI WITH A SMARTPHONE?
Go beyond the animal mug shot: Capture the Details
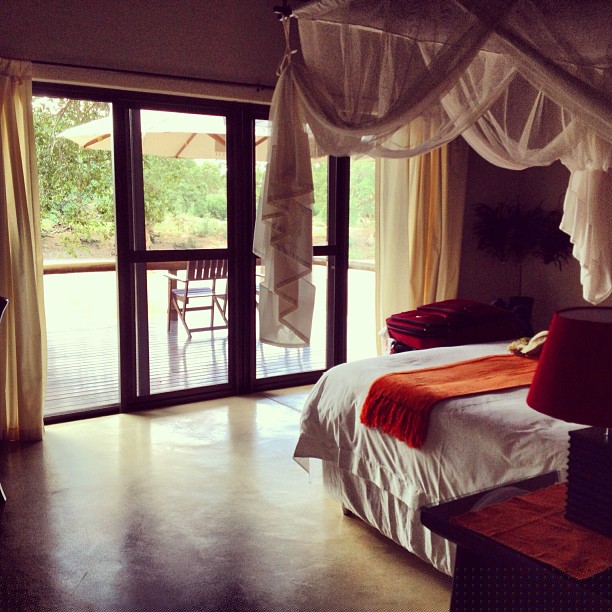
Remember to capture your unique, safari story. The safari lodge you choose for your South Africa safari holiday might be one of the most luxurious accommodations you’ve ever stayed at. It certainly has been the case for me.
Photograph your room and the view, the environment and all the luxurious details – the bed, the decor, the grounds, and the surrounding area.
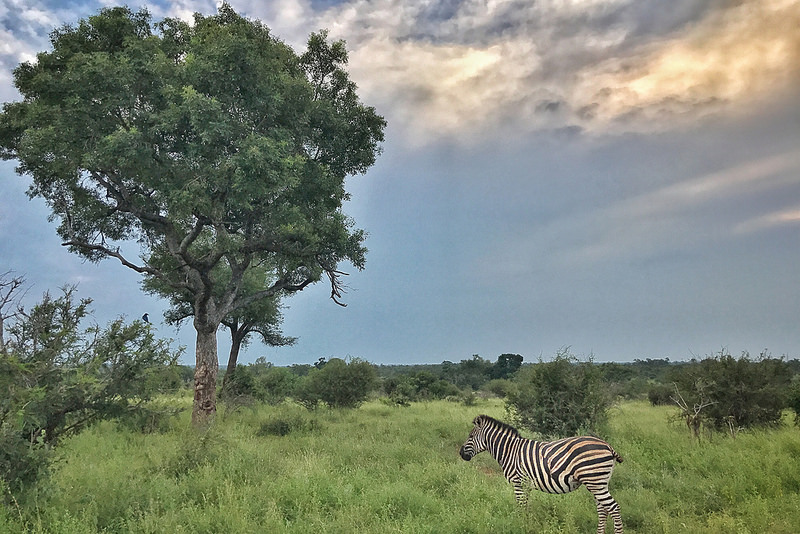
Photograph beyond the animal mug shot, show wildlife in their habitat and surroundings. This is something that should you do whether you use an iPhone, Samsung, Google Pixel, Sony, Nikon, Canon, Fuji or Olympus camera for your wildlife photography. Focus on telling the animal’s story.
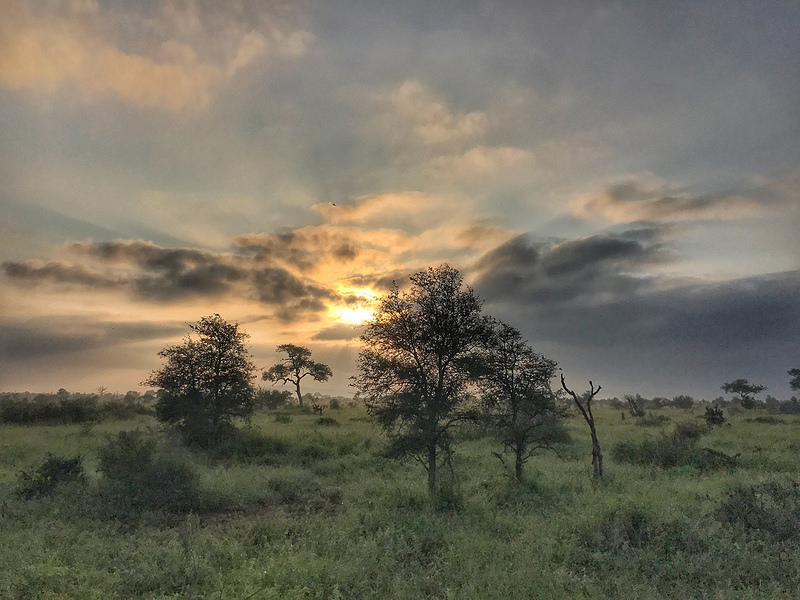
Capture the sunrises and sunsets, the landscapes, trees, flowers, insects, and silhouettes.
The natural beauty of South Africa is some of the best I’ve experienced anywhere. The Kruger National Park has one of the most diverse wildlife, landscapes, and fauna. It truly is a special park and is one of my favourite places in the entire world. For many, a safari is a once-in-a-lifetime experience, and every detail deserves to be captured.
SAFARI PHOTOGRAPHY TIPS AND THE BEST COMPOSITIONS
FRAMING
Use literal, structural, architectural or environmental elements to bring focus to your subject.
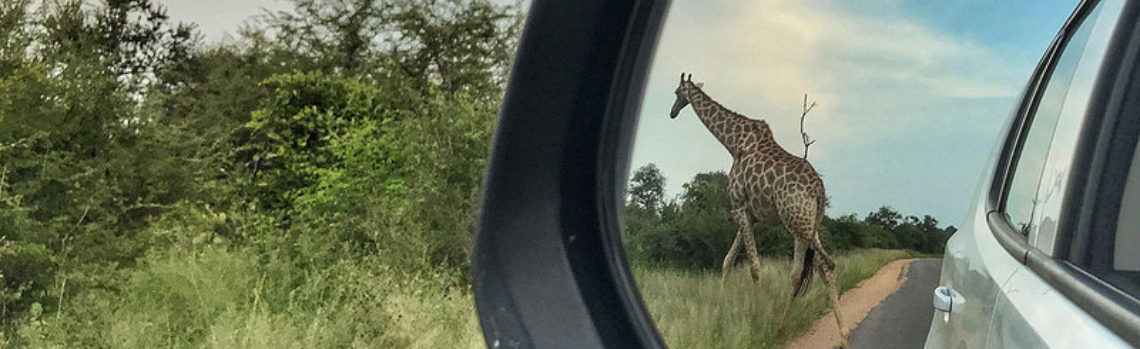
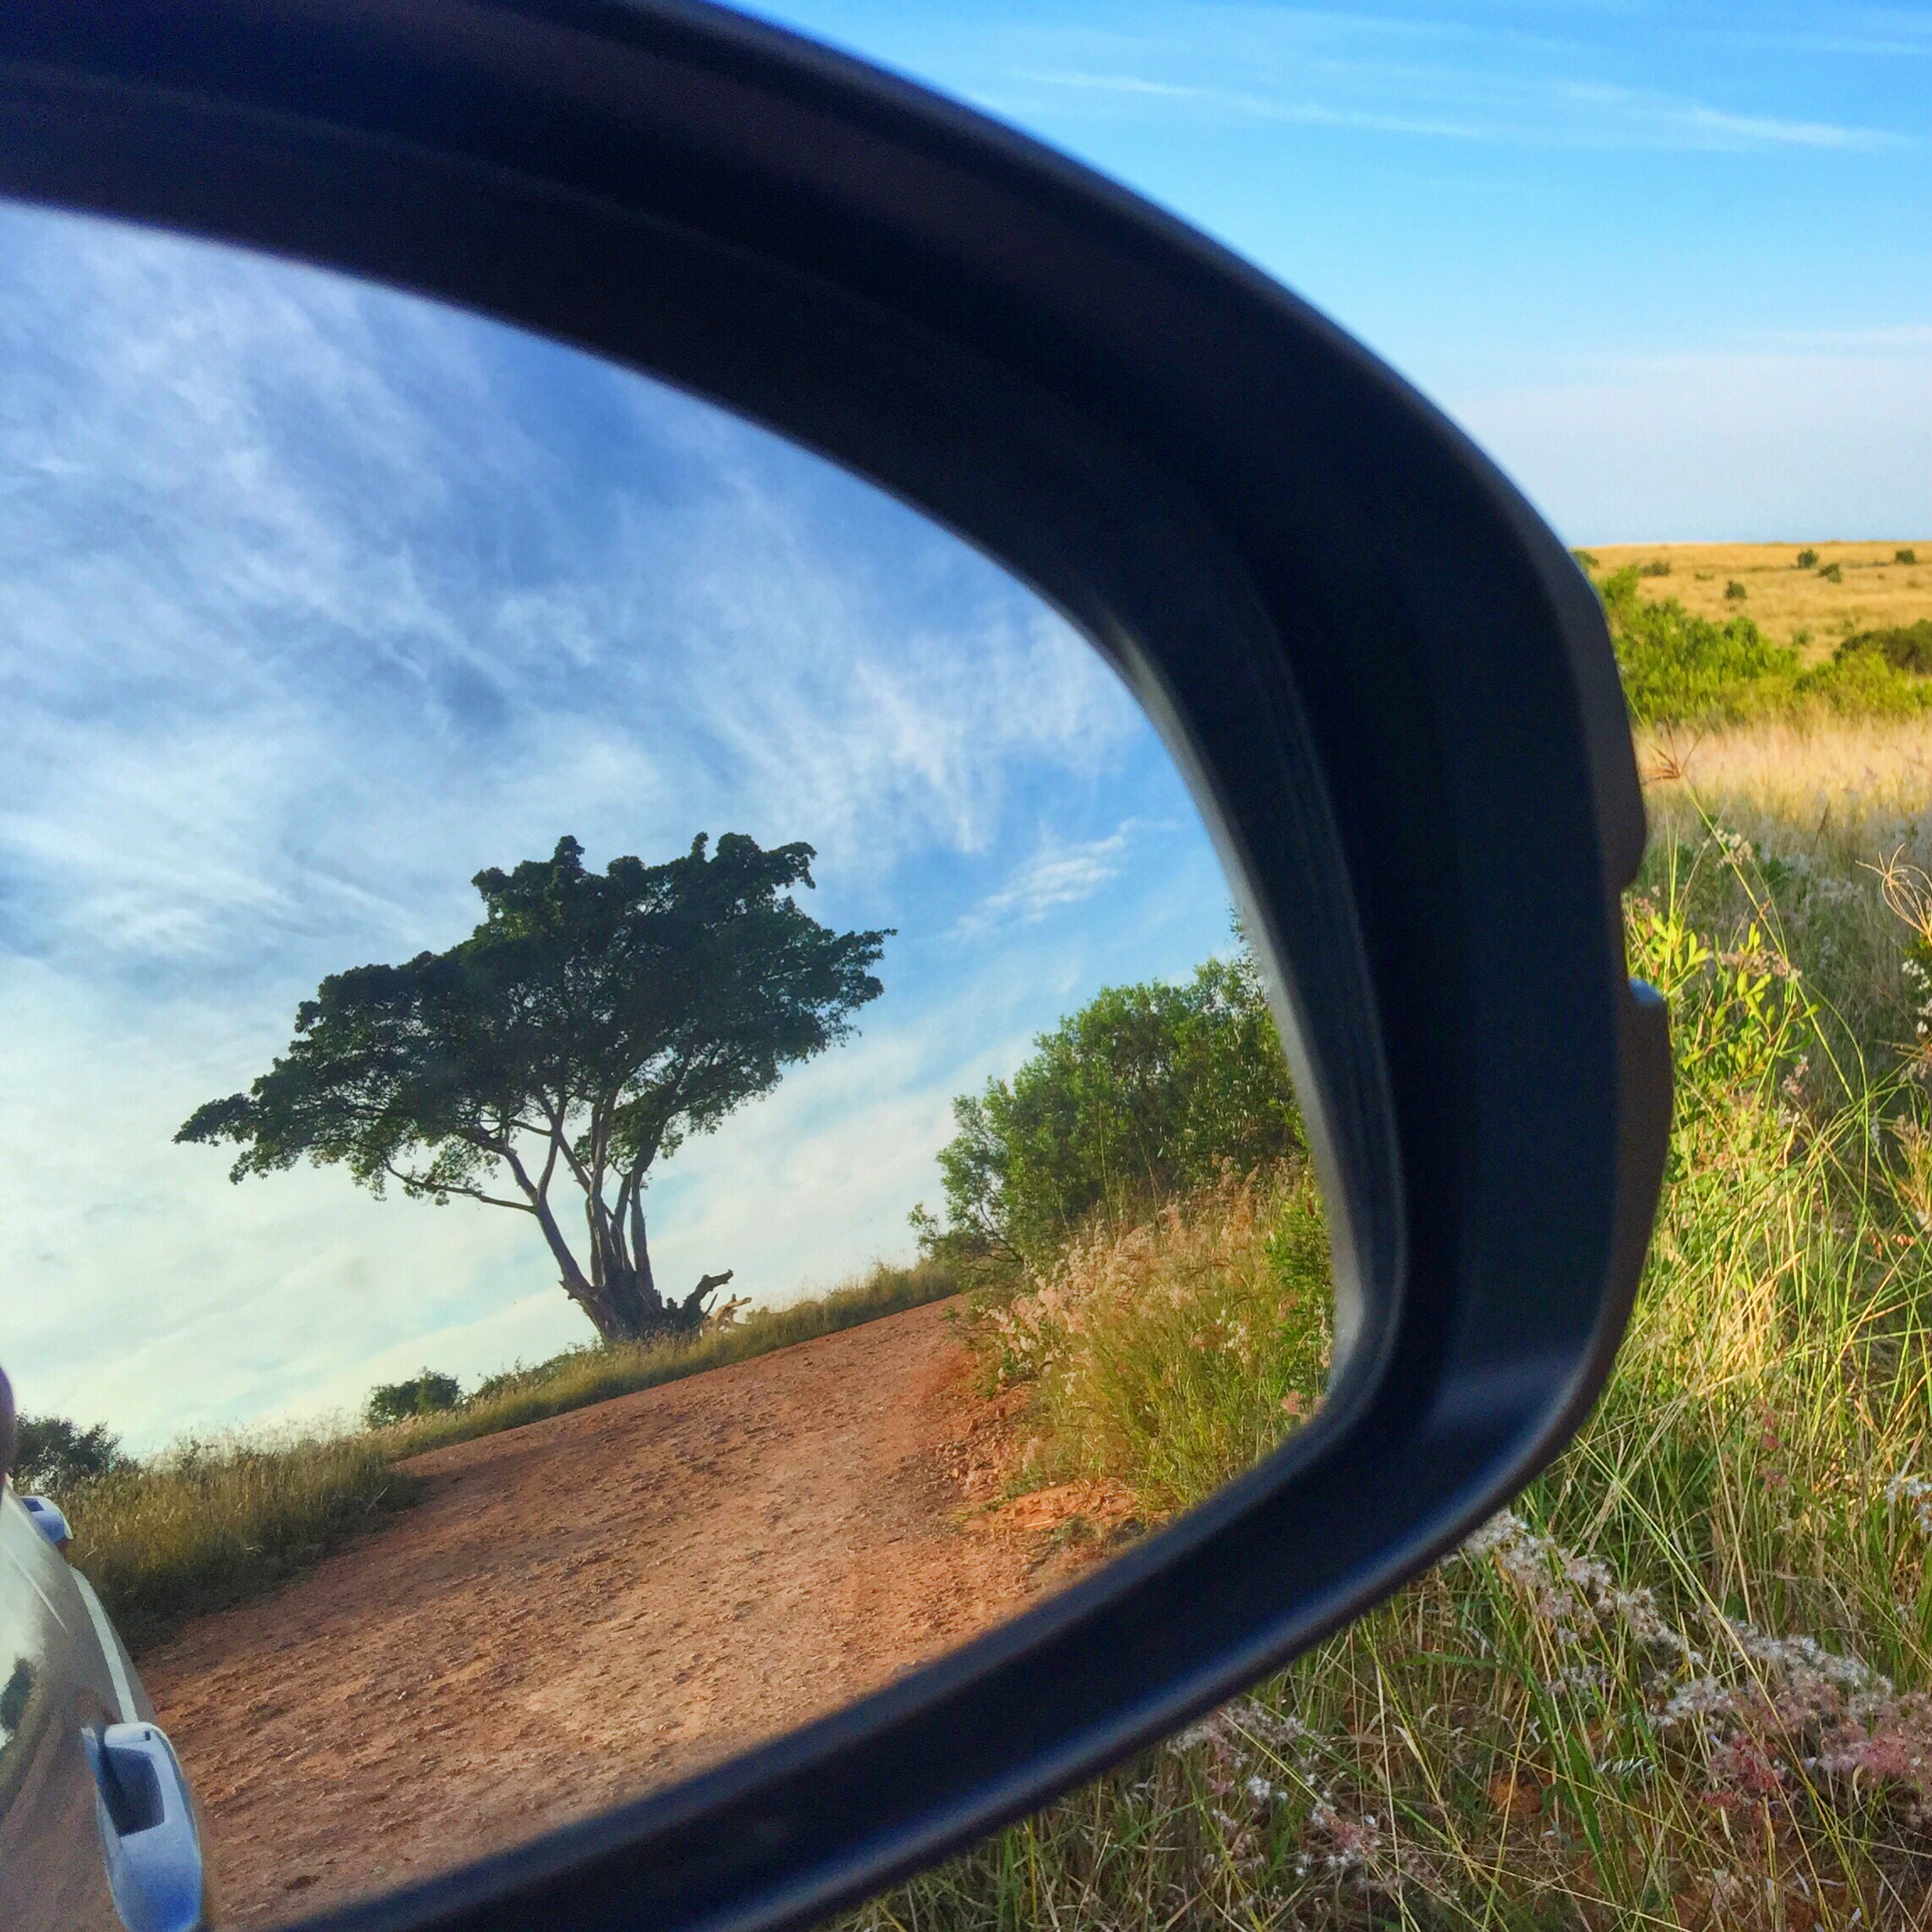
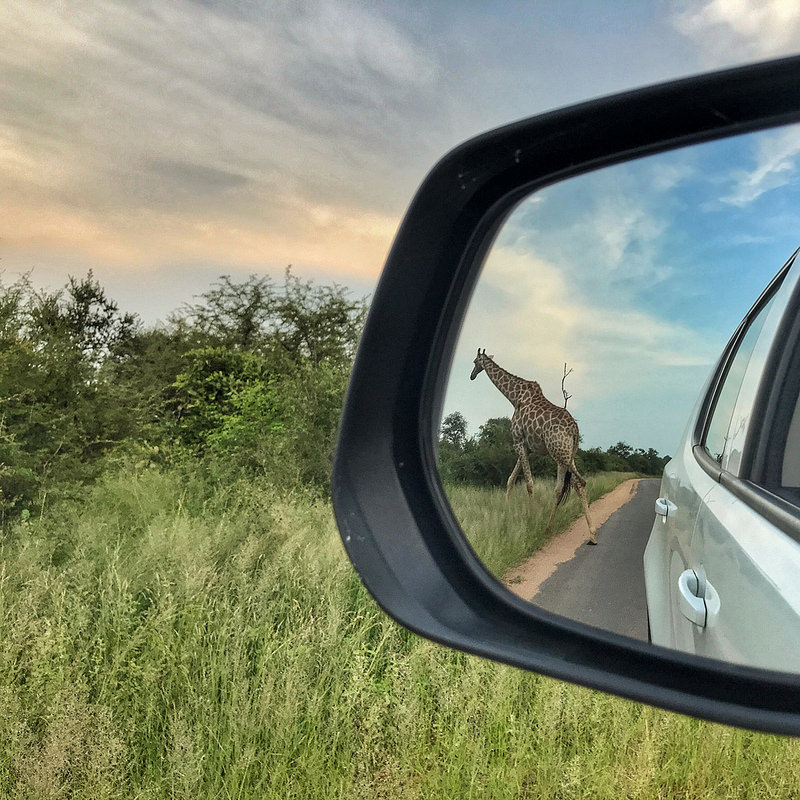
When on safari with your smartphone, think of trees, the landscape, the sky, and other animals to frame your main subject. Use the side view mirrors if you are self-driving in Kruger National Park or any other self-drive national park.
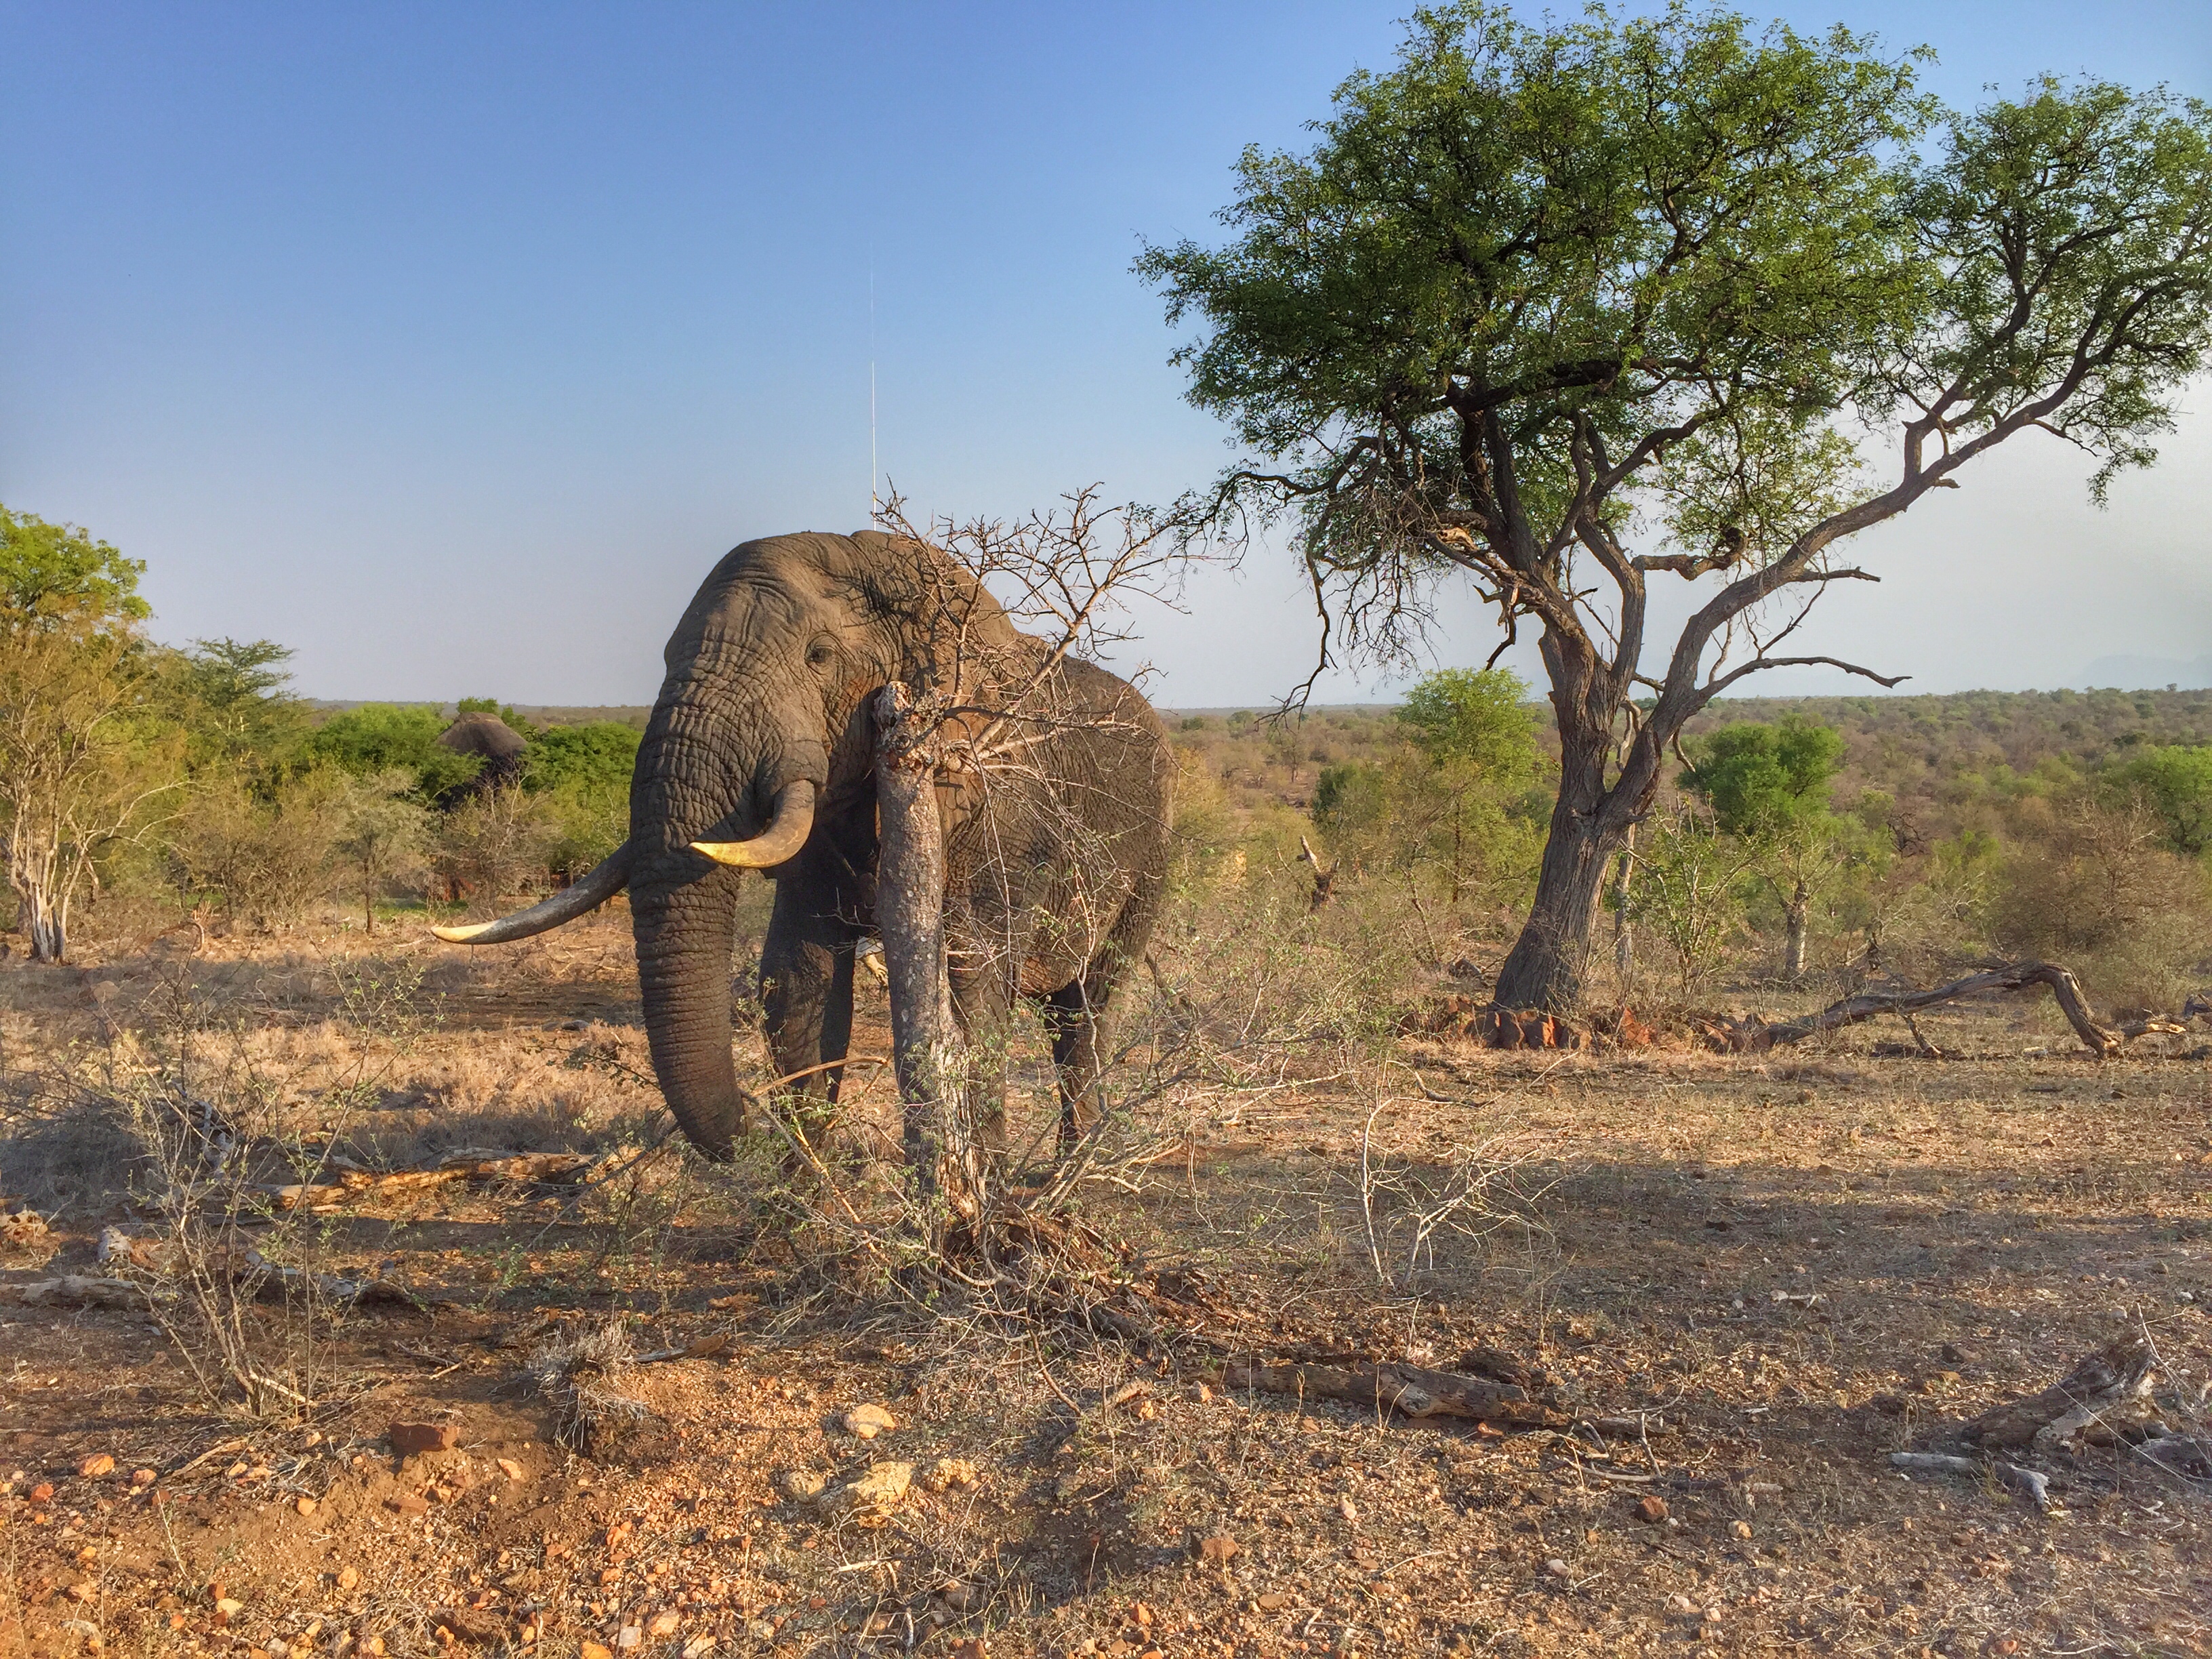
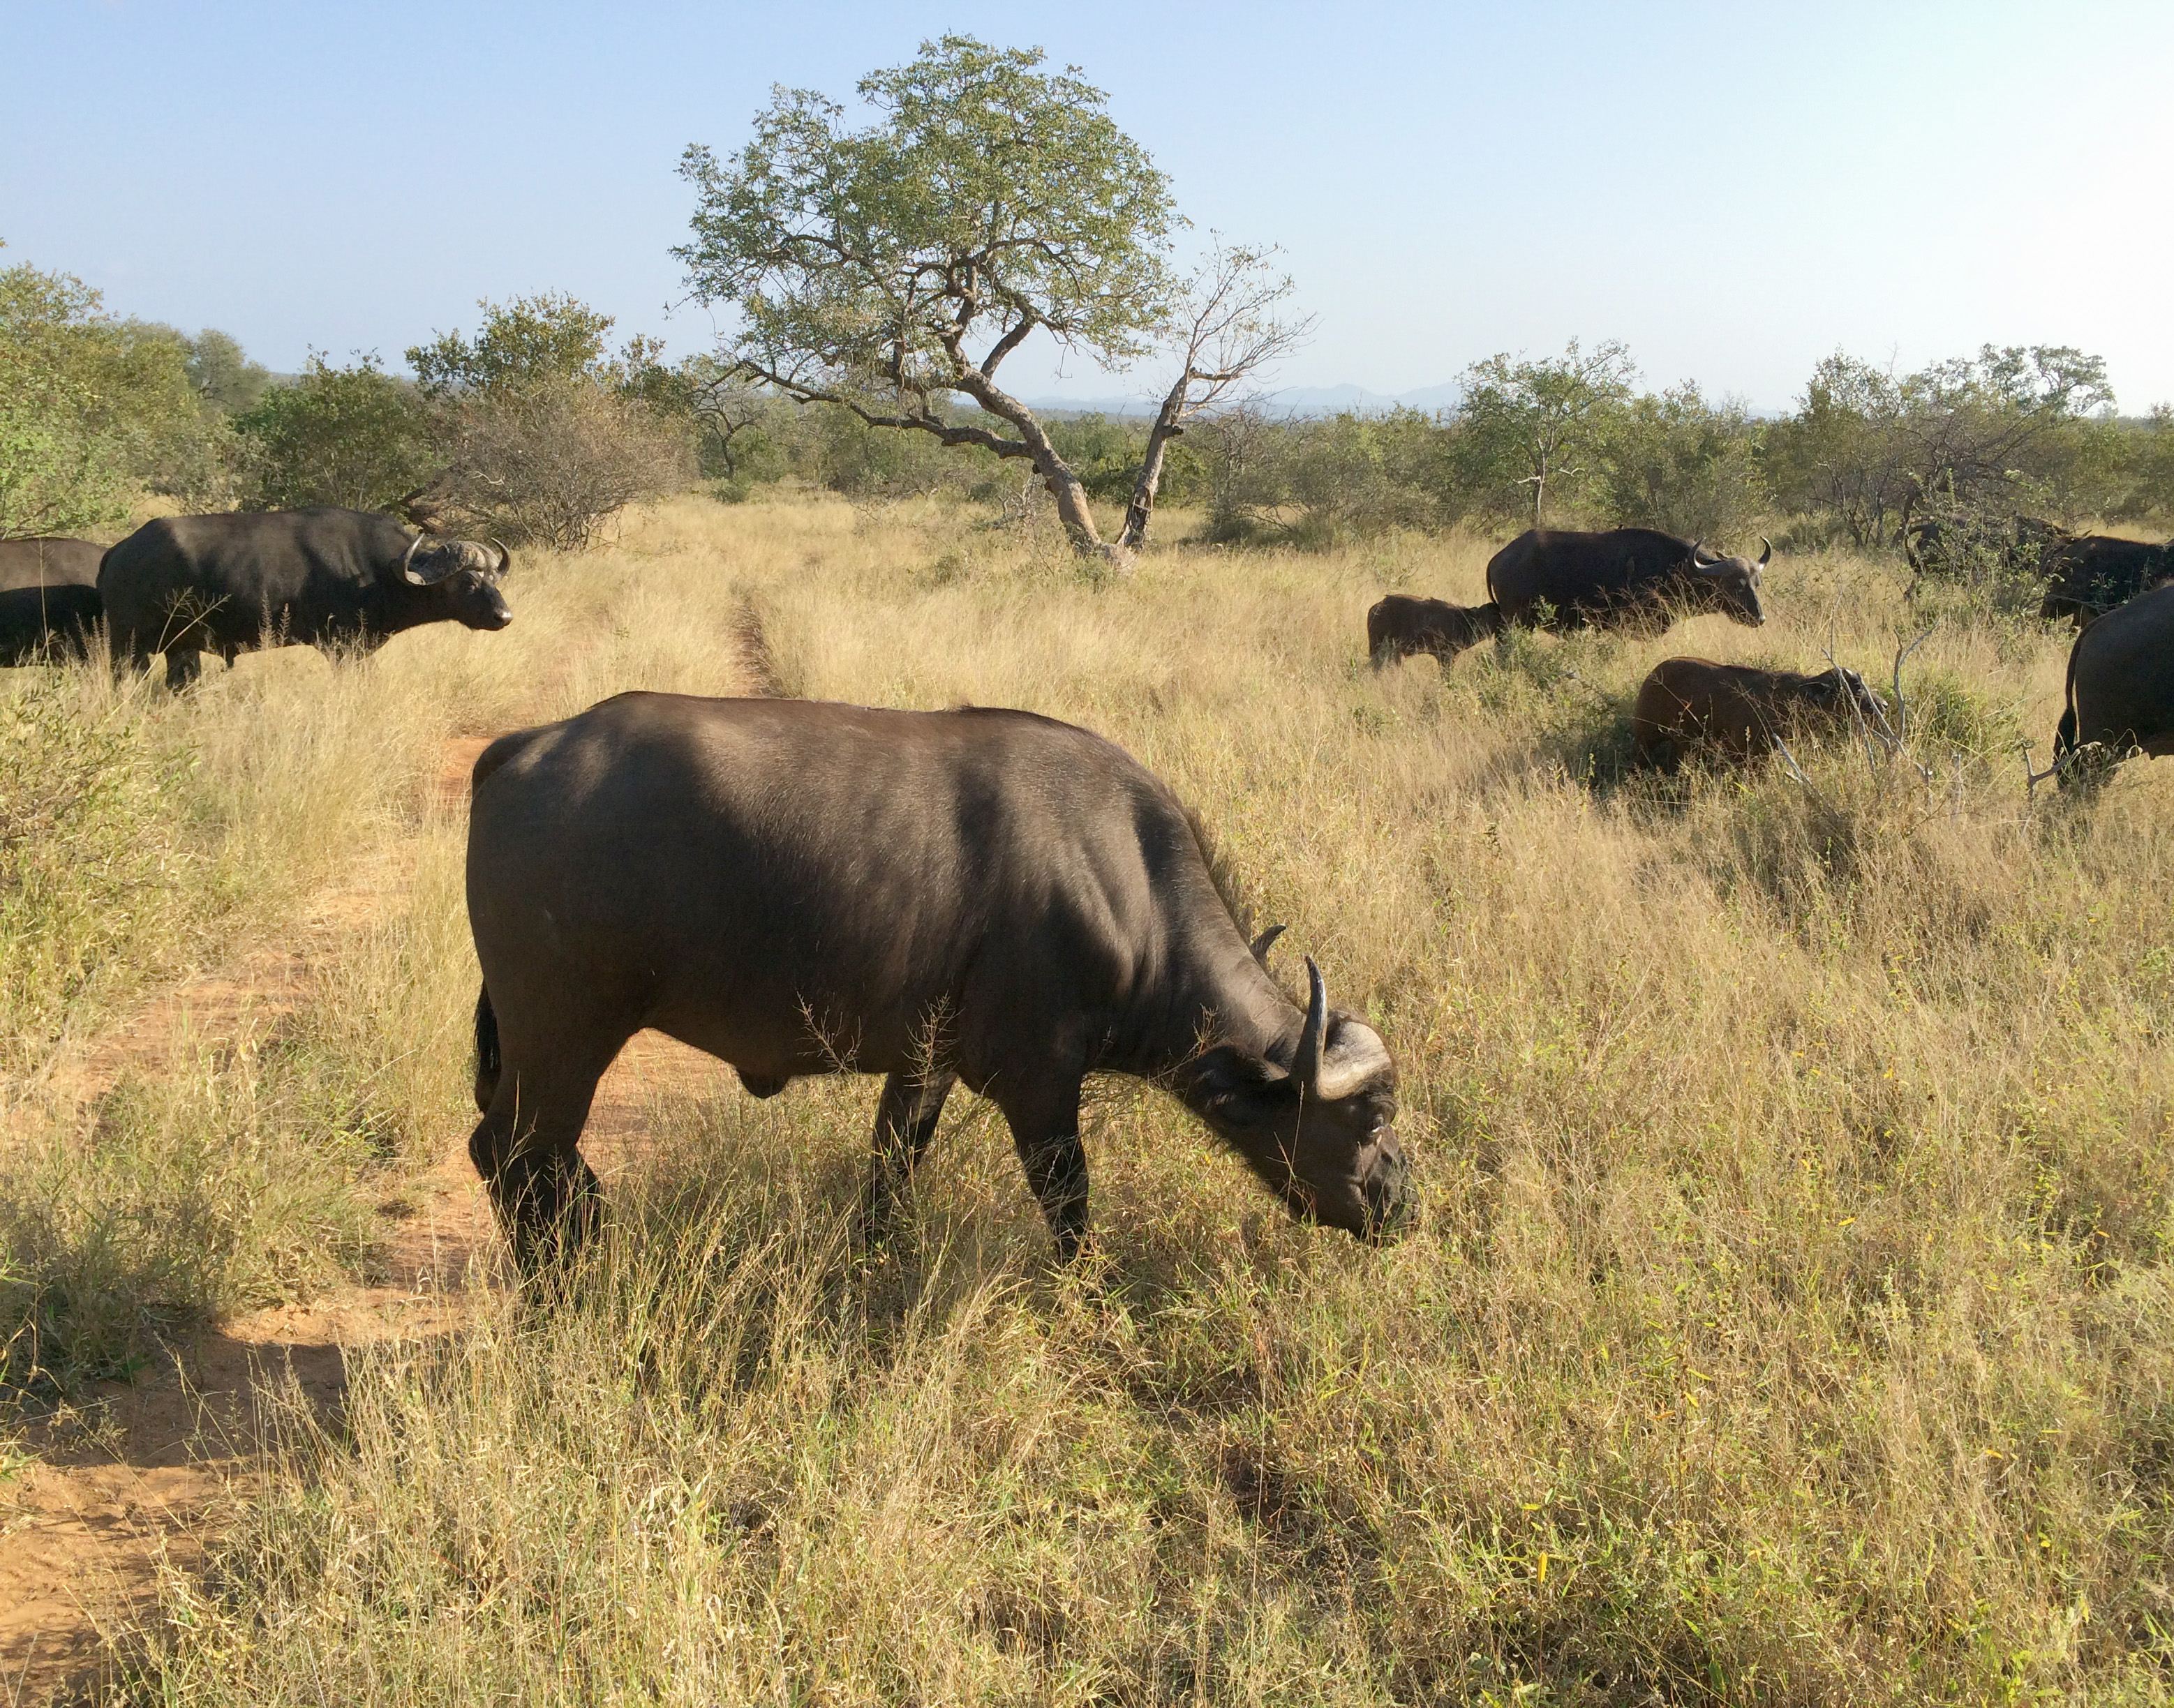
African elephant framed by the trees in Greater Kruger National Park, shot on iPhone 6s.The buffalo that surround the buffalo in the foreground help to “frame” the closest buffalo. The tree and grass also frame it. Shot on iPhone 5s.
LEADING LINES
Leading lines help to guide a viewer through a photograph. They can also direct the viewer to the subject or focal point of the image. They can be straight, diagonal, curved or suggested lines.
The line of the road leads to the tree. Shot on iPhone 5s.
RULE OF THIRDS
The rule of thirds is used to produce a balanced image. Imagine dividing this photo into 3 lines across and 3 lines down. The idea is to place the essential elements along the gridlines or at the intersections where the lines meet.
Make sure you have your grid activated on your smartphone to help you see it.
The rule of thirds works well with the idea of leaving space for the subject to look to or move into. Place the horizon along the top or bottom 1/3 for a strong compositional mobile photo.
Wild Dog on the hunt in Kruger Park was shot on iPod by my oldest son, DRH. The wild dog is along the bottom 1/3 of the photo with space to move into. If you cannot achieve the rule of thirds when photographing, think about how you could do it when you crop.Considering using multiple compositional elements in a single photo for a stronger image. The horizon is along the top 1/3 of the photo (rule of thirds). The road leads to the mountains (leading lines). The vehicle and trees frame the tracker (sitting at the front, framing). Shot on iPhone 4s.
FIND THE LIGHT
Light is an essential part of photography and is often overlooked. Light can make or break an image. It can also help tell a story. Use light to create the mood and feel of your image. Pay attention to the sun and where it is in the sky. The light within an hour after sunrise or an hour before sunset is when the sun is lower in the sky and creates a beautifully soft and warm light for photography.
Natural light is fleeting and ever-changing so don’t hesitate to take that shot.
The harsh, shadow-creating light of midday can create some interesting effects. Don’t be afraid of it.
Sunrise in Kruger National Park. Shot on iPhone 7+
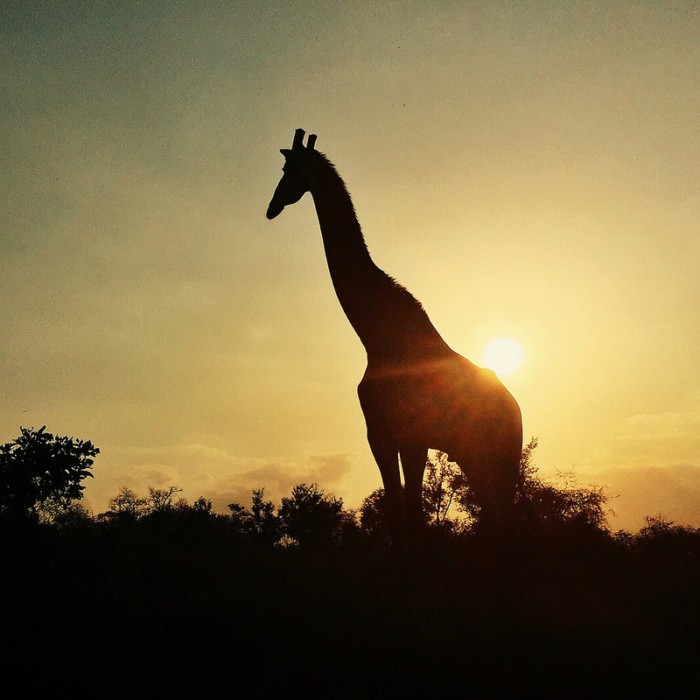
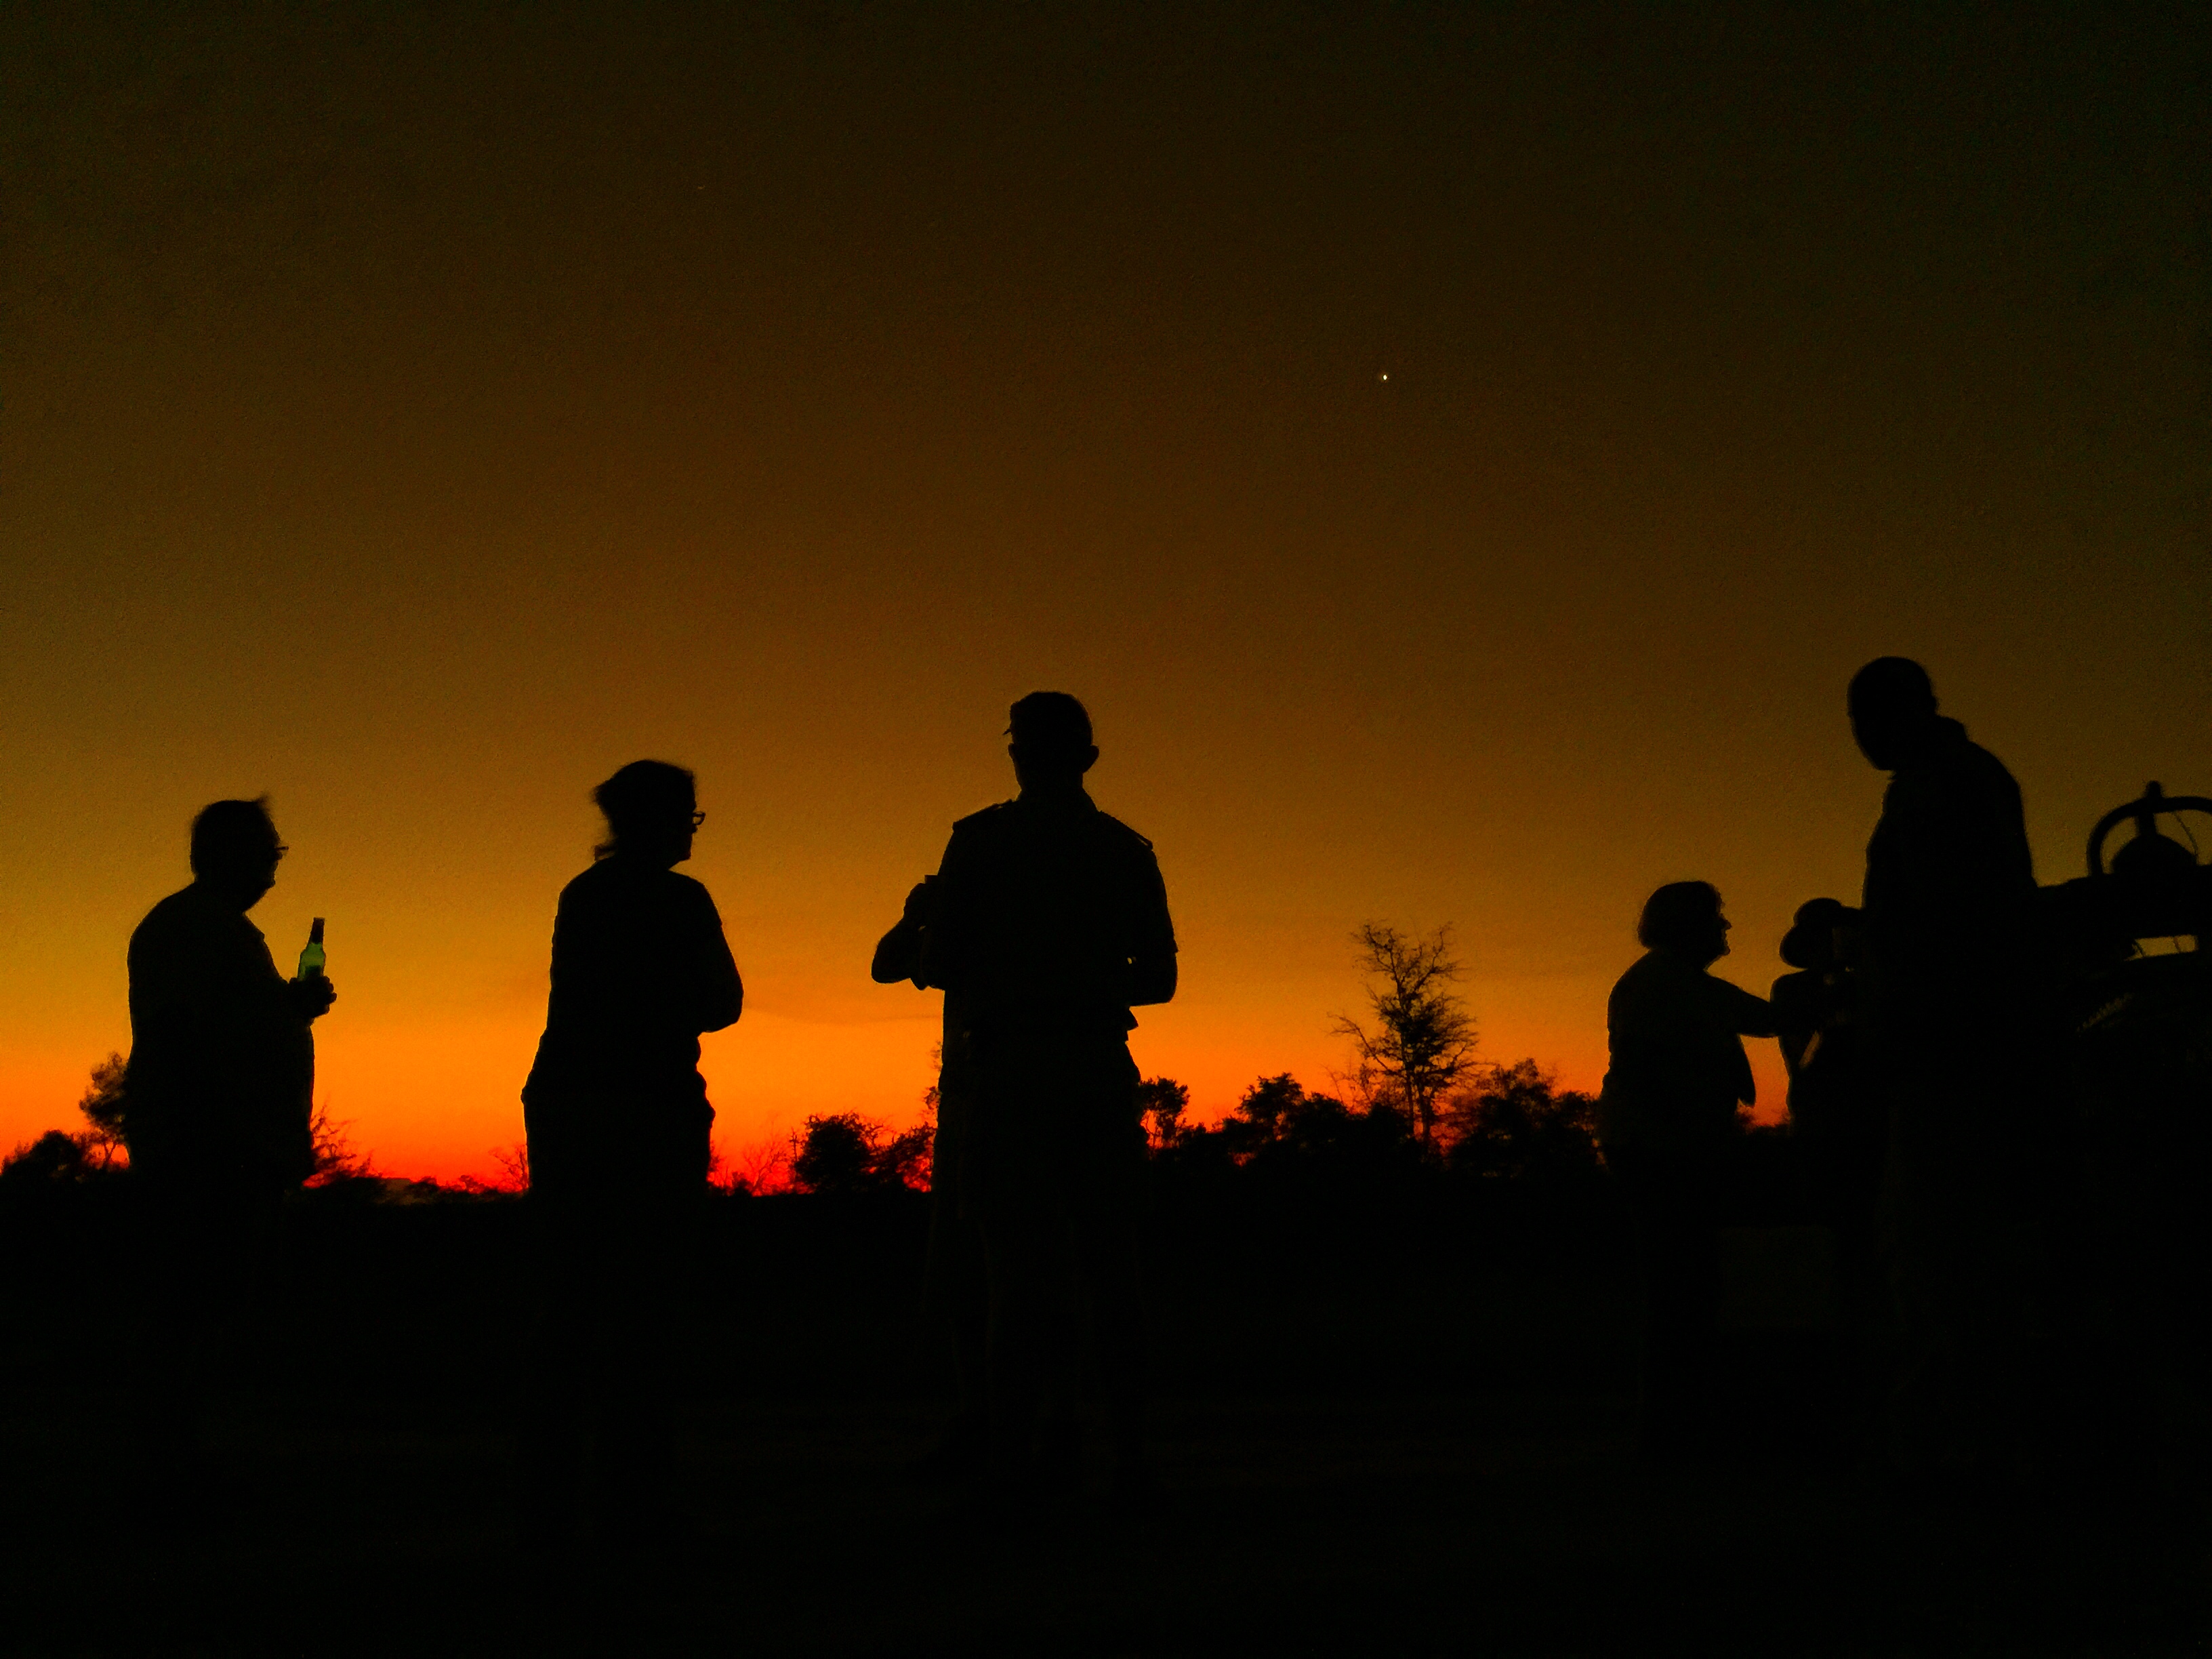
SILHOUETTES
Silhouettes are a great way to capture images when the light has faded or to create anonymity in a photo. Take advantage of the opportunity to create a silhouette image. Look for animals or trees/dead trees with the light behind them. Shoot towards the sun. You may have to get lower and point upwards to separate the subject from the horizon.
A giraffe silhouette in Kruger National Park. Shot on iPhone 6+.Sundowners in the Greater Kruger on safari with Elephant Plains. Shot on iPhone 6s.
WHAT’S YOUR ANGLE?
Unless an animal is nearby, it’s difficult to capture the details with a smartphone. Tell the whole story and include the animal’s environment. Try a different angle, don’t be afraid to experiment. Look in the side-view mirror and capture what’s behind you. Capture the wildlife, road, trees, and mountains using the side view mirror.
Zebra in Kruger National Park shot on iPhone 7+.Giraffe in the side view mirror, Kruger National Park. Shot on iPhone 7+.
IT’S THE LITTLE THINGS: DETAILS
Capture the details of nature and your surroundings.
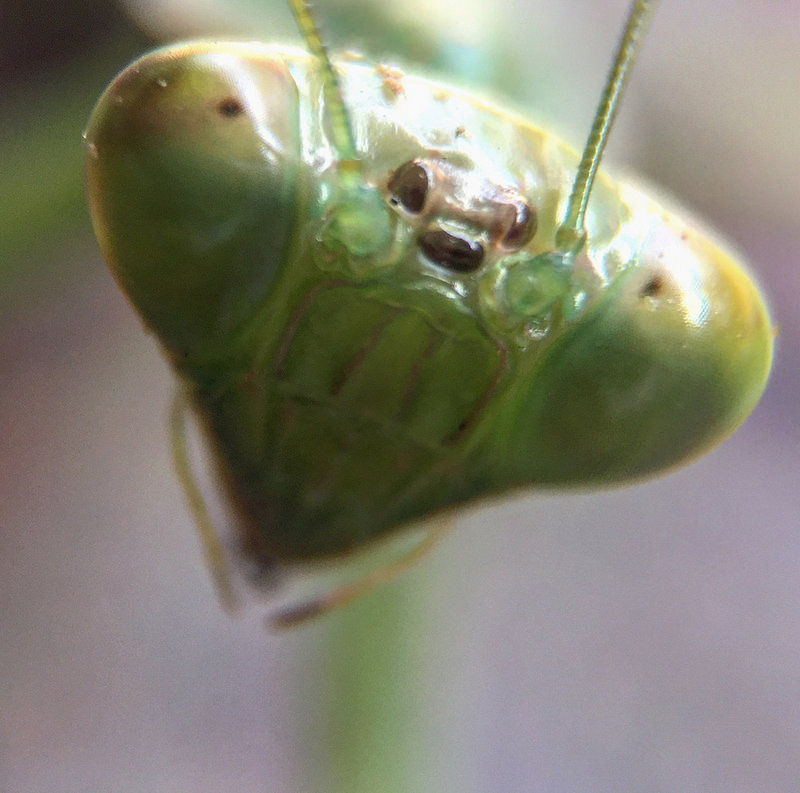
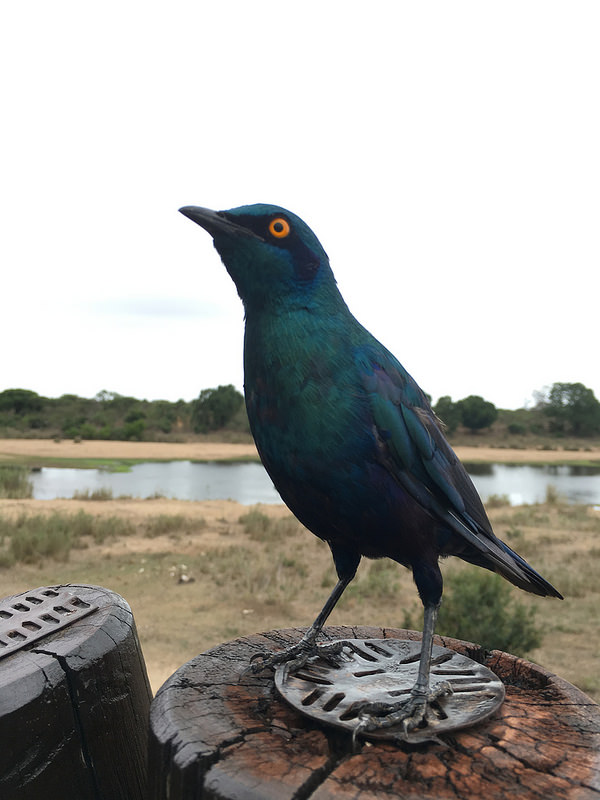
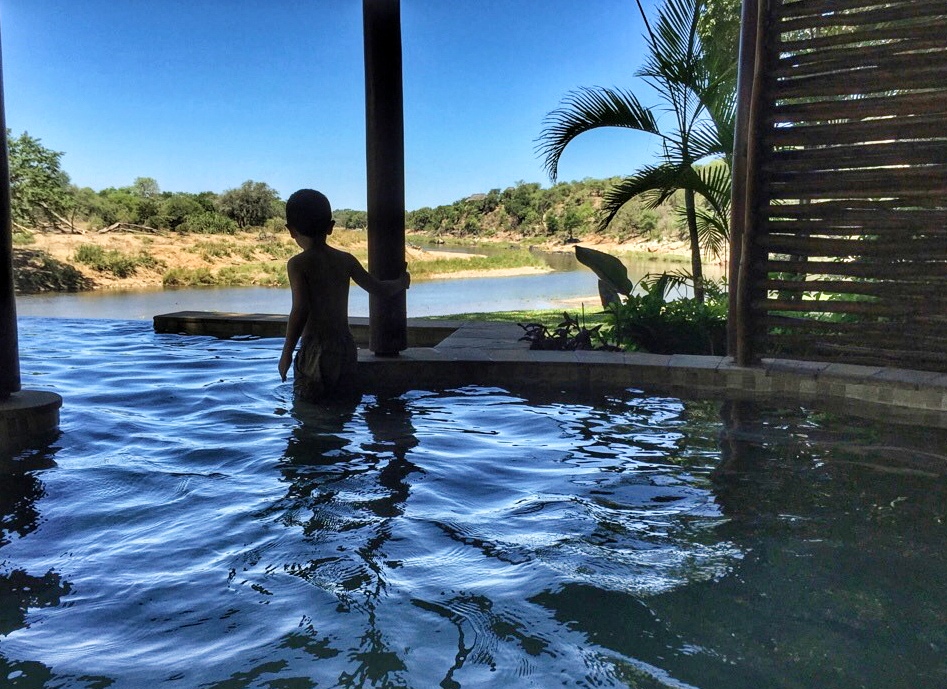
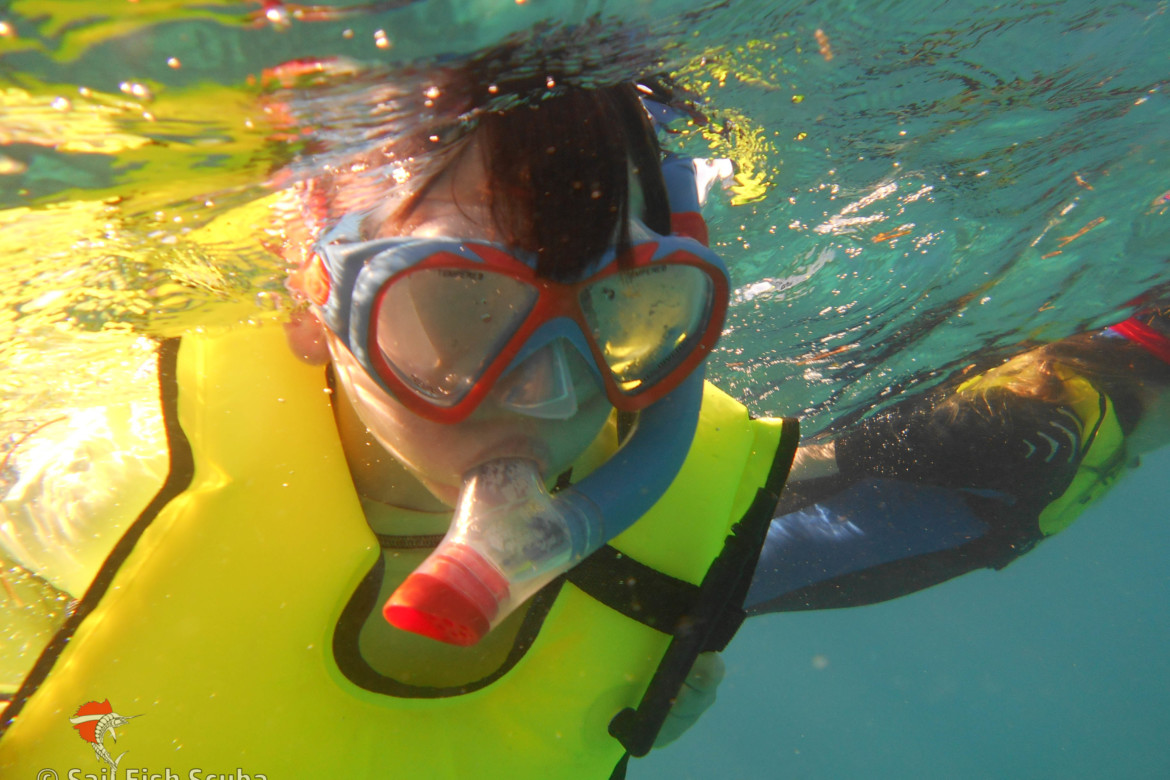
Preying Mantis in macro. Shot on iPhone 6 + Olloclip 21x macro in Kruger.A Burchells Starling at Lower Sabie Rest Camp in Kruger. Shot on iPhone 6s.Breakfast at a hide on safari with Naledi Lodges in Balule Nature Reserve. Shot on iPhone 6plus.My room at Naledi Lodges in Balule Nature Reserve. Shot on iPhone 4s.My oldest son on safari with Naledi Lodges in the Balule Nature Reserve. Shot on iPhone 5s.My youngest son at the infinity pool at Naledi Lodges in the Balule Nature Reserve. Shot on iPhone 5s.
GO WIDE AND SHOOT A PANORAMA WITH YOUR SMARTPHONE
Check to see if your smartphone has a panorama option. You’ll find it in the native camera app on the iPhone. Hold steady and keep the arrow on the line. Tip: Tap the photo square to change directions.
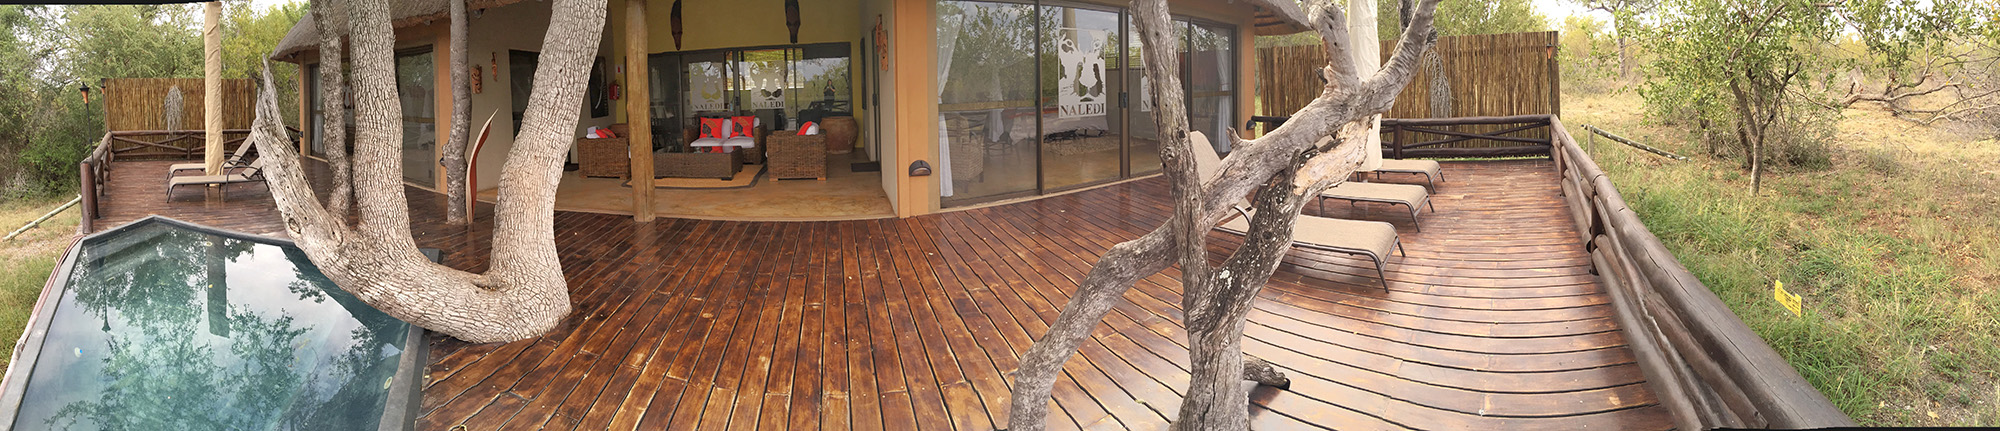
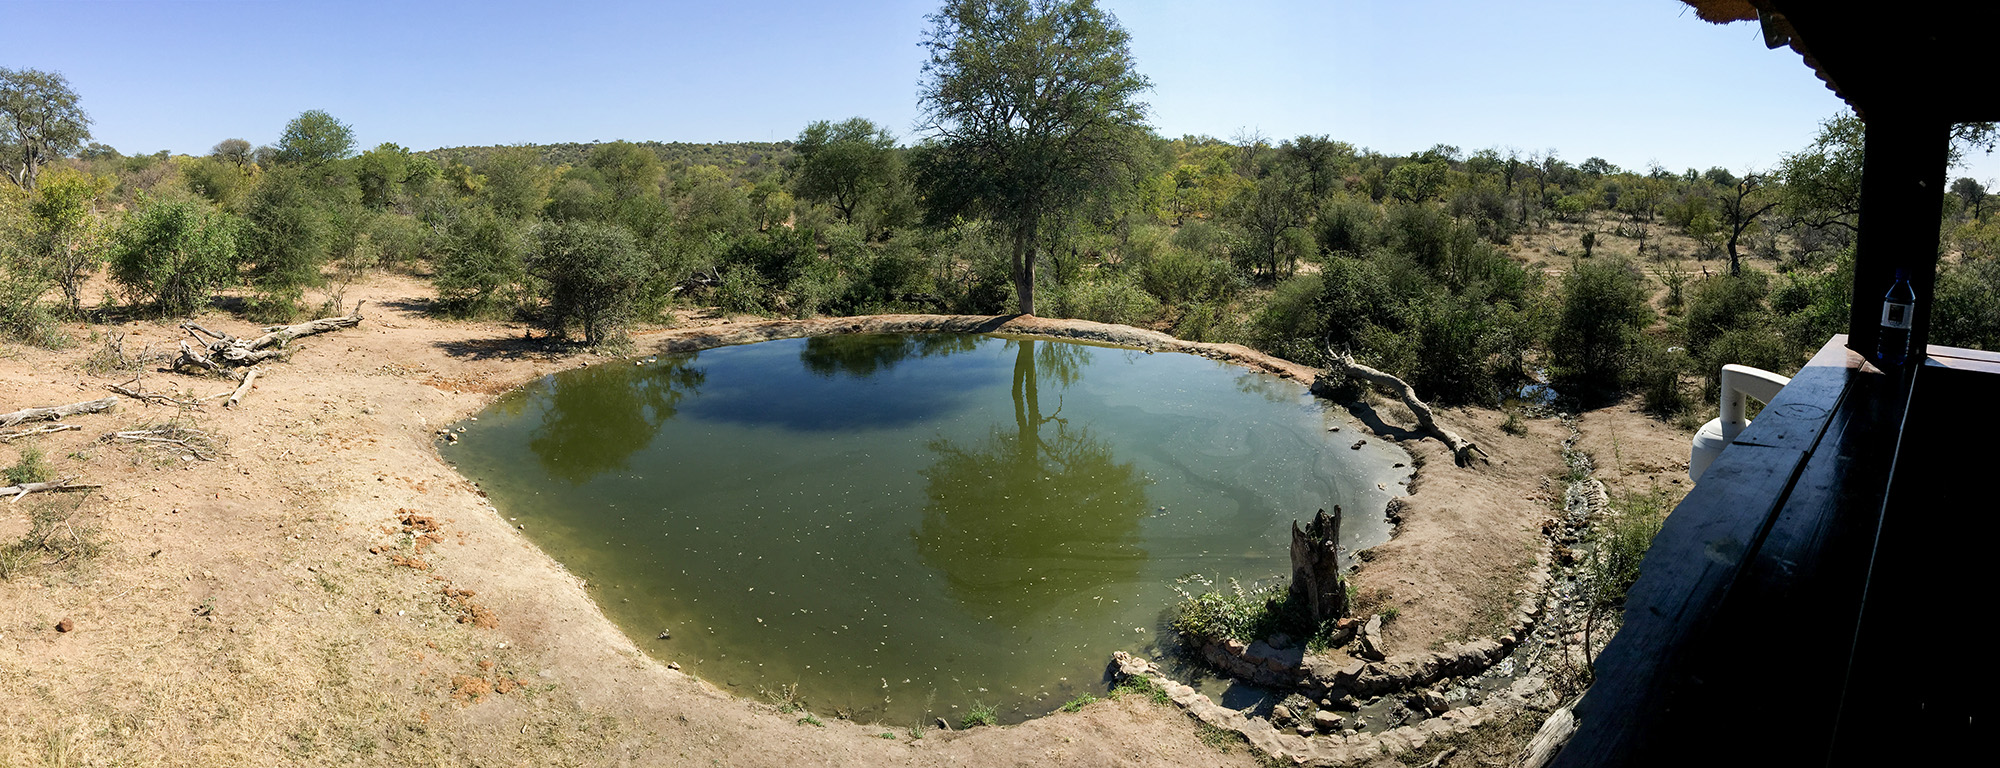
Capture the view with a panorama. Taken at the luxurious Naledi Bushcamp lodge in Balule Nature Reserve. Shot on iPhone 6+.A panoramic view from a Naledi Lodges hide. Shot on iPhone 6
Timelapses are a great way to show a busy environment – clouds, sunset/sunrises
Film close and wide shots, telling details, different angles
Film in motion (pan up/down, left/right) to move the story along
Film more video than you need, and cut (split) when editing.
Keep scenes to 2-5 seconds depending on how fast you want to cut to the next scene.
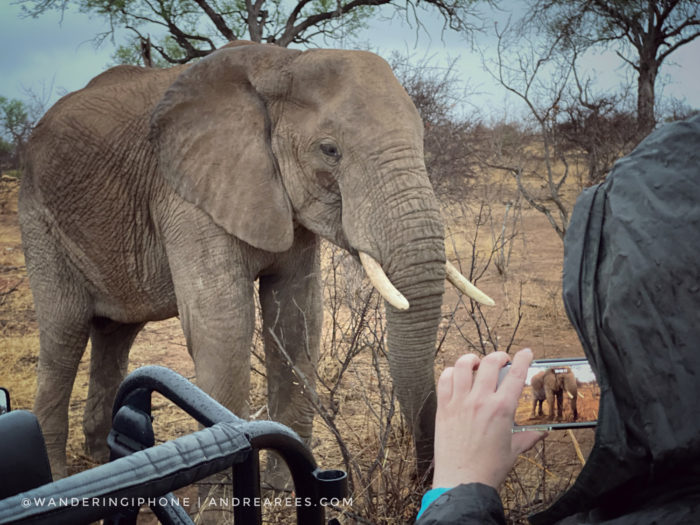
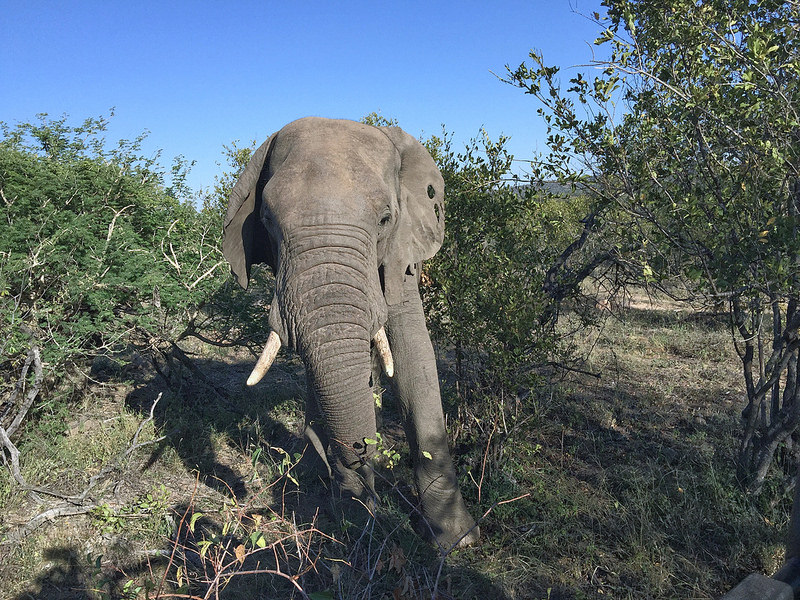
AN ENCOUNTER WITH A WILD AFRICAN ELEPHANT PHOTOGRAPHED ON IPHONE
Sometimes the animals come to you, and you have to capture the moment with your iPhone. This elephant was too close to photograph it with my Olympus OM-D E-M1 mirrorless camera and M. Zuiko 40-150mm 2.8 pro lens (the full-frame equivalent of 80-300mm).
For the full elephant encounter story and video, visit here.
Disclosure: This article may contain affiliate links for Moment products. It means that if you click on a link to purchase a product I recommend I earn a small commission. It is no additional cost to you. For more information, read my full disclosure and privacy page. If you have any questions about the Moment lenses or cases, please do not hesitate to contact me.
SOME OF MY FAVOURITE ACCESSORIES
Did you know that you can get a telephoto lens for iPhone or Android phones?
In 2012, I had a telephoto lens for my iPhone 4s, and it looked ridiculous, but aesthetics do not matter if it does the job, right? I took it on safari with me and I did capture a few images with it. Unfortunately, the photos weren’t of good quality. The lens didn’t fit well so there was a lot of vignetting. I didn’t recommend that lens to anyone and never used it again.
I had the macro and wide-angle Olloclip lenses when I had the iPhone 4s and iPhone 6. Their lenses are okay, but not as good as I hoped they would be. The 2 things that bothered me about the Olloclip system are 1. I had to remove my case and 2. if I upgraded my iPhone, I had to buy new lenses.
I had been keeping an eye on a few different smartphone lens companies for a few years, and in 2017, I decided to invest in Moment lenses. I didn’t invest in the Moment system until I heard that they offered cases that the lenses could be attached to (around the time I had an iPhone 6s). I never use my iPhone without a case on it.
MOMENT ADD-ON LENSES AND CASES
There is no loss of quality with Moment lenses and the wide lens (1x). The best part is that if you upgrade your smartphone, you only have to purchase a new compatible case and not a new set of lenses like you have to with Olloclip lenses. The lenses rotate into the case and fit perfectly. With Olloclip or other clip-on lenses, you have to line it up and hope it stays. Moment cases are available for iPhone, Samsung Galaxy and Note, Google Pixel and One Plus smartphones too.
Moment add-on lenses for iPhone
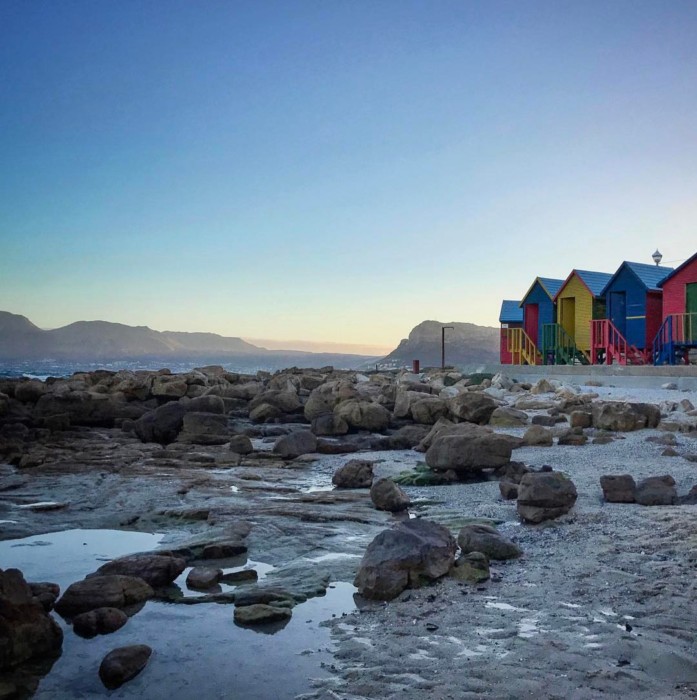
Shot on iPhone XSmax at 1x, 2x (dual lens) and 4x with a Moment telephoto lens.
Dusk at St. James Beach in Cape Town, South Africa.
MOBILE PHOTOGRAPHY WORKSHOPS
I’ve been a professional photographer since 2003 and a mobile photography educator since 2013. I offer live virtual smartphone photography workshops on Zoom and in-person workshops in Toronto, Canada.
I offer a public and private group 60-minute virtual workshop through Airbnb Online Experiences or for a private series of workshops (2 or 3 workshops), check here.
If you’re in Toronto or visiting the area and are into nature, birding and wildlife photography, I offer a birding/nature walk + photography lesson through Airbnb experiences Toronto.
I hope these tips will help you create cherished photos of your safari. If you have any questions, please do not hesitate to contact me.
SUBSCRIBE to wanderingiPhone.com for staying in the loop – exclusive opportunities, photo tours, workshops, webinars, and subscriber discounts on mobile photography workshops, consulting and more.
Today, I’m sharing my top 5 must-have travel gadgets. These tech travel gadgets have helped me on my travels and I never leave home without 2 and 4. I always bring the first 4 items on every trip and these travel gadgets are especially helpful if you’re travelling with family or a group of friends.
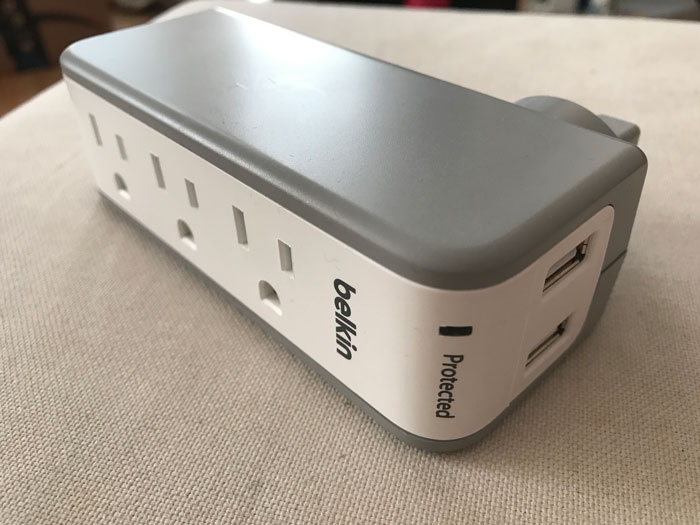
A Small Power Strip with USB slots and Surge Protection
Many of ustravel with a lot of technology, and several things need to be plugged in. This Belkin 3-outlet mini travel charger with 2 USB ports will save the need for multiple plugins & international adapters. It’s also a surge protector which can add some peace of mind. This is a must-have travel gadget for me and my family as there are 4 of us and a lot of travel tech accessories.
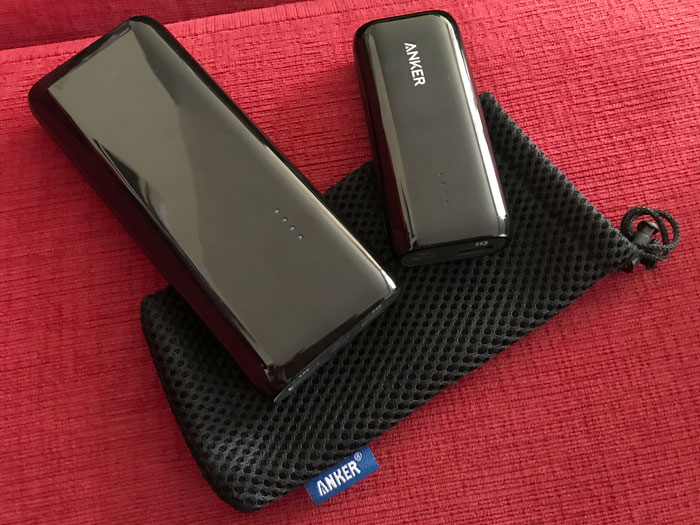
A Portable Backup Battery For Your iPhone or iPad
If you are an average iPhone user, you probably re-charge once a day. When I travel, I am out all day and will drain my iPhone at least once as I like to take a lot of travel photos with my smartphone and share some on social media. I never leave home without a backup battery whether locally or abroad.
My backup battery of choice is Anker as I’ve had great success with them over the years. It’s important to look for a backup battery that can re-charge your iPhone fully at least twice before needing to be plugged in again. I use the 16000 mAh anker portable battery charger on long-haul flights, long-distance travel and when I don’t have electricity. It can charge my iPhone about 4-5 times and my iPad twice before having to re-charge it. It is also a fast charger.
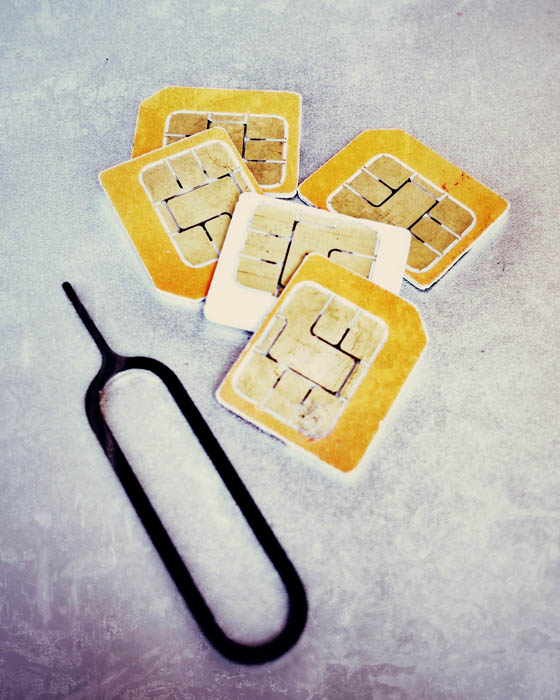
Travel with an Unlocked iPhoneand Purchase a SIM card at the Destination
You will save on roaming charges and often the local telecom will allow you to tether to other devices. Rogers offers Roam like Homeat $12 per day for International destinations or $5 per day for the USA (capped at $100 per account). However, if you’re staying in a country for 3 days or more, it is worth it to get a local SIM as the costs are much lower in my experience.
CANADA: Buh bye unlocking fees – as of December 1st, 2017 you will no longer have to pay to unlock your device and new devices should be sold unlocked. There are also caps on roaming charges and other good things thanks to the CRTC, read more about The Wireless Code. A great resource is the Pay As You Go With Data Wiki for accurate and up to date information on prepaid data by country.
USA & other countries – locked Phone: If you don’t have an unlocked phone, consider purchasing an unlocked portable wi-fi device and get a local sim card at the destination. I’ve heard good things about the Huawei E5577Cs mobile wifi hotspot which gives you 6 hours of working time and the Huawei E5577s mobile wifi hotspot which provides you with 12 hours of working time.
NOTE: Some telecoms offer affordable prepaid portable wi-fi device rentals. You can connect 5-10 devices (depends on unit specs) at the same time. Refer to the pay as you go wiki I mentioned above and check with the wireless companies ahead of time. If you’re travelling to South Africa, there are wireless companies at the airports in Johannesburg and Cape Town. I use Vodacom and know they offer mobile wifi hotspot rental units. I am guessing MTN, and Cell C do as well. Refer to the Pay as You Go with Data Wiki I mentioned above.
Alternatively, companies such as TEP Wireless and KeepGo provide portable wi-fi rental units. Before I had an unlocked iPhone, I rented a TEP Wireless portable wi-fi device for a trip to London. I ordered it online and picked it up at the Heathrow Airport. Read more about that here.
sim cards
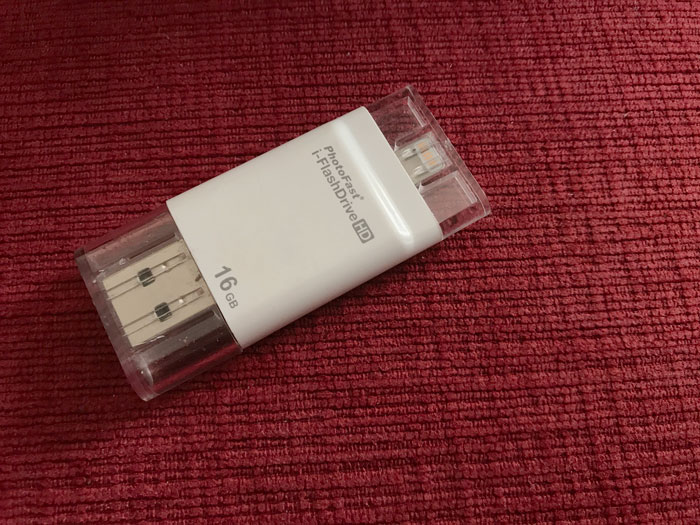
4. An iFlash Drive
If you travel with an iPhone and enjoy taking photos with your smartphone on your travels, this is the tech accessory for you. I often transfer my iPhone photos to my iPad mini to edit and for temporary storage if I’m travelling without a laptop or reliable internet. This is a must-have travel gadget if you find yourself running out of iPhone space and have to delete photos or videos under pressure. This iFlash drive will not only allow me to transfer photos to my iPad mini but back to my iPhone. It works with videos and documents too! It has been a great time saver and allows me to travel lighter when I need to.
16gb iFlash drive for iPhone, iPad and computers
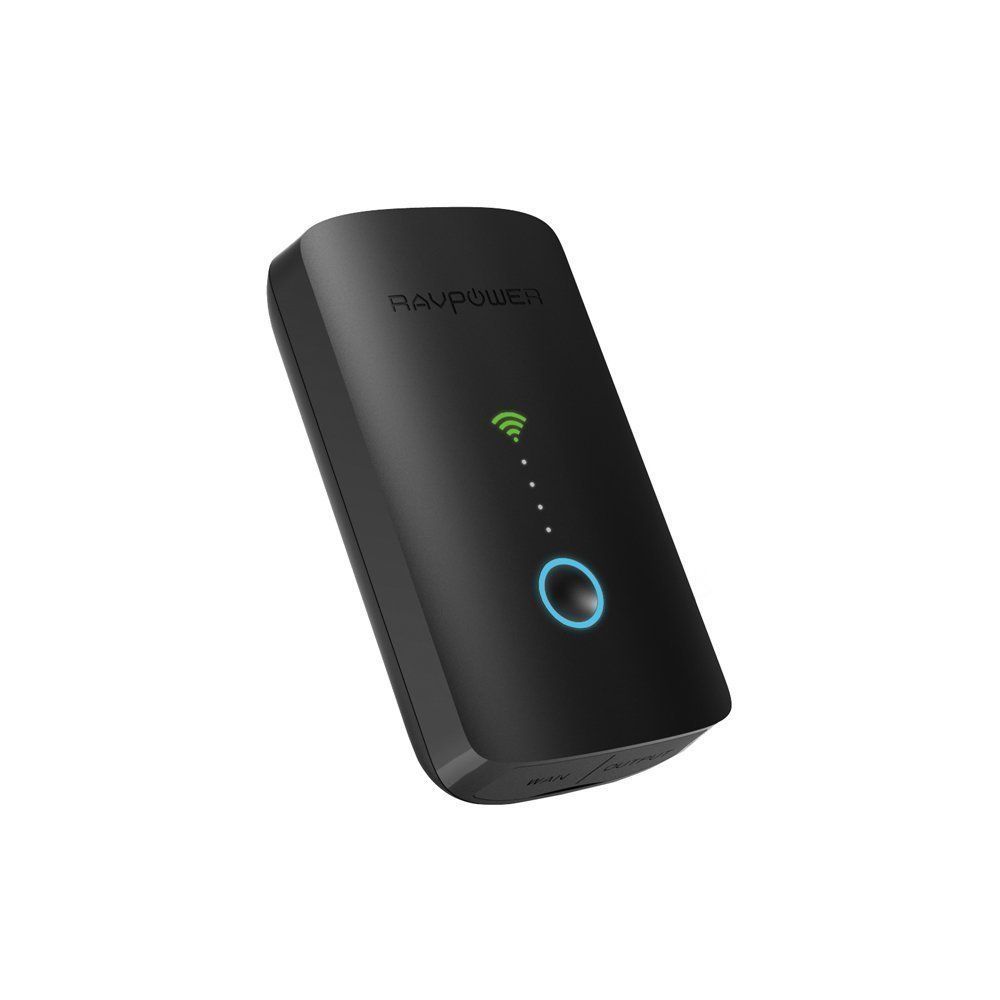
5. A Portable Travel Router
Many hotels offer a broadband connection; the service is often free. With a travel router & network cable, you won’t have to use the frequently bogged down wifi service. The travel router will create a private wireless network so you can connect your laptop, smartphone or tablet and also share the connection with those travelling with you. For fee-based broadband, you will save money, as you’ll just have to pay once.
Note: The one pictured below is what I use but isn’t available now and is more expensive than what’s currently on the market. I’ve heard good things about this RAVPower Filehub Plus which is also a 6000 mAH battery pack and SD card reader.
A marine protected coral barrier reef runs the length of the Keys making Florida Keys snorkelling the best snorkelling in Florida and the continental USA. If you’re an ocean lover and are looking for a snorkelling adventure in the United States, consider a trip to the Florida Keys.
After visiting the Keys 4 times and at different times of the year, I will share what it’s like to snorkel in the Keys. From Key Largo snorkelling at the top of the Keys to snorkelling Key West at the bottom of the Keys, there are many snorkel tour operators to be found.
SNORKELLING WITH CHILDREN
As a mother of 2 children and an avid snorkeller, I’ve been preparing both my sons for snorkelling since they were toddlers so they could join me on snorkelling adventures around the world. In this guide to snorkelling the Florida Keys, I share tips to help you prepare your children for an open water snorkel trip and give specific snorkelling location tips.
I’ve compiled a list of the reefs we visited and will share what we saw. I will include general tips to prepare you for a snorkelling trip and what we experienced with six different operators. Plus, I’ve made a shortlist of snorkel gear.
latest update: May 2019
Click to jump to the related section in this post.
The first time I snorkelled, I was 16 years old and in Barbados with my dad. I picked up some gear from a kiosk on the beach of our hotel in Christ Church and swam to the reef not far from shore. I didn’t know how to snorkel correctly or knew what I would find there. Every time I saw a fish, I went the other way. True story.
I’ve since snorkelled many times including snorkelling the Great Barrier Reef of Australia and the remote Mergui Archipelago of South Myanmar, also known as the Myeik Archipelago. My appreciation and love for the ocean have grown over the years, and my fear of its inhabitants has dissipated. Not to say that poking my head underwater still doesn’t give me pause, but I no longer swim the other way.
I love to travel to destinations that offer opportunities to see marine life in their natural environment. It is important for me to be able to share those experiences with my two sons in hopes that they too will love our natural world and appreciate the ocean.
FLORIDA KEYS BARRIER REEF
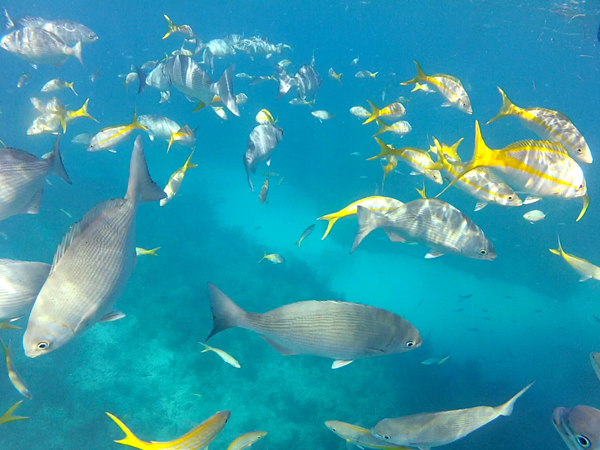
The Florida Keys are home to the third-largest coral barrier reef system in the world and is the only tropical coral reef in the continental United States. The reef runs the length of the Keys and can only be accessed by boat. The reef is approximately 3-6 miles offshore depending which Key you’re leaving. With so much talk of the damaged and dying coral reefs around the world, it is hopeful to see the abundant coral and marine life in many of the sites we visited. There are over 200 species of fish in the Florida Keys reef system.
MY PICKS FOR THE BEST FLORIDA KEYS SNORKELING LOCATIONS:
Enroll your children in swim lessons so that they are comfortable in the water and have necessary swimming skills.
Invest in a dry top snorkel set with just the mask and snorkel or a set of fins that can grow with them. A dry top snorkel helps to keep the water out of the top. You can borrow fins from the various tour operators, but if you plan to snorkel on your own, fins are helpful. Dry top sets are not usually available on snorkel trips.
Be sure to practice swimming in lakes close to home. If you can practice swimming from a boat offshore, close to shore, that will help them get used to the open water feeling.
Practice snorkelling in swimming pools at home or on vacation if you can.
Practice snorkelling from shore before your snorkel excursion. Sombrero Beach (Marathon) Bahia Honda State Park (after the 7-mile bridge towards Key West) and Clarence Higgs Memorial Beach Park (Key West) are our favourite Florida Keys beaches.
Do some research to know what marine life you might see; it will help to get them involved and excited. I’ve found the small laminated ID guides to be a great source. You can find the guides in dive shops or some book stores in the Keys.
Talk about all the colours of marine life.
Learn the hand signals for some of the marine life or make up your own.
Discuss rules and safety and talk about not touching anything on the reef.
GENERAL TIPS TO PREPARE FOR A SNORKELLING TRIP
All tour operators include masks, snorkels, fins, snorkel vests and offer water noodles. Some offer wetsuits. They all have an anti-fog solution and a rinse bucket available. We brought our dry top snorkel and mask but borrowed fins. The snorkel vests were mandatory on most trips, but you could inflate or deflate the snorkel vest as much as you wanted. I enjoyed using the noodle as it helped keep my hands free and steady to capture video footage.
Always use reef-friendly sunscreen, I found some at The Looe Key Dive shop.
Consider a long-sleeve UV protected swim shirt or rash guard; the Keys have a variety of jellyfish, and you’ll use less sunscreen.
Take anti-fog solution (toothpaste also works), so you can snorkel before or after your snorkel excursion.
Take an easy to pack a wet bag. It’s especially helpful if you have to fly out the same day, and your swimwear hasn’t had time to dry.
I recommend a small dry bag for your valuables, great for car/hotel room keys, money and cell phones.
Bring water shoes for shore snorkelling if you need to walk in a bit. I have a small, lightweight mesh drawstring backpack that I use to carry a small dry bag in with valuables, extra batteries, water shoes and a microfiber towel.
Consider bringing a snorkel vest for kids to snorkel from shore.
Consider an anti-nausea medication if you ever feel queasy on rides or road trips. It can take 30-60 minutes to get to the reef.
If you encounter jellyfish, remember they are slow-moving so you can go around them. The little transparent jellyfish are harmless though you might feel a slight sting. A long sleeve shirt helps.
NOVEMBER 2016 – 3 TOUR OPERATORS IN THE MIDDLE & LOWER KEYS
SUNDANCE WATERSPORTS
We spent two nights at Hawks Cay Resort (read our experience here) on Duck Key and booked our first snorkelling trip in the Keys with Sundance Watersports.
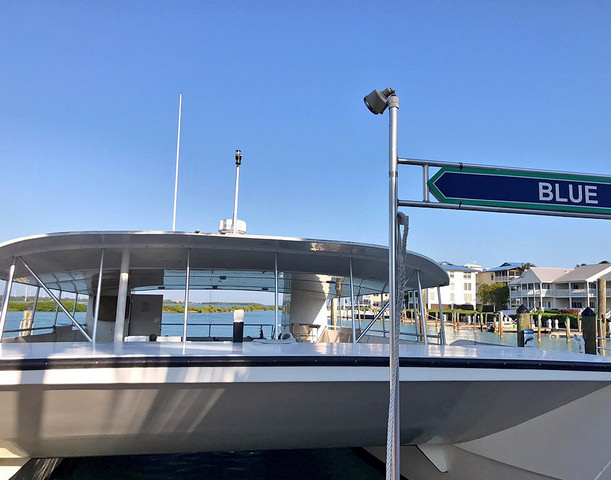
After a friendly check-in, we boarded Blue, a 65-foot catamaran, on a beautiful sunny day. Blue is a perfect boat for snorkelling trips as it has sturdy ladders off the back for easy entry, seats along the perimeter offering great views, wide open space in the middle, and shower heads on board to rinse the salt water off after snorkelling. Blue was a perfectly thought out snorkelling boat.
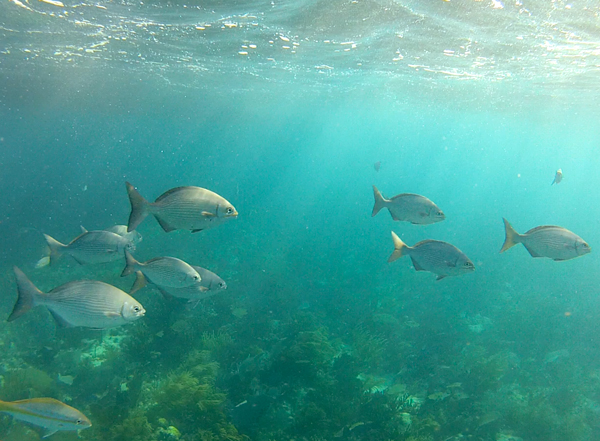
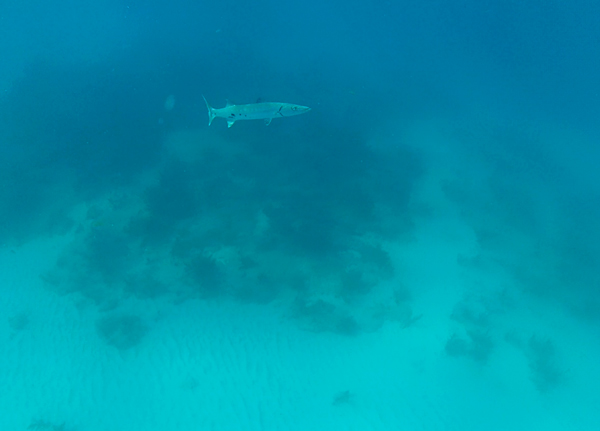
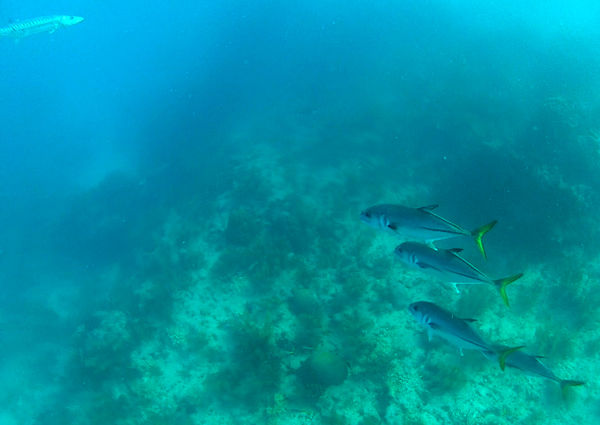
We arrived at the Stake and were greeted by small flying fish. After instructions from the Captain and staff, we took to the glistening azure waters. The waves were a little choppy, but visibility was excellent. We saw French, Queen and Gray Angelfish, Blue and Stoplight Parrotfish, Great Barracuda, Blue Hamlet, Wrasse, Trunkfish, Sergeant Major, Yellow Jack, Butterflyfish and countless other tropical fish species.
Thanks to the team at Sundance and their helpful instructions on how and where to snorkel, my son had an incredible first experience snorkelling in the open ocean; we were the last ones back to the boat.
Snorkelling at Coffins Patch with Sundance Watersports
Snorkelling and coral at Coffins Patch with Sundance Watersports
Where: As of December 2017, Sundance departs from Robbie’s of Islamorada due to the rebuilding of the marina at Hawks Cay Resort after Hurricane Irma.
Note: My experience is based on a departure from Hawks Cay Marina at mile marker 61. I visited Robbie’s in November 2017 & March 2019; there are restrooms on the premises, a restaurant and bar and some shopping. From Hawks Cay Marina you travel about 4 miles offshore toThe Stake at Coffins Patch.
Snorkelling with Children: Coffins Patch appeared to be the most shallow of the three reefs we went to on the November 2016 trip. That made underwater viewing easier as the reef and thus the fish are closer to the top. My son had no problem snorkelling there.
I recommend this reef for children 6-7 years old+ who can swim, are comfortable in the water/salt water and with getting splashed as there will most likely be some waves even if the waves are small. Consider your children’s personality and abilities. There was a young child about 4-5 years old on board; he was in the water for only a few minutes as he was afraid. It’s a fantastic beginner reef with much to see.
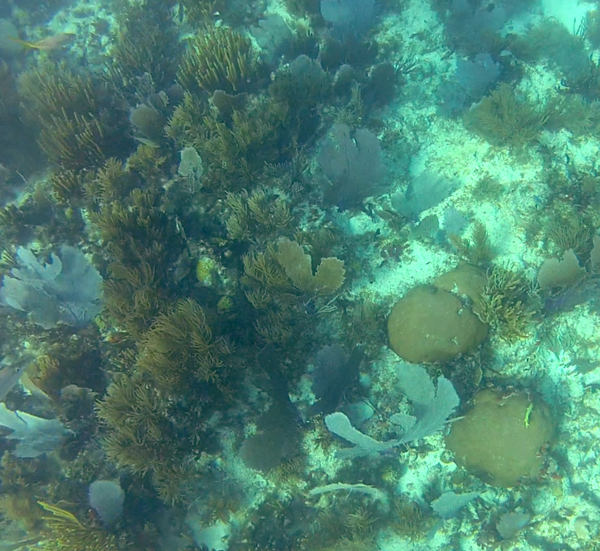
To 25 feet. Beginner. Brain coral, fire coral, and pillar coral are seen. Visibility is sometimes good here, sometimes not so good. A great place for snorkelling. Caution: Surgy, fire coral.
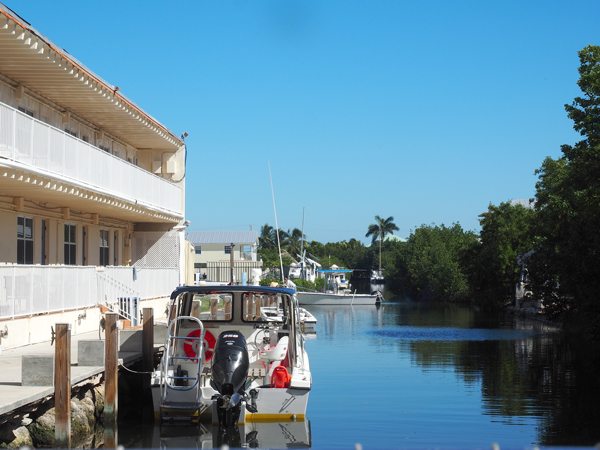
Blue, a catamaran with Sundance Watersports in Duck Key, Florida
Hawks Cay canal view in Duck Key, Florida.
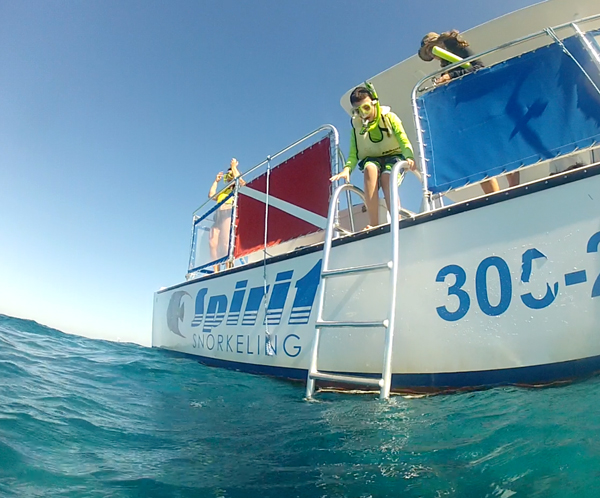
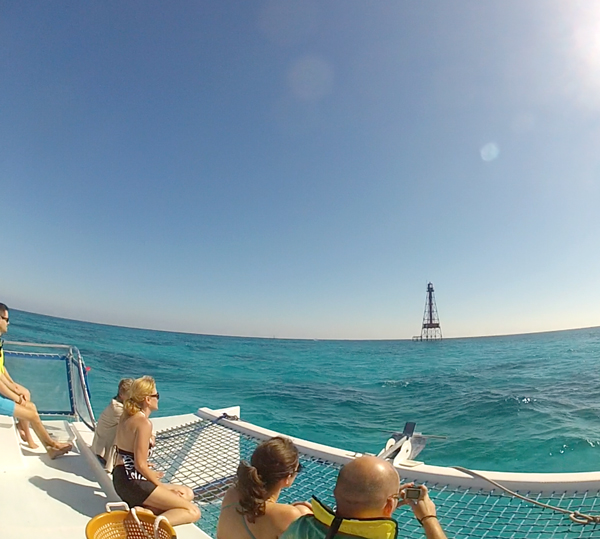
SPIRIT SNORKELING – a departure from Marathon
When I called to book with Spirit Snorkeling, they weren’t sure if they were going out as the forecast had called for high wind. Fortunately, it wasn’t windy, and we were off to Sombrero Reef for our second snorkelling excursion in the Florida Keys on our November 2016 trip.
It was another sunny day, and the ride to the reef took us under the 7-mile bridge to the Sombrero Lighthouse. It was a smooth ride out, and visibility was good. We saw a variety of fish and coral, much like Coffin Patch plus some marine life we hadn’t yet seen such as Blue Tang, Banded Butterfly, Scrawled Filefish and Jellyfish. Some snorkelers in the group saw an eel, sea turtle and nurse shark. Sombrero is a spur and groove coral reef and was deeper than Coffins Patch, but we could still see the marine life, just not as close as our previous trip. With calm seas and good visibility, it is a special place in the Florida Keys.
Kim (divemaster) was friendly and helpful. The boat has ladders off the side and back, but the side ladder was in use. It also had a rope platform to sit on in the front of the vessel. After snorkelling, we were given lollipops to help get rid of the saltwater feeling on our lips. What a great idea and it worked.
My son entering the water at Sombrero Reef
A spur and groove reef and tropical fish at Sombrero Reef in the Florida Keys
Where: Depart from Captain Pip’s Marina at mile marker 47.5 and travel about six miles offshore to Sombrero Reef at the Sombrero Lighthouse
Notes: There is a change room/bathroom available at the marina should you need it. There were plastic round tubs to keep our bags dry. They also offer snacks and sodas on board.
Snorkelling with Children: My 11-year old son had no problem snorkelling there. It is deeper than Coffins Patch, but some parts of the reef came closer to the surface, which made it easy enough to see the fish. There was a 6-year old girl on board who snorkelled for an hour; I don’t know her previous swimming or snorkelling experience.
I recommend Sombrero Reef for children who can swim, are comfortable in the water/salt water and with getting splashed as there will most likely be some waves even if the waves are small. Consider your children’s age, personality and abilities as it is further out and deeper.
To 35′ Beginner-Intermediate. Marked by the 142-foot Sombrero Key Light, built in 1858. This classic spur-and-groove reef system provides sand channel alleys and finger reefs just loaded with fish and giant brain coral, which make for cleaning stations for barracuda, turtles and other customers who come to be picked clean by the tiny cleaner wrasse. This site is terrific for snorkelling. Caution: Currents.
Snorkelling with Spirit Snorkeling and a view of Sombrero Lighthouse
Under the 7 mile bridge in the Florida Keys
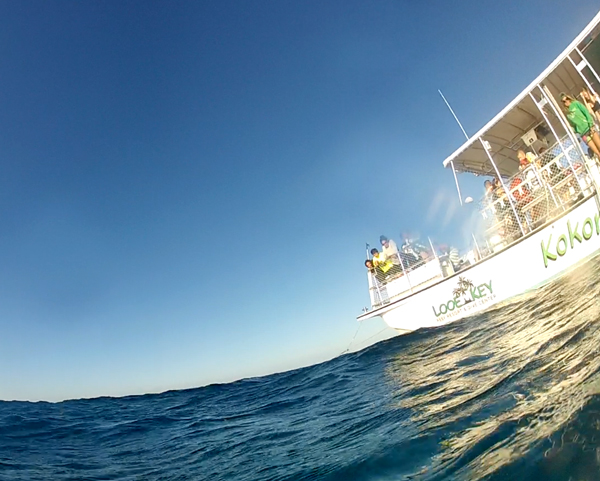
LOOE KEY DIVE CENTER – a departure from Ramrod Key
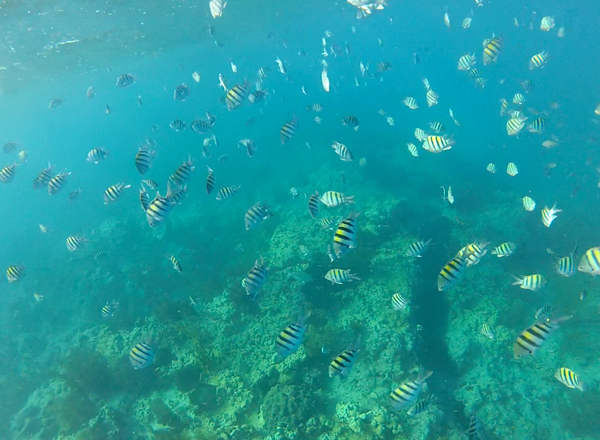
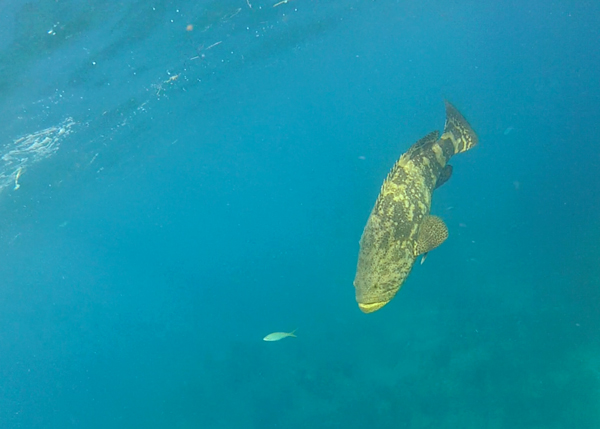
We moved to Key West for our last night in the Keys. Our final snorkel trip was to Looe Key Reef with a fully outfitted dive centre, and we had several divers on board. In my research about Looe Key, I kept coming across the phrase “not for the faint of heart.” My understanding is that Looe Key is on the edge of the barrier reef and therefore, the fish are more substantial. The reef was deeper than the previous two reefs we snorkelled, but with the large reef patches that came close to the surface, viewing was exceptional. If some members of your group or family scuba dive, this is a fantastic reef for you. If you’re interested in seeing the critically endangered goliath groupers, this is the place. We got to see them both times we visited the reef. It’s an exciting reef with so much to explore.
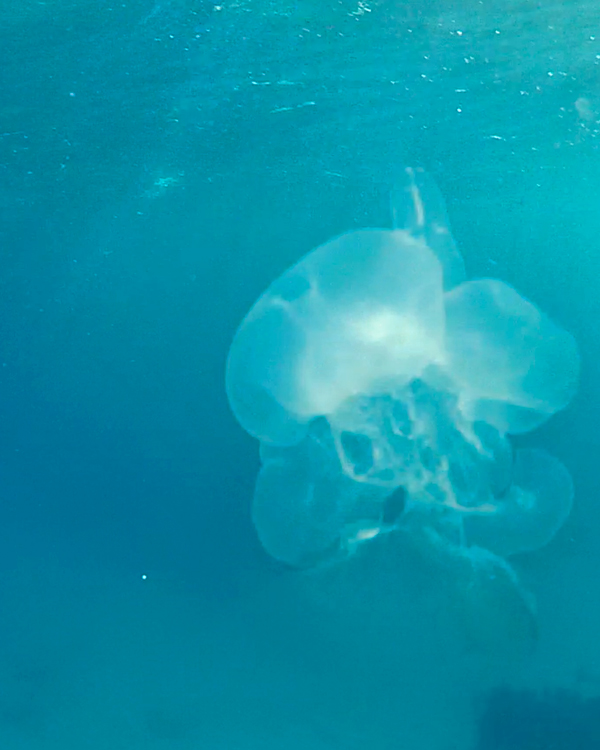
We lucked out with the third day of sunny skies and good visibility. This time we were aboard Kokomo Cat II, a 45-foot Catamaran with ladders on the side. We saw many of the same fish we had seen at the other two reefs and others I haven’t ever seen before like the Horse-eye Jack and Black Durgon. We saw a lot more Great Barracuda and the ones we saw were larger and swam closer to the surface. We also saw moon jellyfish and had an incredible sighting of three goliath groupers, one in the first location and two in the second. The moon jellyfish and groupers made my son a bit nervous, but he handled it well and again we were amongst the last to get back on the boat. The goliath groupers are a protected species, and they had to be about 150-350 lbs or more. I was secretly hoping for a sighting of a nurse shark. Others in our group saw a Caribbean reef, hammerhead or nurse shark.
Looe Key Dive Center is an excellent, friendly and professional snorkel and dive operator. The staff were knowledgeable and helpful. They also have a motel and tiki bar on-site.
Snorkelling the Looe Key reef in the Florida Keys
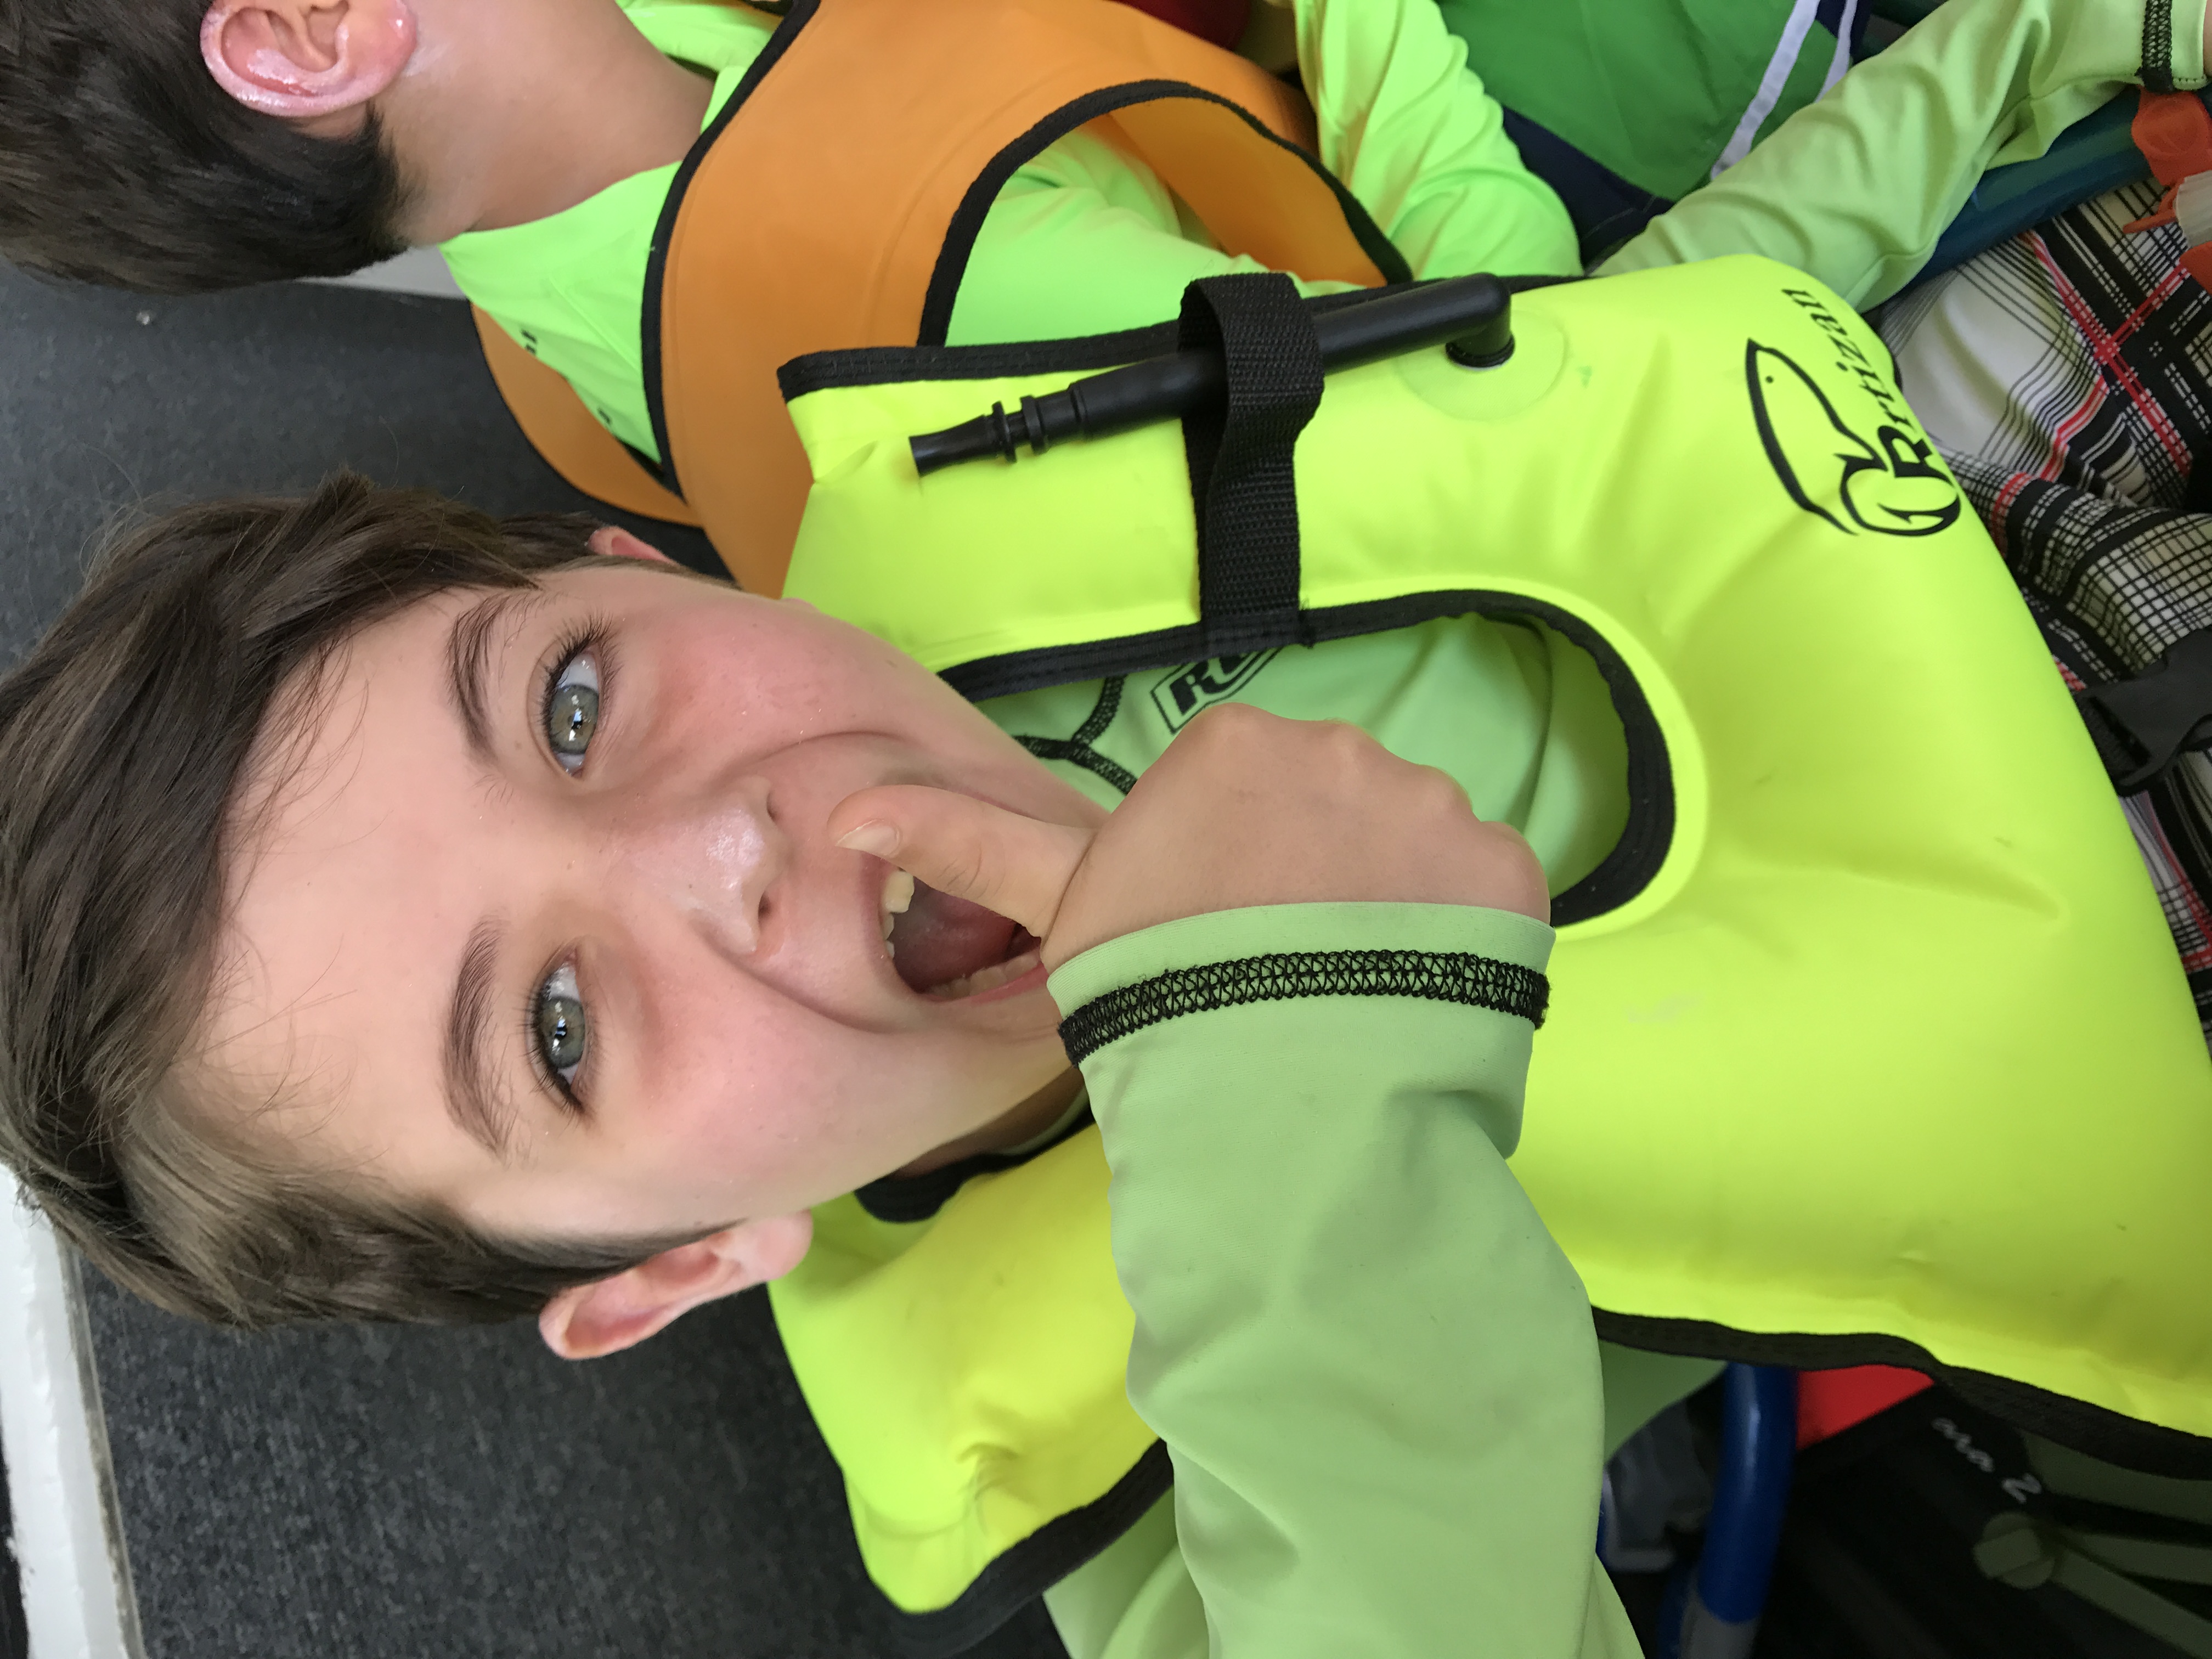
My son snorkelling with a Goliath Grouper at Looe Key Reef
Great Barracuda at Looe Key Reef
Goliath Grouper at Looe Key Reef
Great Barracuda and Horse-Eye Jack at Looe Key Reef
Where: We departed the Looe Key Dive Center Marina at mile marker 27.5 to Looe Key Reef, about 5 miles offshore. We snorkelled in two locations for an hour each.
Notes: Arrive a little early to browse the shop, and you need to sign a waiver before boarding. You can purchase reef-friendly sunscreen here. It’s the closest operator to Looe Key reef, so you spend less time on the boat and more time in the water. They sell snacks and soft drinks on the boat.
Snorkelling with Children: My 11-year old did well at this reef though he was a little nervous about the moon jellyfish. Admittedly, I was a bit too as I hadn’t ever snorkelled with jellyfish before. However, they are slow swimmers, so there is time to move away from them. Be aware if you’re snorkelling in August and September as I understand that is moon jellyfish season.
I recommend Looe Key Reef for children who are quite comfortable in the water, and with the possibility of seeing larger marine life such as groupers and sharks. As with all snorkelling in the Florida Keys, there is a chance that there will be some waves even if the waves are small. The fishes were bigger than the fish at the previous two reefs. There is a possibility of seeing sharks as well as the giant groupers. My son was nervous about the groupers, but they didn’t come too close. Consider your children’s personality and abilities. There was a 10-year-old on board who was audibly nervous. He didn’t have previous snorkelling experience but snorkelled for about an hour. He didn’t snorkel in the second location.
EAST END to 35′ Intermediate. “The name comes from the British Man-O-War, HMS Looe, which ran into the reef here and sank in 1744. The reef is made up of parallel limestone ridges that come within 10 feet of the surface. Looe Key dive is brilliant over an 800-yard stretch. Here you will find a variety of soft and hard corals, sea plumes, sea fans, sea rods, and sea whips. A good snorkelling site. Caution: Surgy.”
WEST END to 35′ Intermediate. The Looe Key consists of 800 yards of magnificent underwater variety, which is perhaps equal to the entire Florida Keys’ collective assortment. In fact, a common nickname for this reef is the Jewel of the Middle Keys. The west end is a classic spur-and-groove reef formation where you will find brain, star, and giant star corals, brown tube and orange elephant ear sponges, elkhorn coral, yellowtail snapper, sergeant majors, surgeonfish, French grunts, damselfish, barracuda, mutton snapper, and Nassau groupers. This is also a good snorkelling site. Caution: Surginess can make for an added challenge, but the Gulf Stream Current can be very difficult. The current sometimes rips along at over 3 kts., making this a great drift dive, but it is very demanding on the dive boat operator to make sure you don’t wind up heading for Europe.
Kokomo II at Looe Key Reef
Looe Key Dive Center and Resort Marina
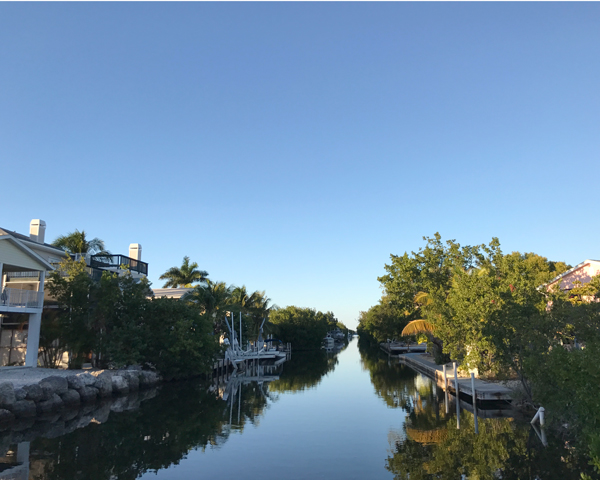
Canal near Looe Key Dive Center and Resort
JANUARY 2017 – A return to the Florida Keys and windy days
I returned to the Florida Keys in early January, this time with my adult niece in hopes of snorkelling again. We spent one night on Long Key and two nights on Little Torch Key. Here are my follow-up experiences with the same three snorkelling tour operators:
Sundance Watersports
We attempted to book a snorkelling trip with Sundance, but unfortunately, all excursions high winds forced the tour operators to cancel the snorkel trips. I have to shout out to Fourie (sp?) at Sundance as he was helpful in explaining the situation and pushing our reservation to the following days while we were in the Keys in hopes the winds would die down, sadly, they didn’t.
Spirit Snorkeling
This time there were high winds as mentioned above, and the Captain decided to go out. As we made our way past the 7-mile bridge, the seas were rough, and the waves got increasingly bigger as we got closer to the Lighthouse I wondered if we were going to turn back because as the front of the vessel dipped into the waves, water spilt into the boat. The guests seated at the front were soaked. The boat filled with some water, fortunately, the boat is made for that, and the water quickly flowed out of the drainage holes. I wondered about visibility in the water and was also concerned about the senior snorkelers on board as it was hard to walk around the boat and navigate the ladder due to the waves. Visibility was not good, at maybe 3-4 feet. Despite that, I managed to see about five different species of fish in the ten minutes we had in the water before we were abruptly called back to the boat due to the black clouds and the storm rolling in. We got caught in the rainstorm on the way back to the safe harbour. The ride back in was smoother than the way out to the reef due to the wind being at our backs.
I believe the Captain did the best job he could, given the conditions. However, I feel a partial refund should have been offered as we only had ten minutes to snorkel, and many had less than that. I don’t think I would have allowed my 11-year old son to get in the water had he been with me that day. Once my head was down and looking underwater, the waves didn’t bother me. My issue was poor visibility.
I would still recommend a trip with Spirit Snorkelling on days that don’t have strong winds as my first experience with them was perfect. I would have preferred to have been told that visibility would be reduced and that the seas would be rough when I called or at check-in with the option to cancel or reschedule. I feel that we should not have gone out that day because what is the point of snorkelling in such poor visibility and rough seas. We were told that the storm was due to arrive at 4 pm and we were to be back at the dock by about 3 pm. It came early.
Tip: If there is a visible sway of palm trees (wind) and you are at all concerned, call another operator to see if they are going out. Make your decision based on what other operators are doing, if you could handle rough seas and your abilities.
Looe Key Dive Center and Resort
I stopped at the Looe Key Dive Center and asked if they would be going out that day or any dates that week. All excursions were cancelled due to the high winds expected for several days/weeks but recommended we check with an operator that has a larger boat in Key West, to see if they would be going out. We called Fury in Key West, but they too did not go out.
NOVEMBER 2017 – A re-do, 3 operators and a visit after Hurricane Irma
I returned to the Florida Keys with my 12-year-old son, my 7-year-old son and my niece. After my trip in January, I knew I needed to return with my niece as she didn’t see the Keys and snorkel it the way I did in November 2016. I had hoped to snorkel in the middle Keys again as we had planned to stay on Cudjoe Key. Unfortunately, Hurricane Irma had other plans, and our accommodations were cancelled due to damage. The lower keys were the most impacted by the hurricane. I struggled with the idea of whether to cancel the trip or to go ahead with it. I didn’t want to get in the way and wasn’t sure how to feel about going on holiday while others worked to rebuild or lost everything. I followed the rebuilding closely and finally decided to continue with our visit as I wanted to support tourism and the independent smaller businesses in the Keys. Key Largo in the Upper Keys and Key West at the bottom end didn’t suffer as much as the rest of the Keys, so we stayed for four nights in Key Largo and two nights in Key West.
There were visible signs of damage, and US 1 was lined with debris from the length of the Keys with the lower Keys having significantly more damage. Most of the restaurants, hotels and attractions in Key Largo, Islamorada, Marathon and Key West were reopened.
Although I couldn’t compare the state of the reefs from before and after Irma, it was my understanding that most of the reefs faired well.
KEYS DIVER – a departure from Key Largo
The first snorkelling excursion of our trip began with Keys Diver in Key Largo. I called the office to inquire about the trip and ask some questions. I wanted to know what the process was if my 7yo old son wanted to get out of the water and stay on the boat in case I needed to stay in the water with my 12 yo. Whoever answered the phone answered my questions, and I booked the 3 location trip. I was concerned about how my 7yo would feel being in the open ocean. It wasn’t about him being far from shore but how he’d be able to handle the waves if there were like the ones my oldest son and I had experienced the year before. Keys Diver allows children to stay on the boat without parental supervision.
It was a sunny day, and visibility was high. We snorkelled in three locations starting with Grecian Rocks. The waves weren’t bad at our first stop. We saw a variety of fish and coral as well as a giant barracuda. The water was shallow, which made visibility even better. Some snorkelers saw Conch. We then went to the Christ of the Abyss statue for about 20 minutes and ended with Dry Rocks. The boat was equipped with ladders off the back of the boat and a small restroom. They sell snacks and soft drinks on the boat. Wetsuits are available onboard.
On the way to Grecian Rocks and his 1st open water snorkel.
Where: We departed from the docks near the Holiday Inn in Key Largo. We snorkelled in three locations starting with Grecian Rocks. We then went to the Christ of the Abyss statue for about 20 minutes and ended with Dry Rocks.
Notes: You have to go to the shop first. There they give you directions as to where to board. As with other operators, you need to sign a waiver.
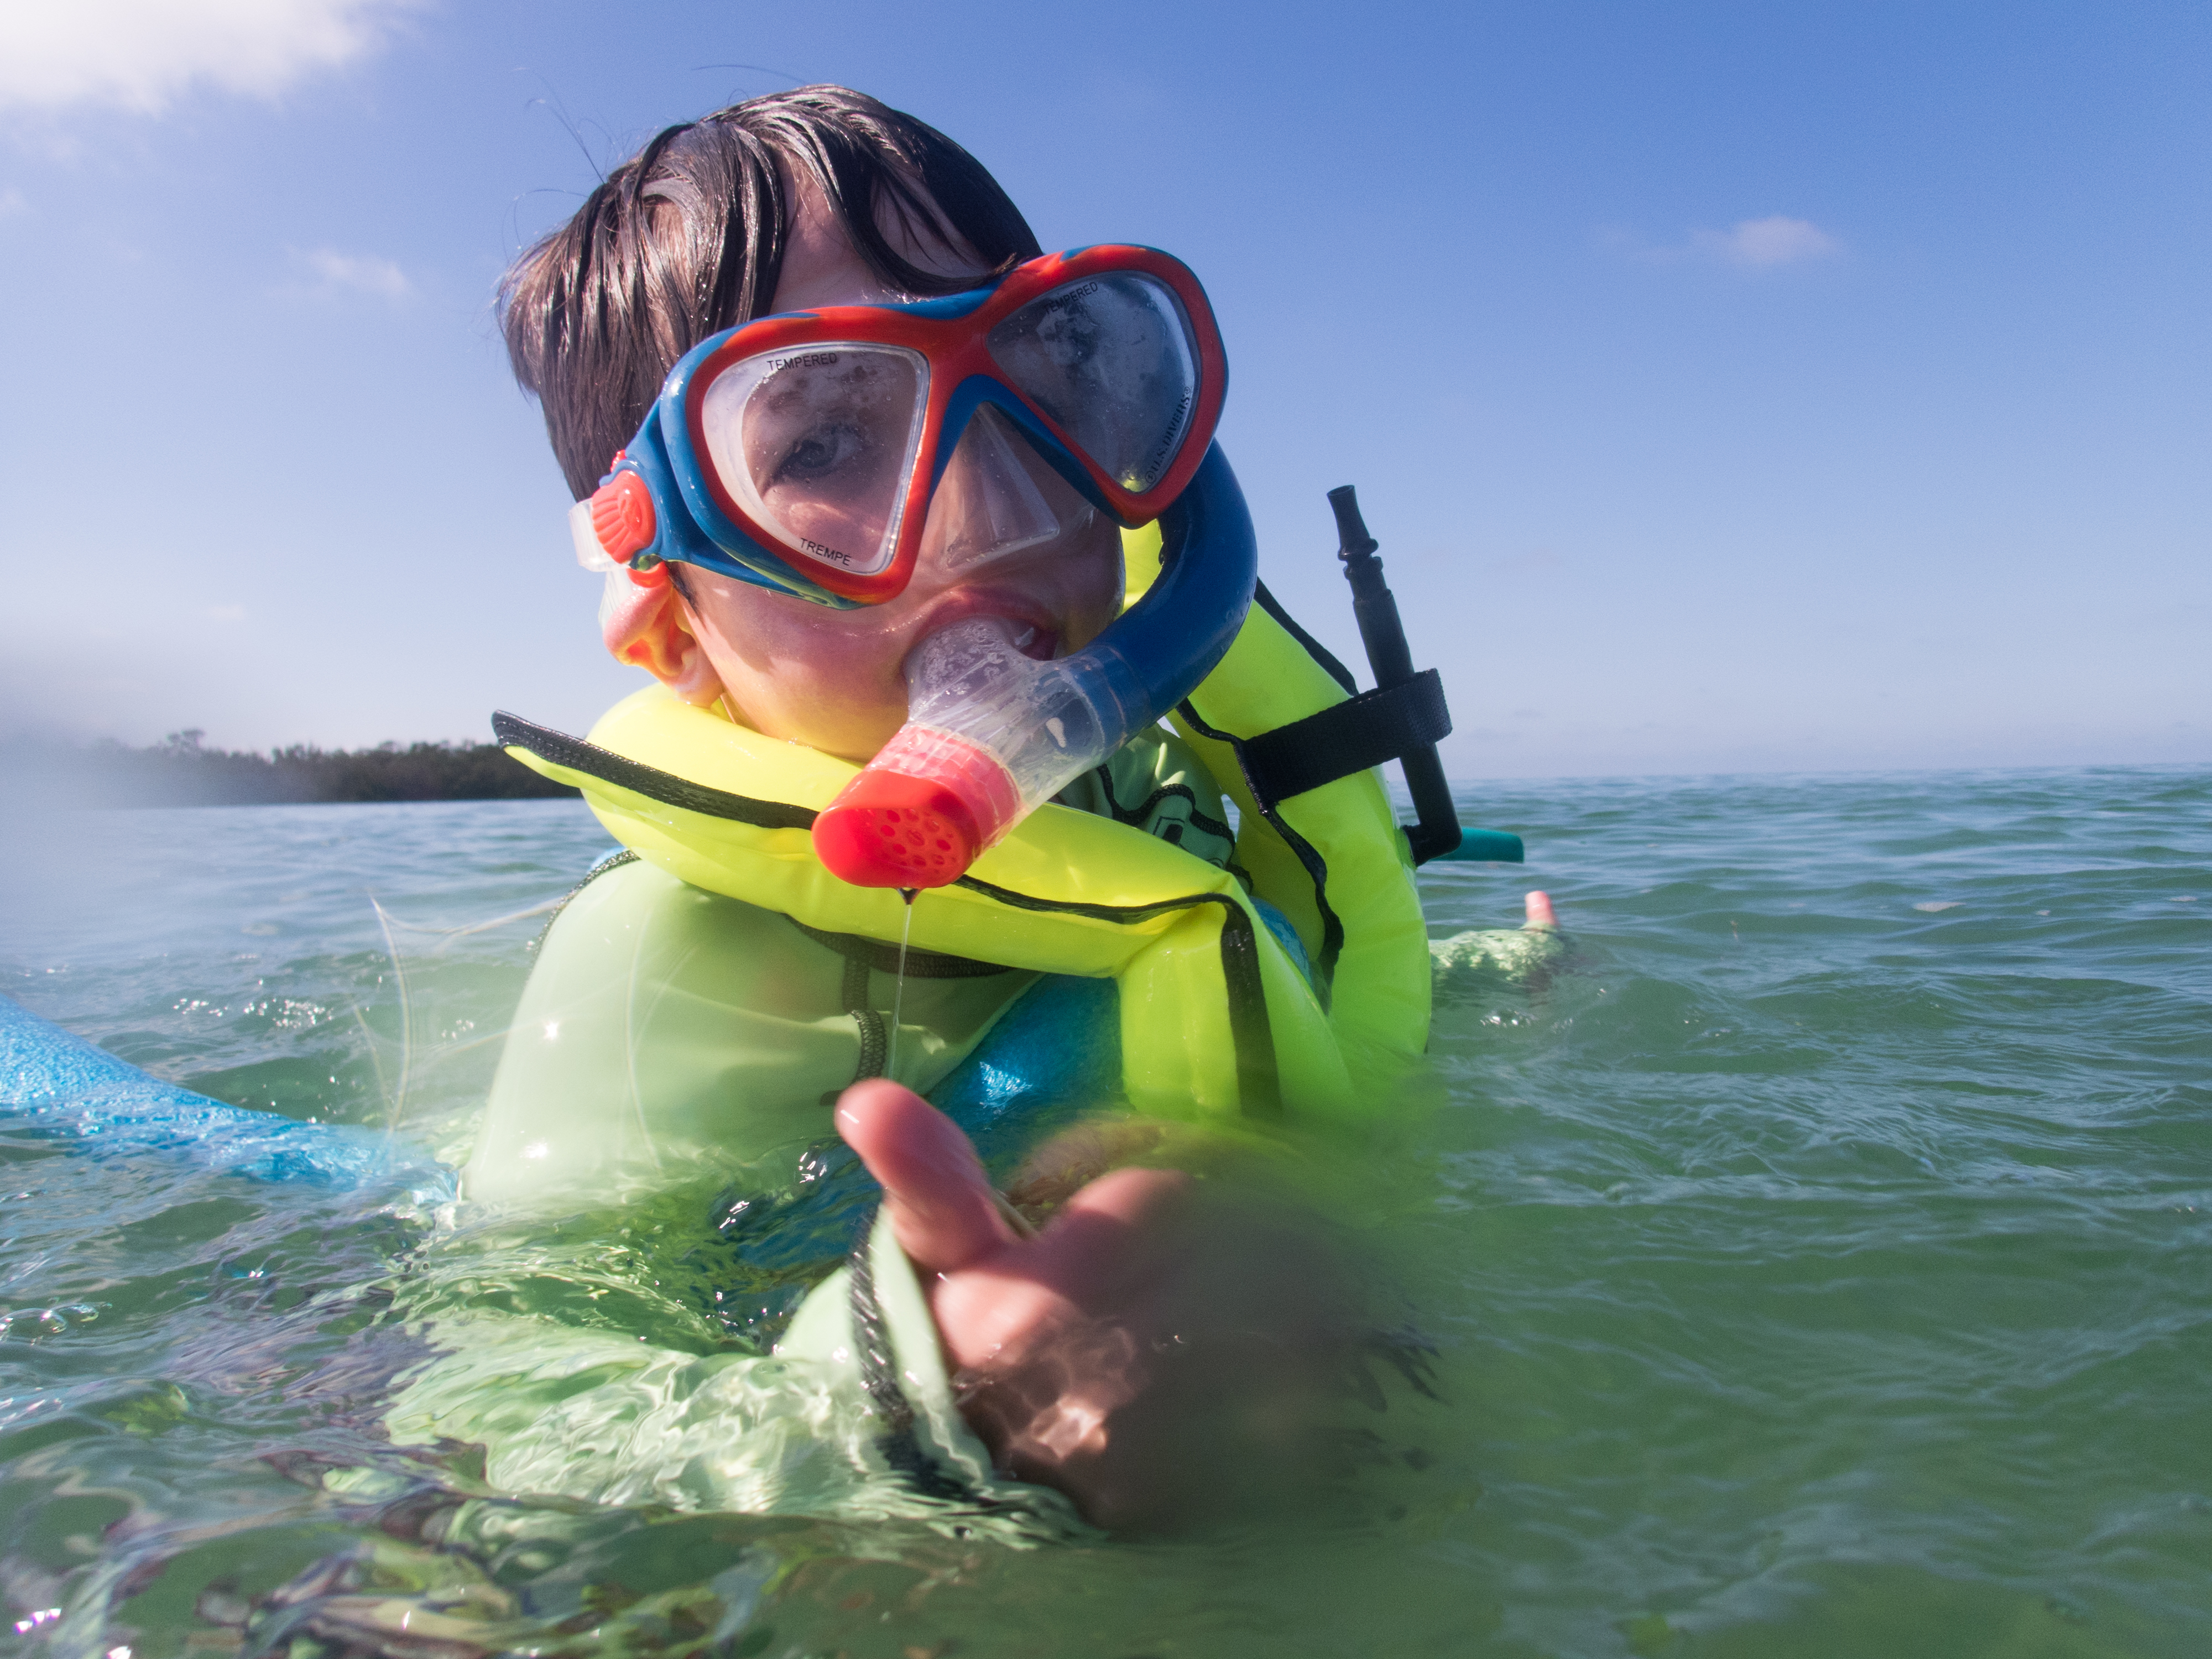
Snorkelling with Children: My 7-year old snorkelled the shallow Grecian Rocks for almost an hour and then ingested some saltwater as he looked straight below him, the top of his snorkel dipped forwards into the water. We swam back to the boat, but it was near the end of the first stop. He decided not to snorkel the other locations and did well for his first open water experience.
Conditions were rough at the statue as it’s not a protected spot, but my 12 yo and niece seemed okay with it but were tired from the swim to/from the statue. You could feel it on the boat as we rocked side to side. My 7yo and I could’ve used some anti-nausea medicine while waiting for the snorkelers, but we managed to fight it off. Others on board were not so lucky. Tip – Stare at the clouds or into the distance at the horizon if you feel queasy. We also chewed some peppermint gum I happened to have with me. Captain Bedford was wonderful and brought my son to the upper deck to blow the horn at the end of our second stop. Unfortunately, none of us went in the water for Dry Rocks so I can’t speak of the conditions. My 12yo did well at both locations he snorkelled.
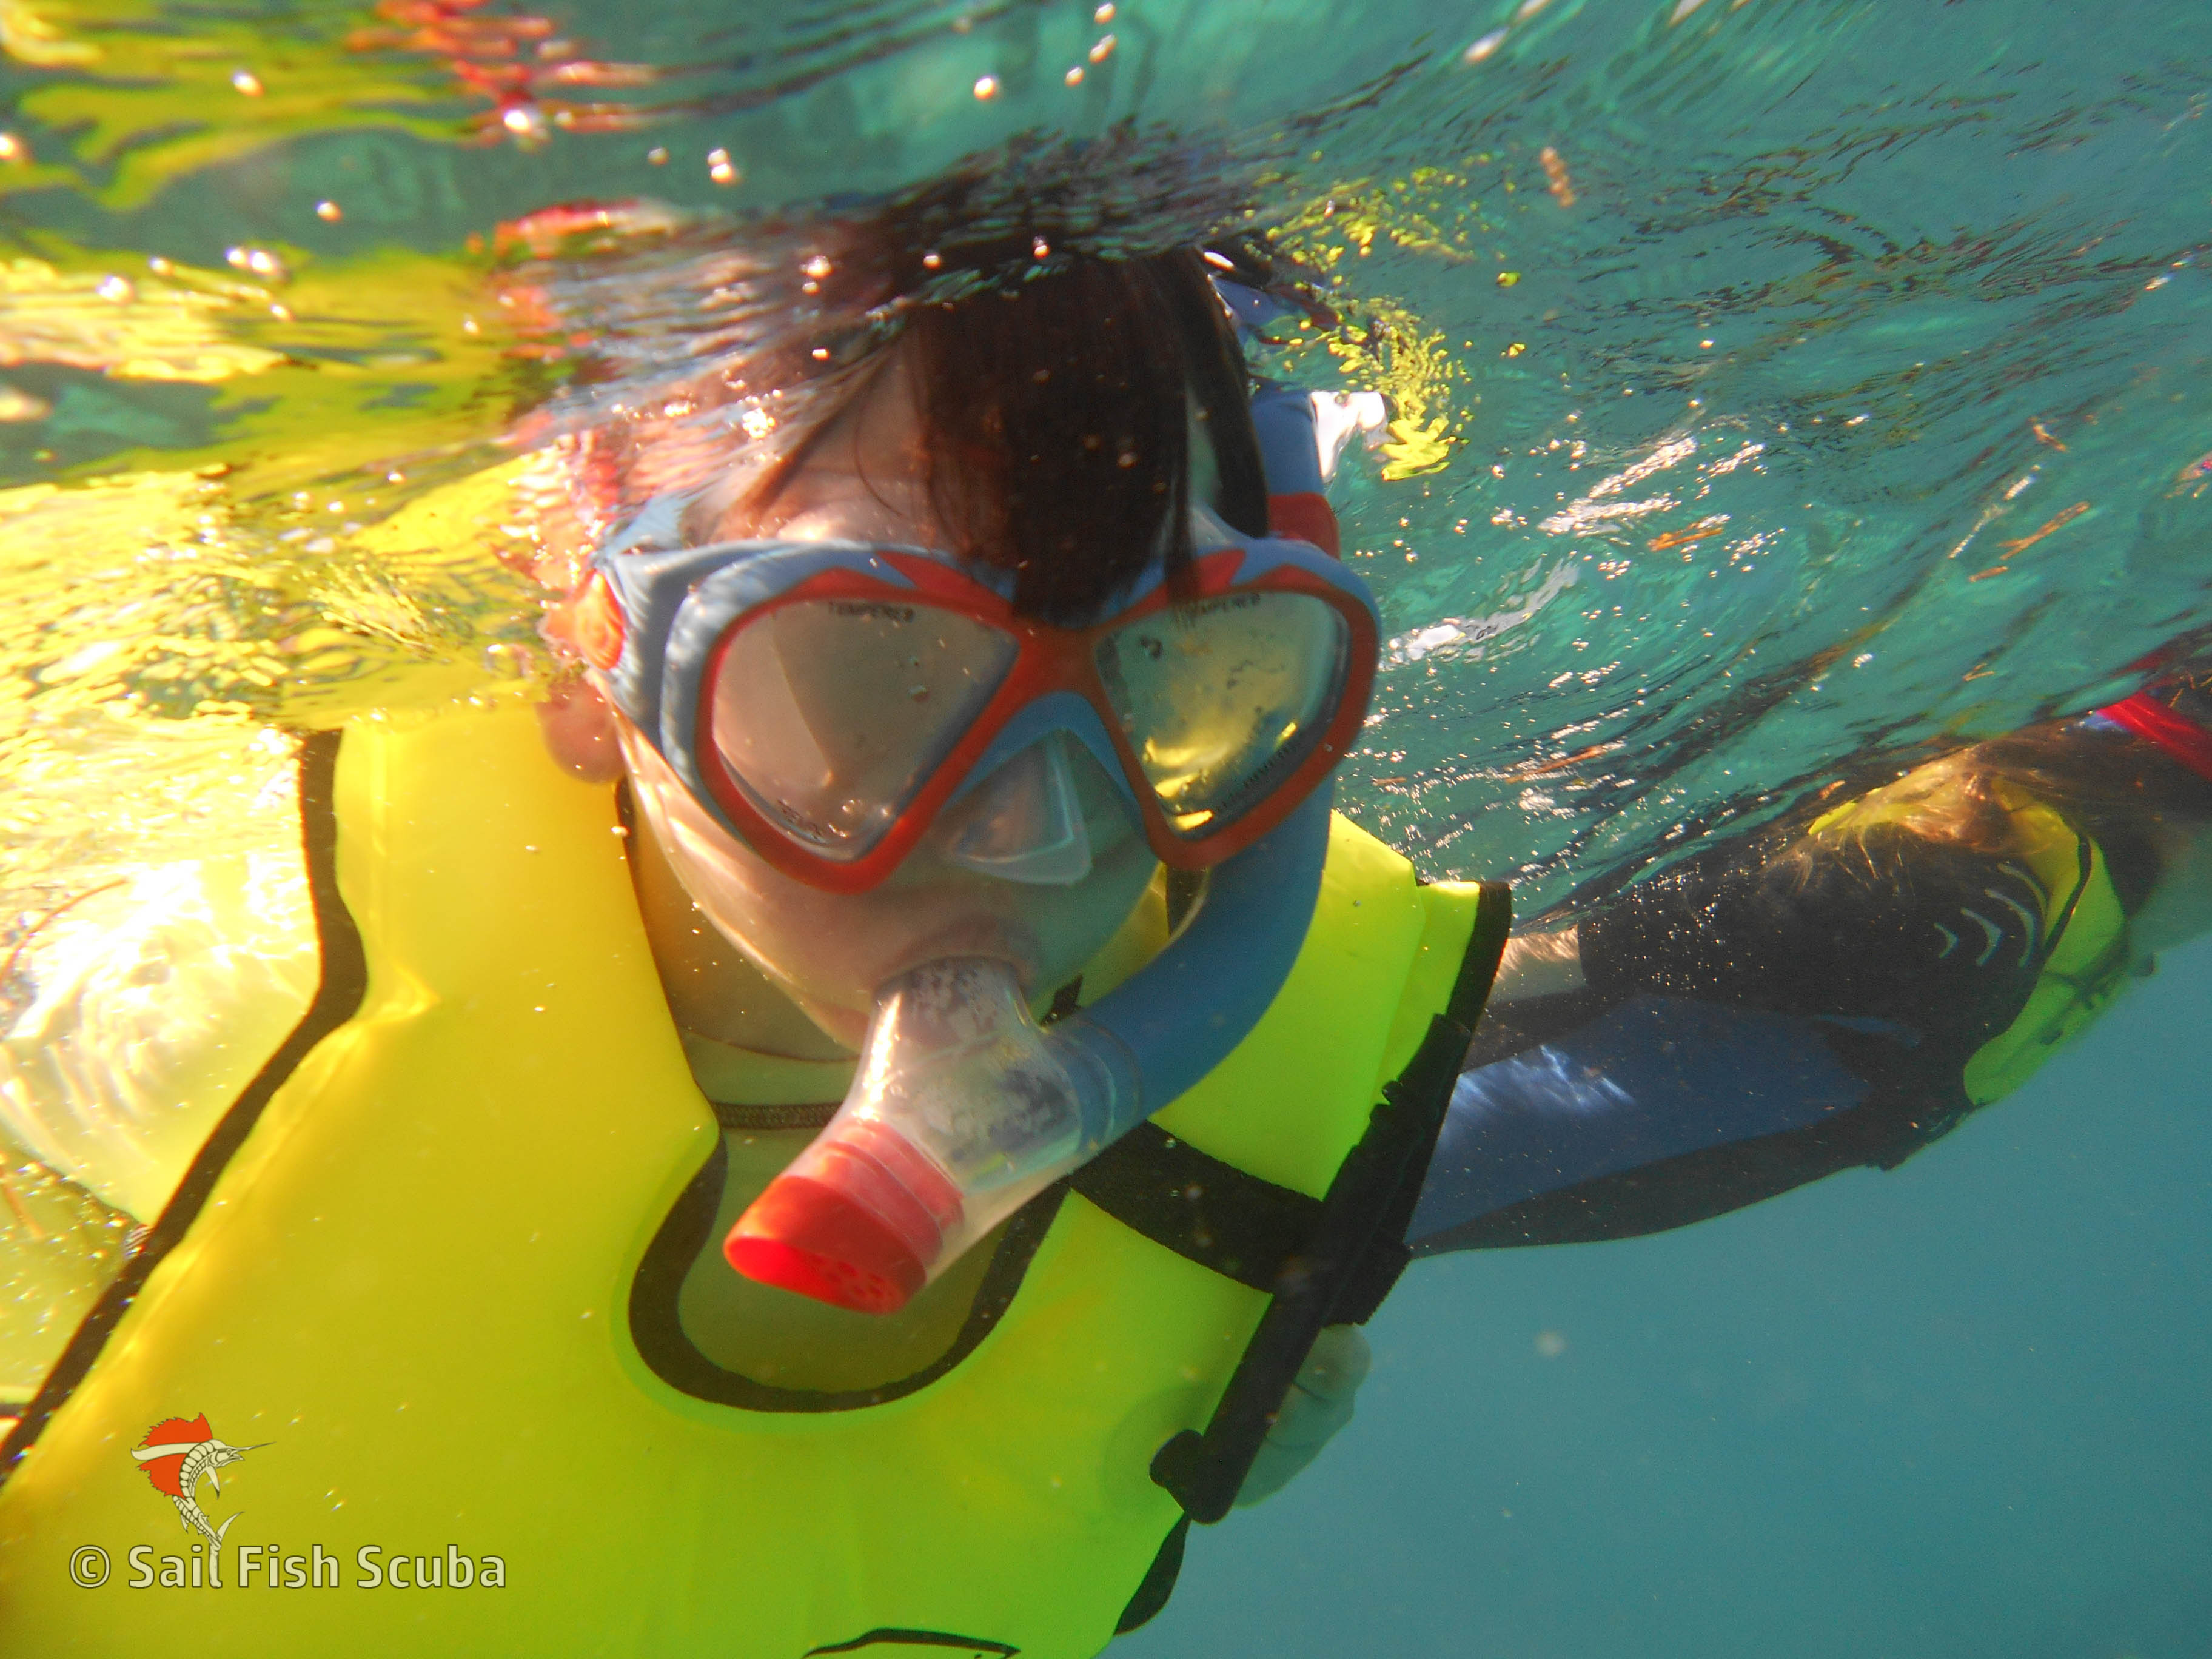
SAIL FISH SCUBA – a departure from Key Largo
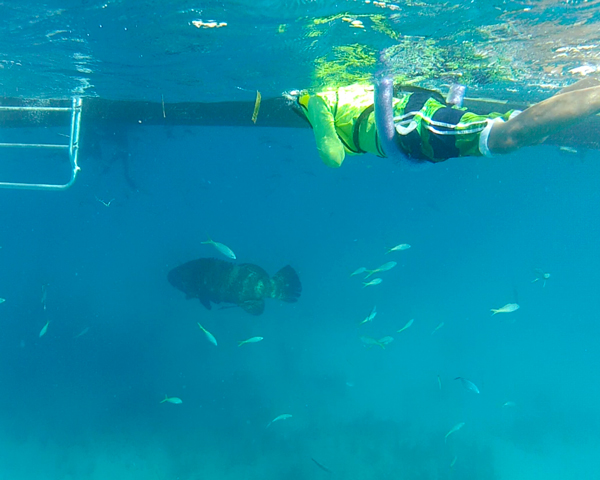
I can’t say enough about Sail Fish Scuba. I wanted our first trip to be with them, but they were booked for a few days into our trip. From Holly in the shop answering all my questions and concerns to Glenn our snorkel guide to Captain John, we had a fantastic experience. Glenn was hands-on with my 7yo as he snorkelled the Winch at Molasses Reef. There was a current, but having Glenn with us was a welcomed relief as it allowed me to enjoy the experience thoroughly.
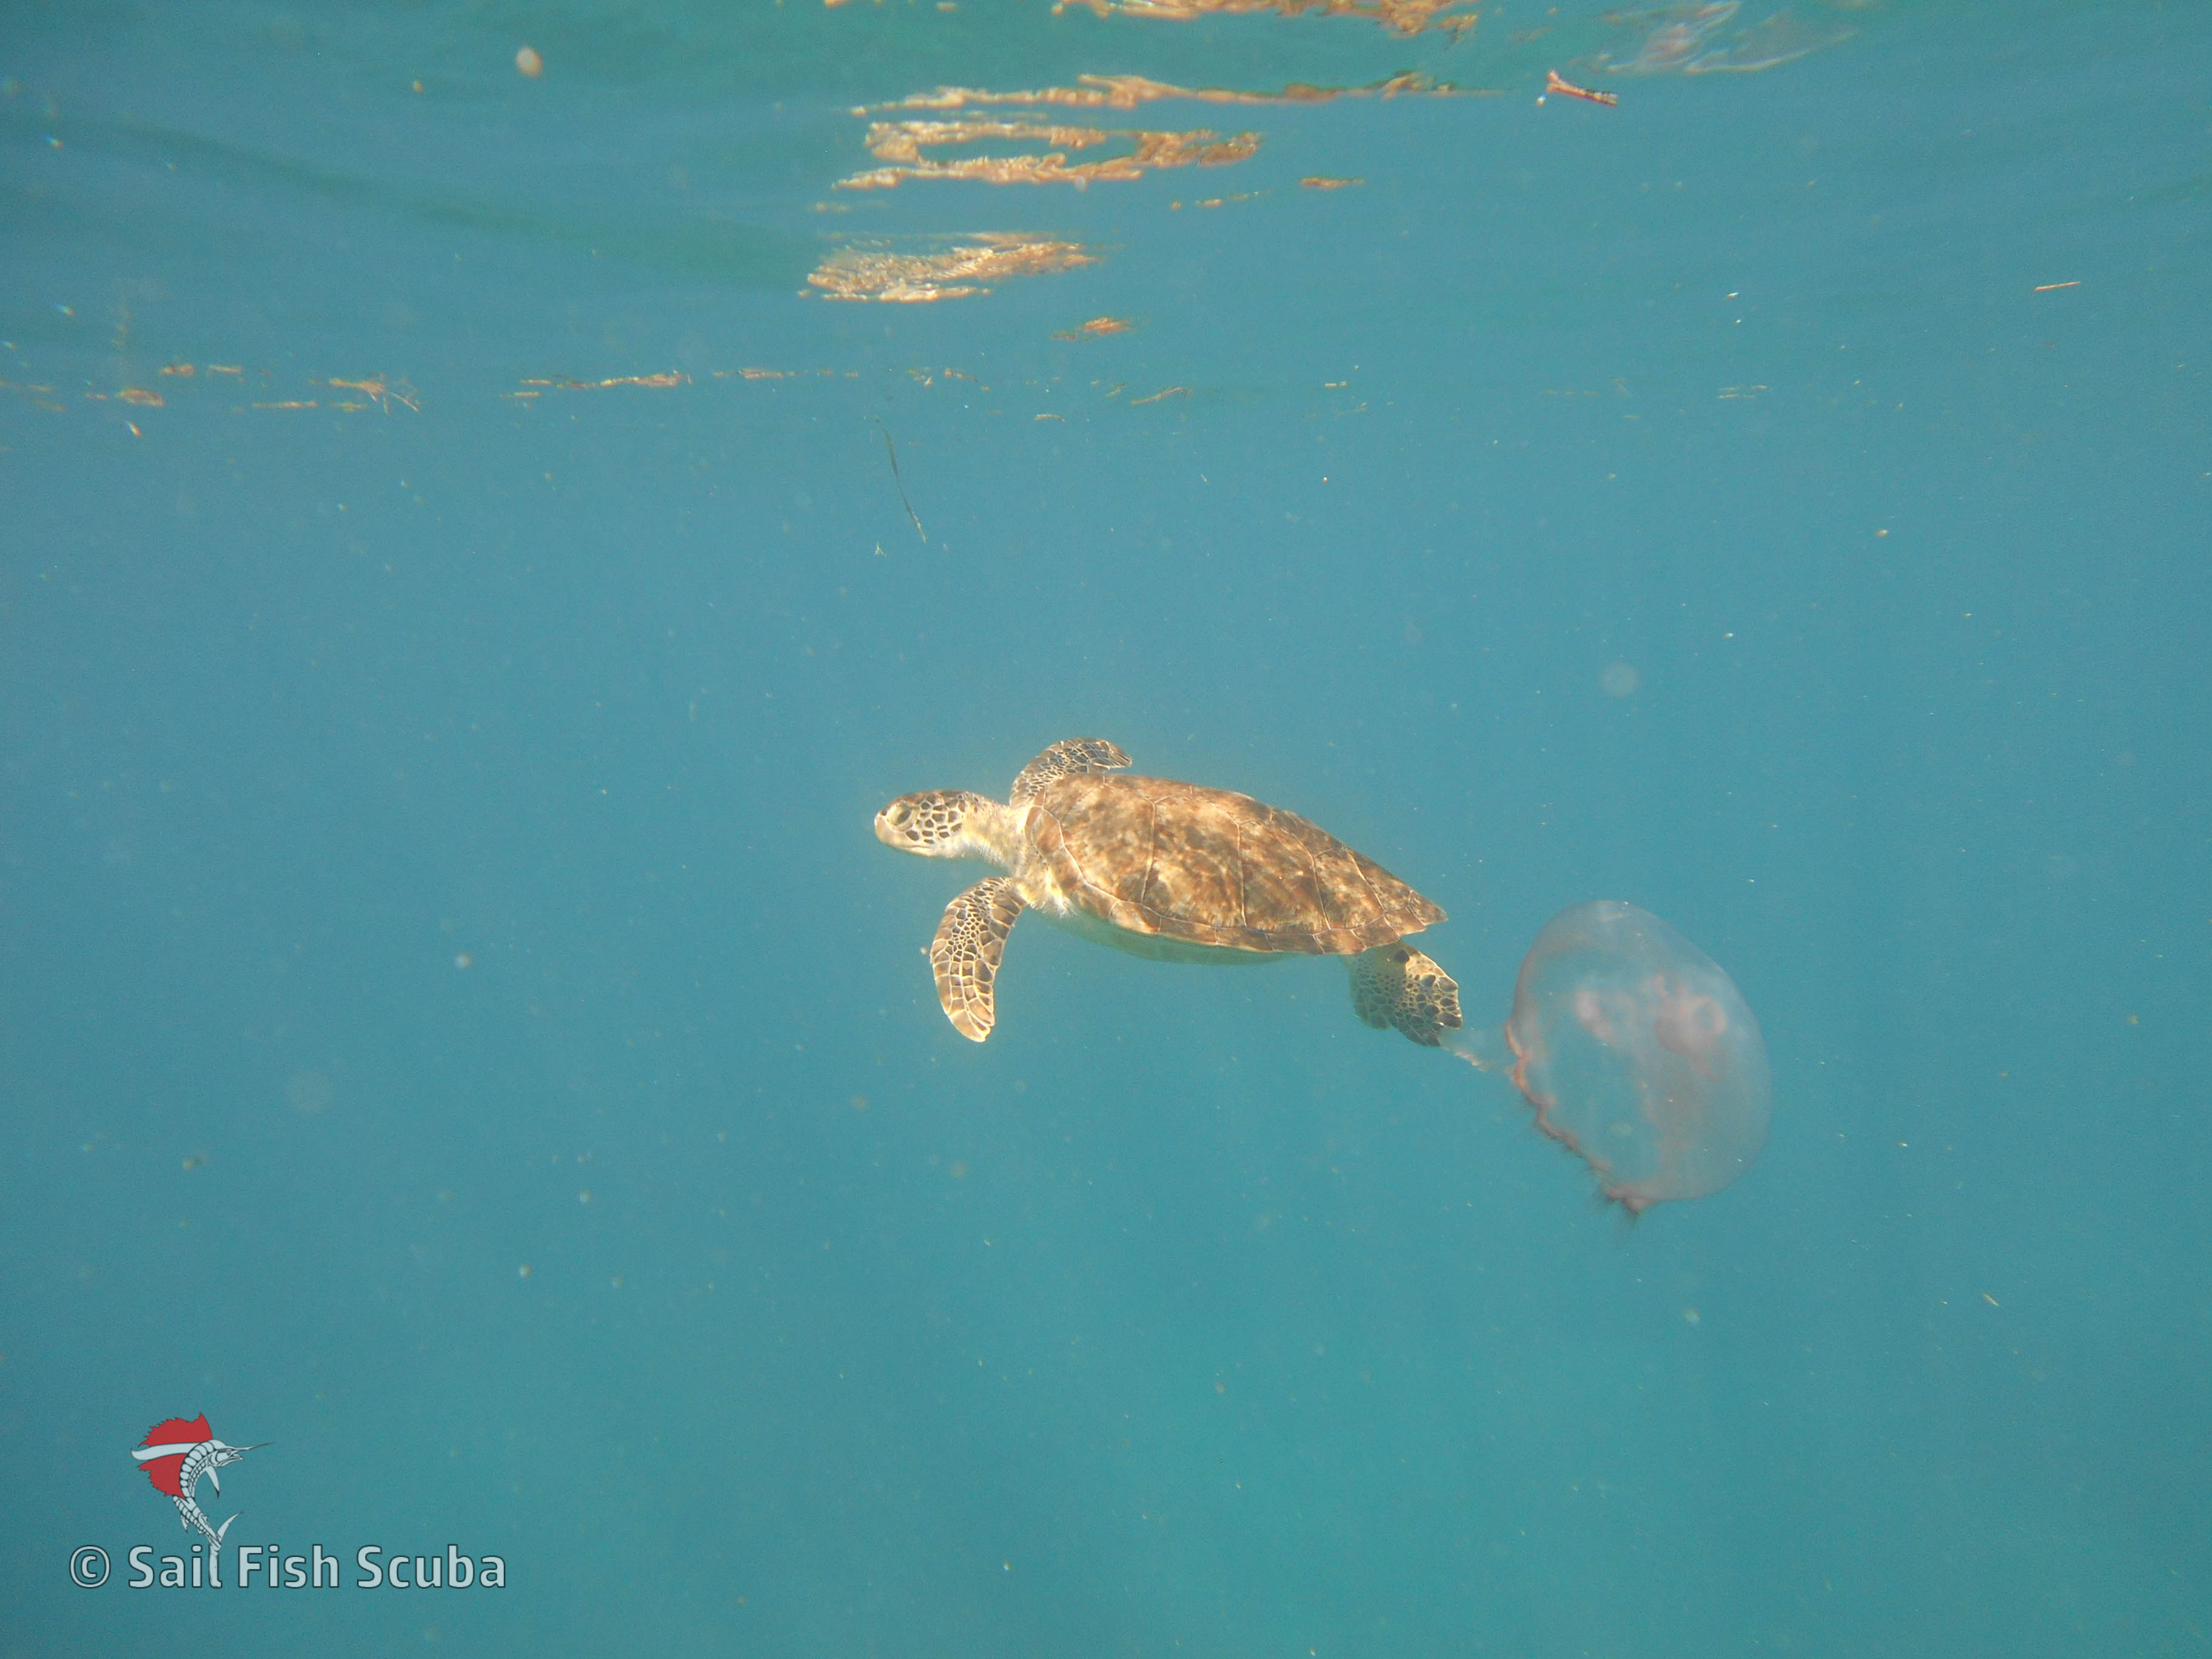
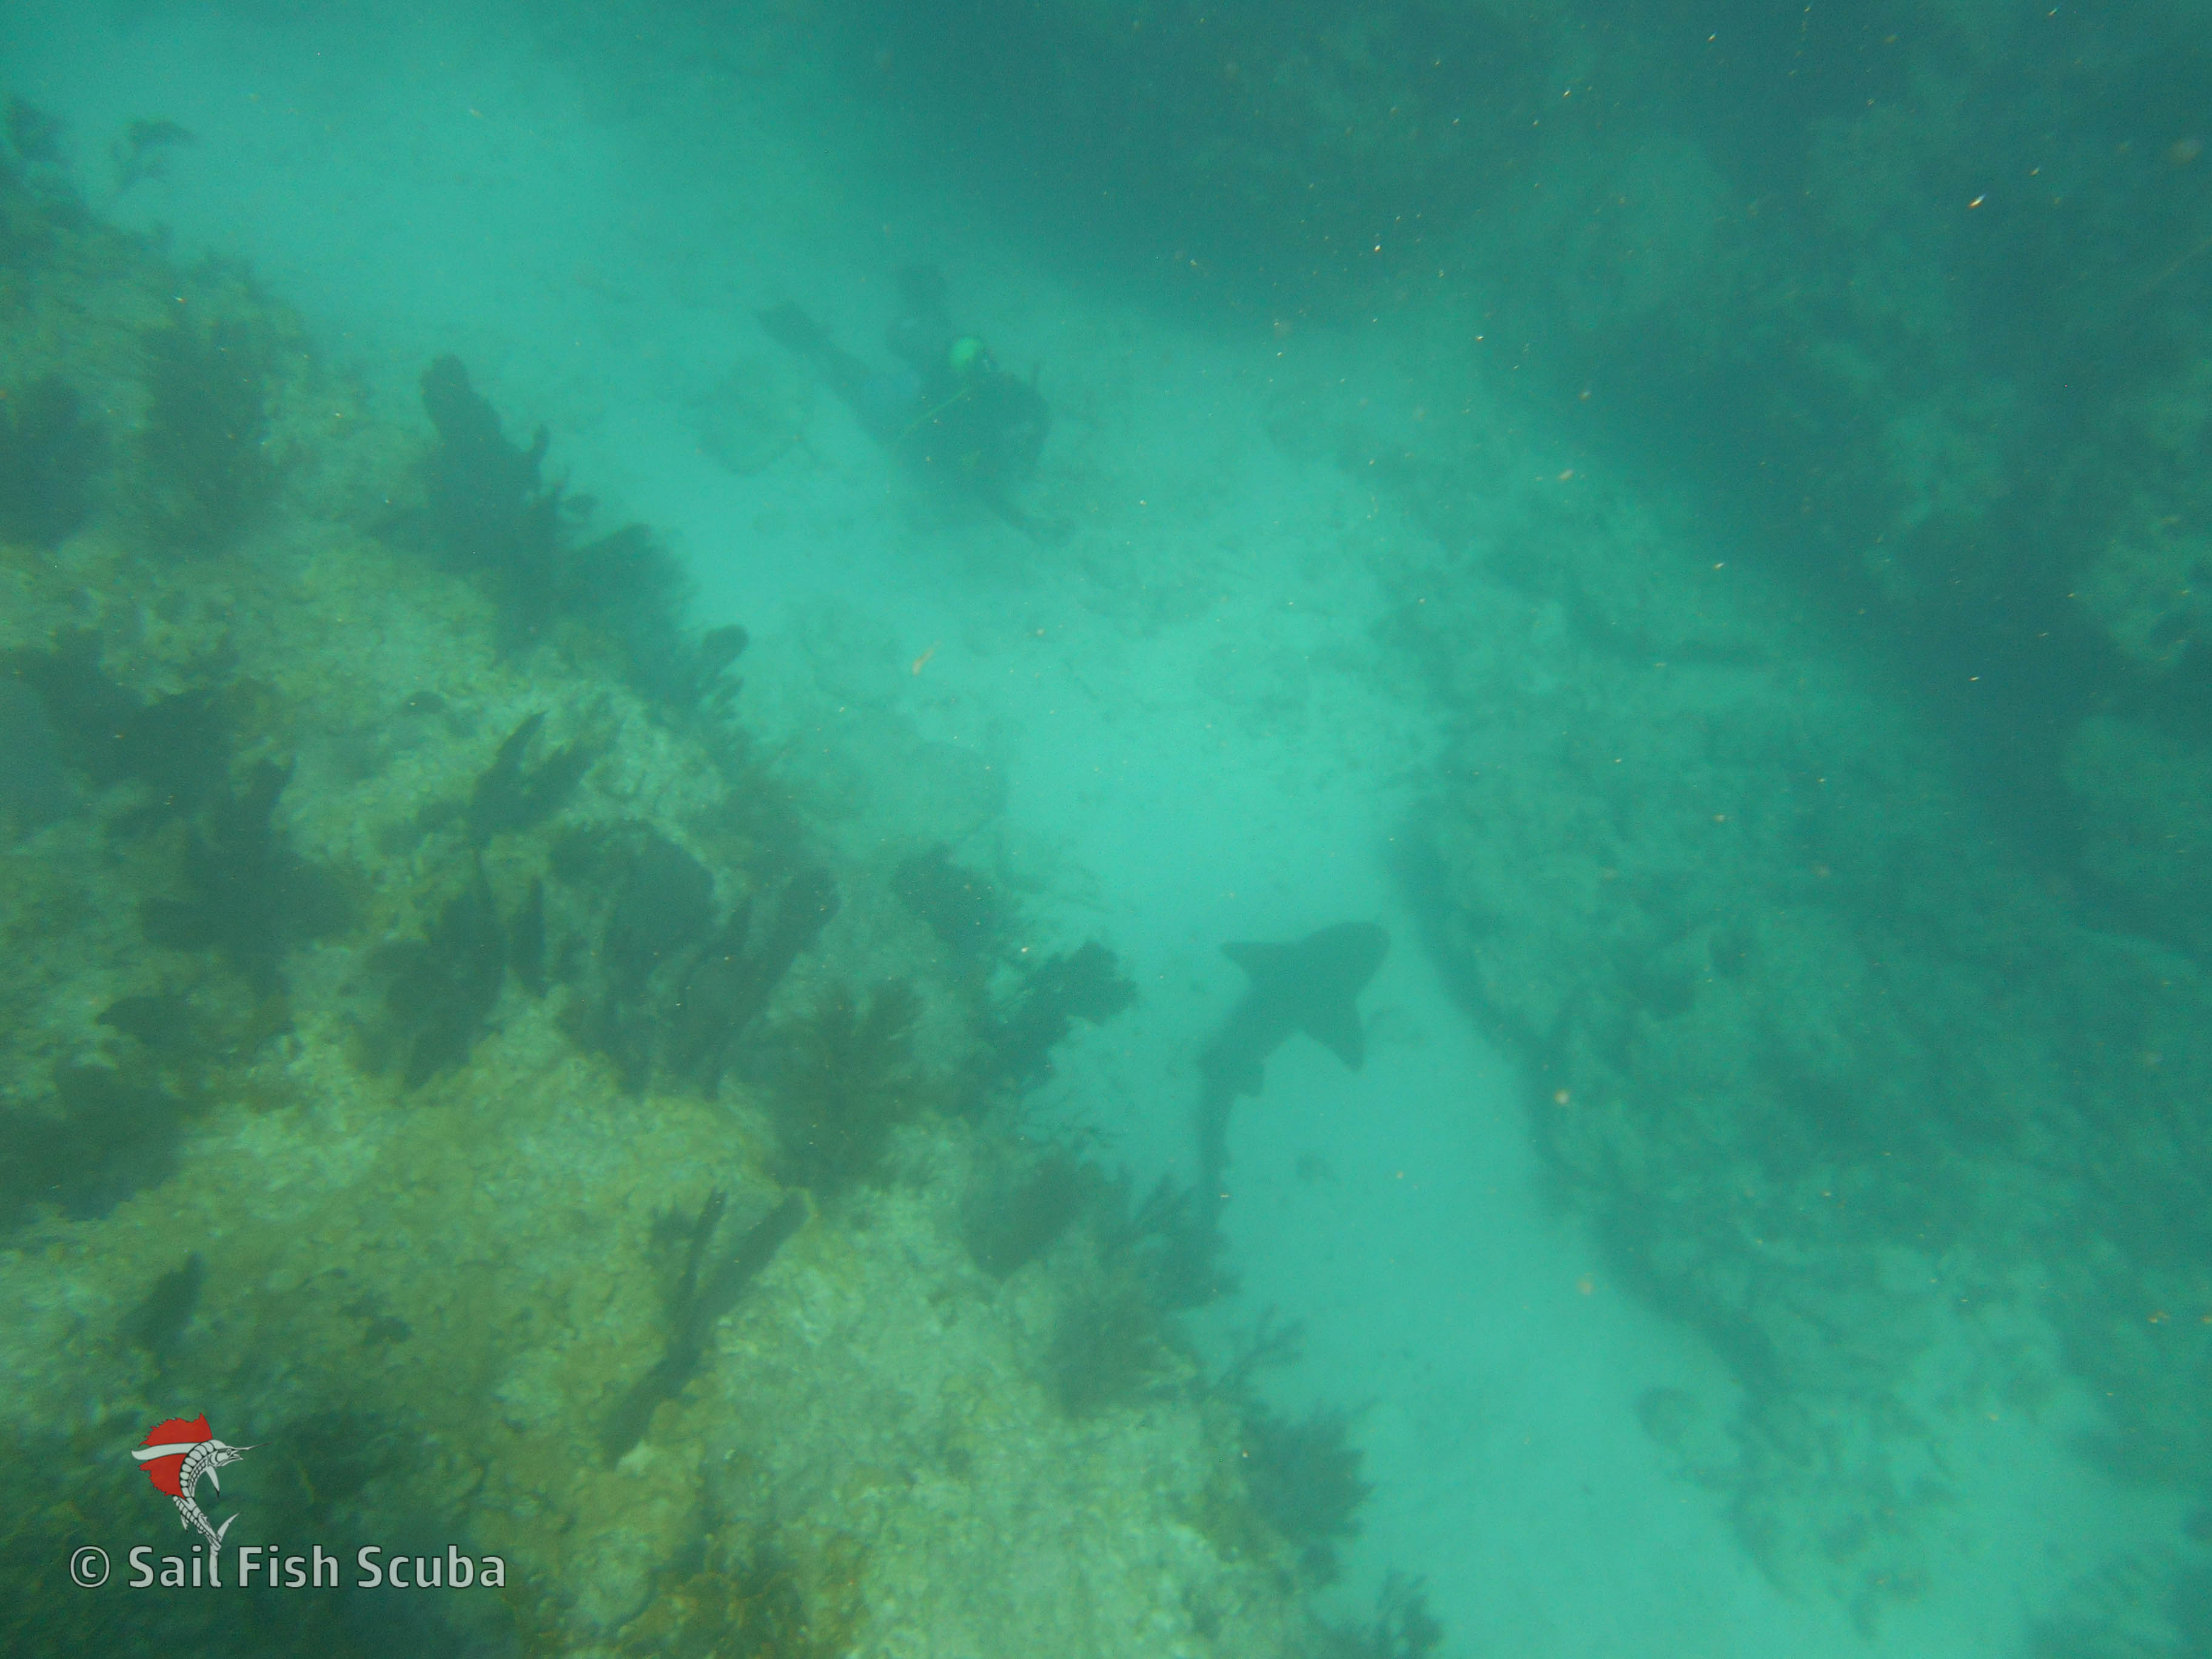
Glenn not only helped my 7yo son in the open water but also guided my niece through a group of moon jellyfish as she was nervous. He calmed any of our fears we had about the jellies. He helped us see and identify a variety of fish and sea turtles. We saw a Caribbean reef shark, nurse sharks and several sea turtles.
Having a guide in the water with you is wonderful. It’s also fantastic to have someone else to take the photos; you are given access to them through Dropbox. Photos were also made by the diver’s guide that was on the boat. It was a treat to be welcomed back with some snacks; my sons loved that.
My 7yo snorkelling Molasses Reef. Photo courtesy Sail Fish Scuba
A sea turtle and jellyfish at Molasses Reef. Photo courtesy Sail Fish Scuba
Our view of the nurse shark and the dive guide below us at Molasses Reef. Photo courtesy of Sail Fish Scuba.
Where: We departed from the canal behind the shop. We snorkelled in two locations on Molasses Reef.
Notes: As with other operators, you need to sign a waiver before boarding. Wetsuits are available, and the dive shop is well equipped. There is a restroom to change as well as a variety of hair care products you can use. If you want to use a wetsuit, they are given out at the shop.
Snorkelling with Children: Molasses Reef is a deeper site, ranging from 16 to 40+ feet in depth. It is closer to the edge of the barrier reef which brings larger fish, sharks, sea turtles and stingrays. Visibility was excellent, and the current wasn’t too bad. We did see a variety of fish, but with the excitement of our shark and turtle sightings, I can’t recall what else we saw.
My 7yo decided not to go back in the water after we returned to the line in the water for a break. Captain John kept him company and took great care as he hung out at the back of the boat. I highly recommend Sail Fish Scuba to anyone even if you are an experienced snorkeller. A guided snorkel is especially fantastic for beginner-intermediate snorkellers. They have a 6 to 1 ratio, so all trips are small groups. This is the best tour operator for snorkelling the Keys with children because of attention from the guide. We were the only snorkellers; there were also two divers and their guides on the boat.
My 7-year loved this experience. He was so happy to have seen a shark and sea turtles. He decided not to snorkel the second location; Captain John was delighted to hang out with him on the boat while the rest of us snorkelled in relative proximity to the boat. Visibility was high, and the current wasn’t too bad. Because of our experience the day before, we all took anti-nausea medicine, and it seemed to work well. We didn’t feel the slightest bit queasy.
FURY ISLAND ECO ADVENTURE TOUR – a departure from Key West
We booked this tour to experience snorkelling in the backcountry of the Florida Keys and its biodiversity as well as to experience the sandbar. The trip also included kayaking in the mangroves. Unfortunately, due to the speedboat races in the area, we couldn’t visit the sandbar.
It is more expensive than all the other tours, but with the kayaking, sandbar experience and food, I was okay with that price. I did feel overcharged since we didn’t get to go to the sandbar and wish we were told that we weren’t going there and had the option to cancel, reschedule or get a discount.
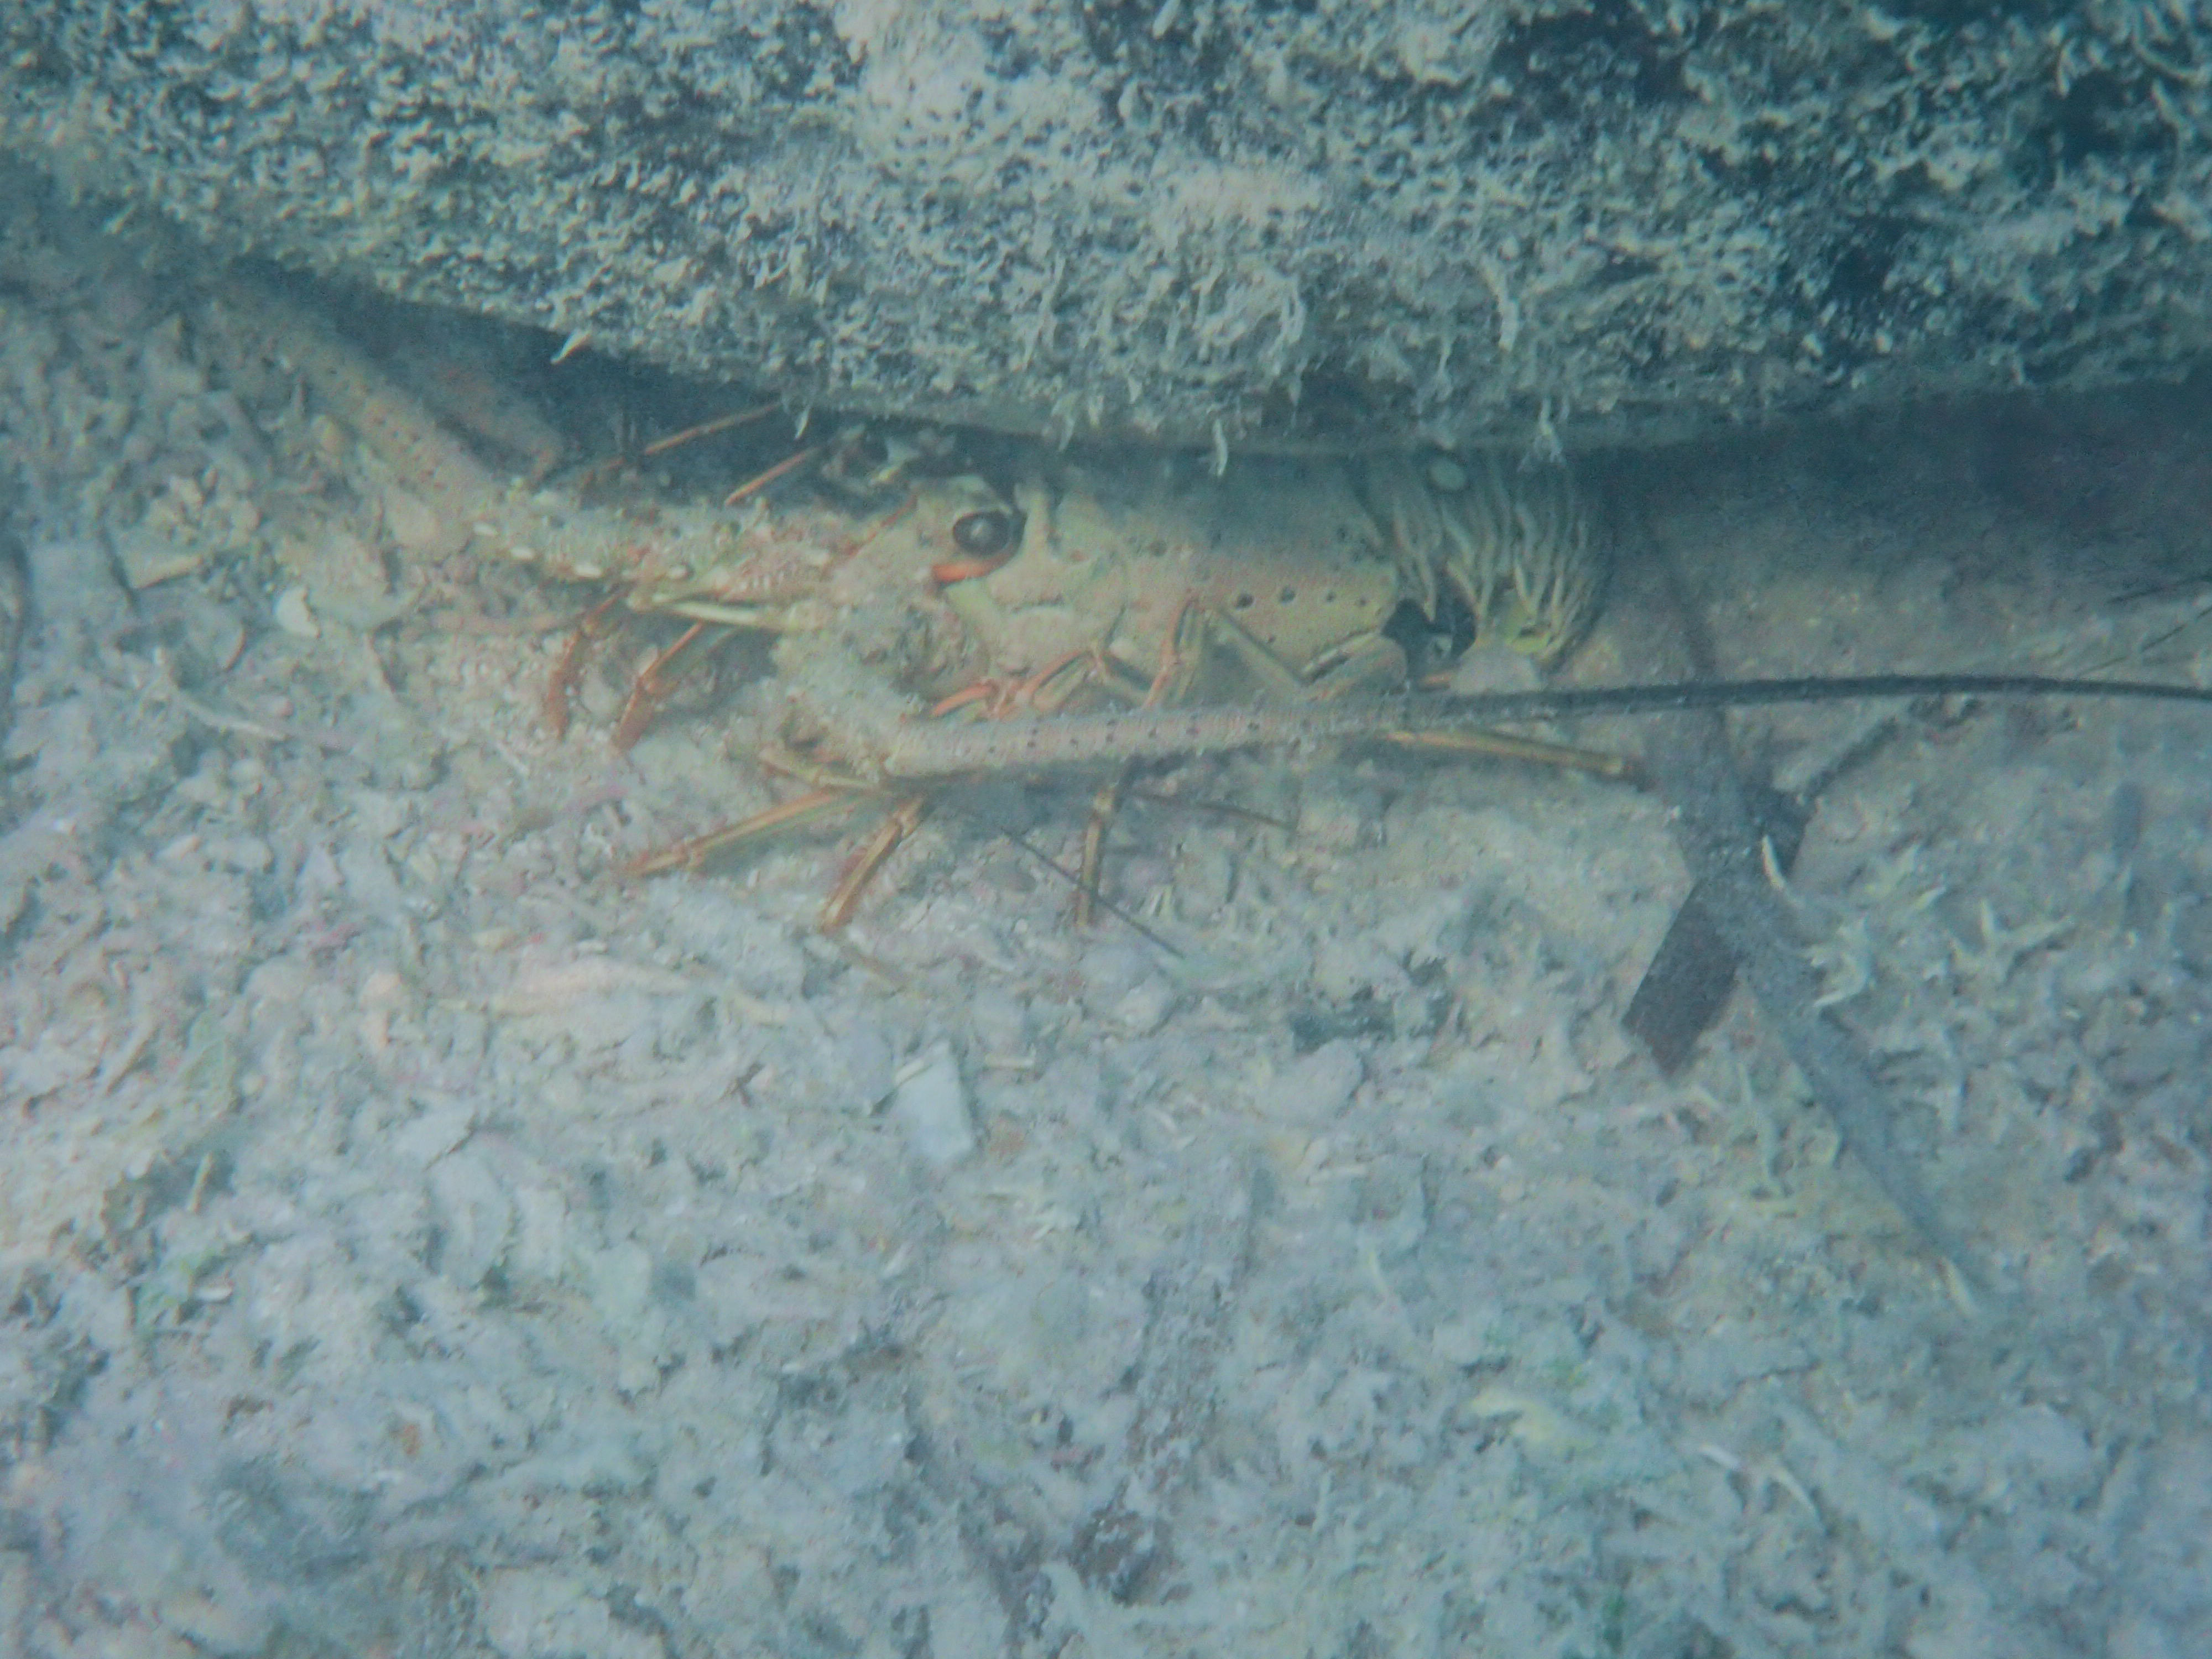
The water was shallow and calm and filled with sponge gardens where we saw many spiny lobsters, angelfish, porkfish, crabs and sponges in a variety of shapes. The boat was well equipped with a ladder off the side, a restroom, noodles and all the equipment for snorkelling.
Overall it was an excellent way to spend a half-day and take in the sunset on the way back. The Captain and crew were wonderful and went above and beyond to make our experience a good one despite not being able to go to the sandbar.
Sponge gardens in the backcountry of the Florida Keys.
A spiny lobster is hiding in the backcountry of the Florida Keys.
My 7yo snorkelling in the backcountry of the Florida Keys.
Notes: If you book online, you have to check it at the kiosk near where you board the boat. The island eco-tour included snack foods, sandwiches and drinks,
Snorkelling with Children: If you want to introduce your children to snorkelling in open water, this is a good tour for that. The water is calm, warm and shallow. If you’re looking for a wide variety of colourful fish, this is not that tour. It was interesting to see lobsters, starfish and the sponge gardens. Many of the marine species here like to hide so take your time. I would recommend trying to hover over a spot to wait and see what might appear. There was a bit of a current which could be a challenge for beginner swimmers/snorkellers. My sons did okay with it once they got some fins on.
MARCH 2019
A return to the Middle Keys and I think my favourite location to be based in the Florida Keys.
We’ve stayed all over the Florida Keys from budget motels to resorts. We’ve stayed in several locations on the same trip to get a feel of what the upper, middle and lower keys and their respective snorkelling locations have to offer. Here’s a list of our favourite accommodations in the Florida Keys.
Although most operators offer a snorkel set, fins and snorkel vests, you may want to bring your own. Most of the tour operators in the Florida Keys did not provide a dry top snorkel set except for Looe Key Dive Centre. I find that to be an essential piece of equipment for beginner snorkelers, especially when you are snorkelling with children. It’s not a guarantee to keep water out of your snorkel, but it certainly helps. It is also essential to have your equipment when you go to the beach in shallow water to help your children practice. For these reasons, this is my list of snorkel gear I recommend and that we use on our snorkel trips.
I hope this guide will help you experience the best snorkelling that the Florida Keys has to offer. As always, if you have any questions, please do not hesitate to connect with me. – Andrea
Disclaimer:
Some links are referral links to accommodations, snorkelling trips or camera gear in which I receive a small compensation if you book through my referral. It is no additional cost to you, just one way to support this site if you found the information useful.
I received a complimentary snorkel trip for two from Sundance Watersports as part of my stay at Hawks Cay Resort. As always, the choice of activities as well opinions are strictly my own.
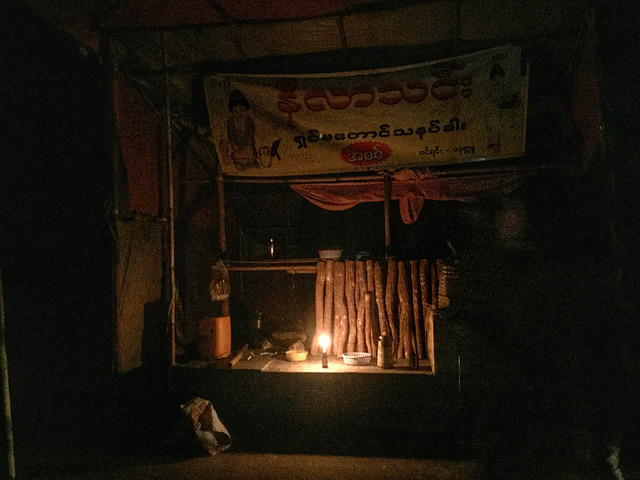
As the daughter of a Myanmar born father, I wanted my first trip to Myanmar to be a memorable and meaningful experience. I learned about Thadingyut, the festival of lights and the Phaung Daw Oo Pagoda festivals and I just knew they would be two Myanmar festivals worth travelling to Myanmar for.
PHAUNG DAW OO PAGODA FESTIVAL – INLE LAKE, MYANMAR
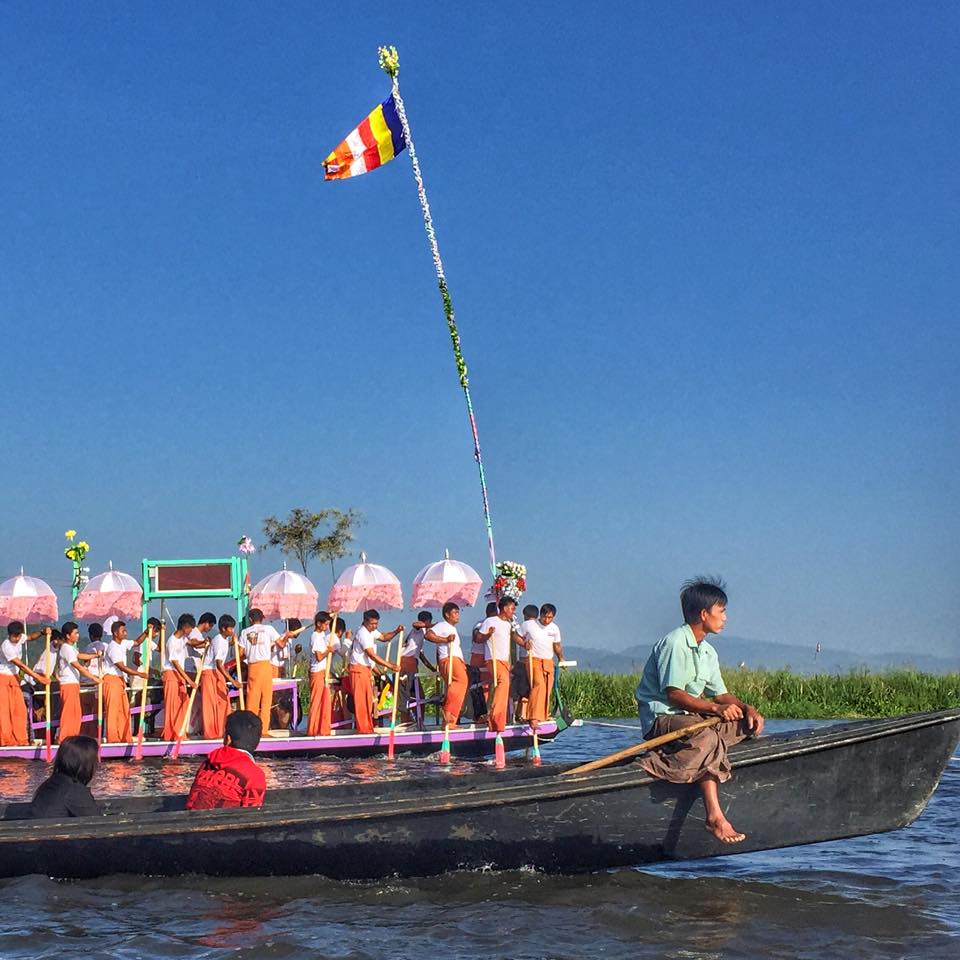
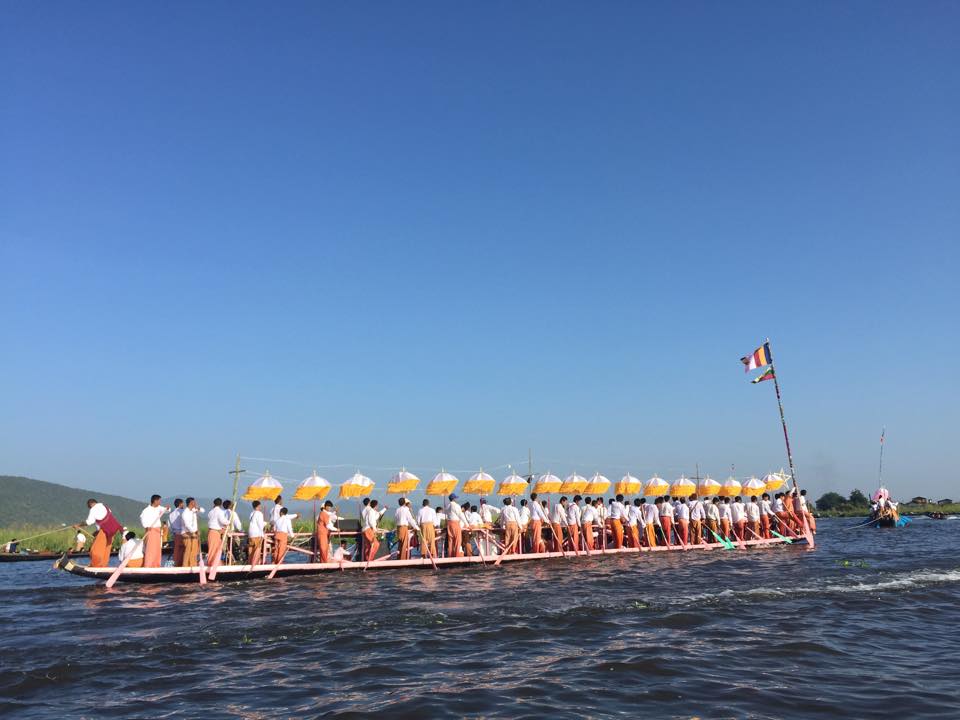
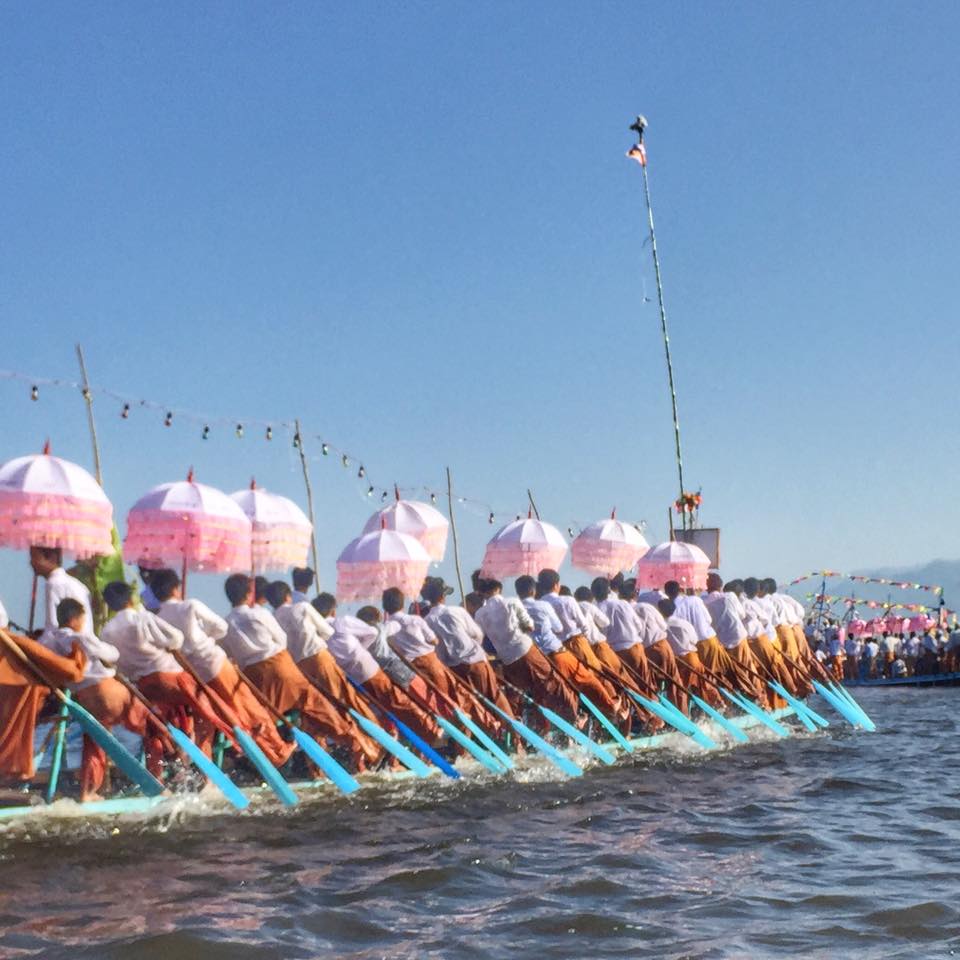
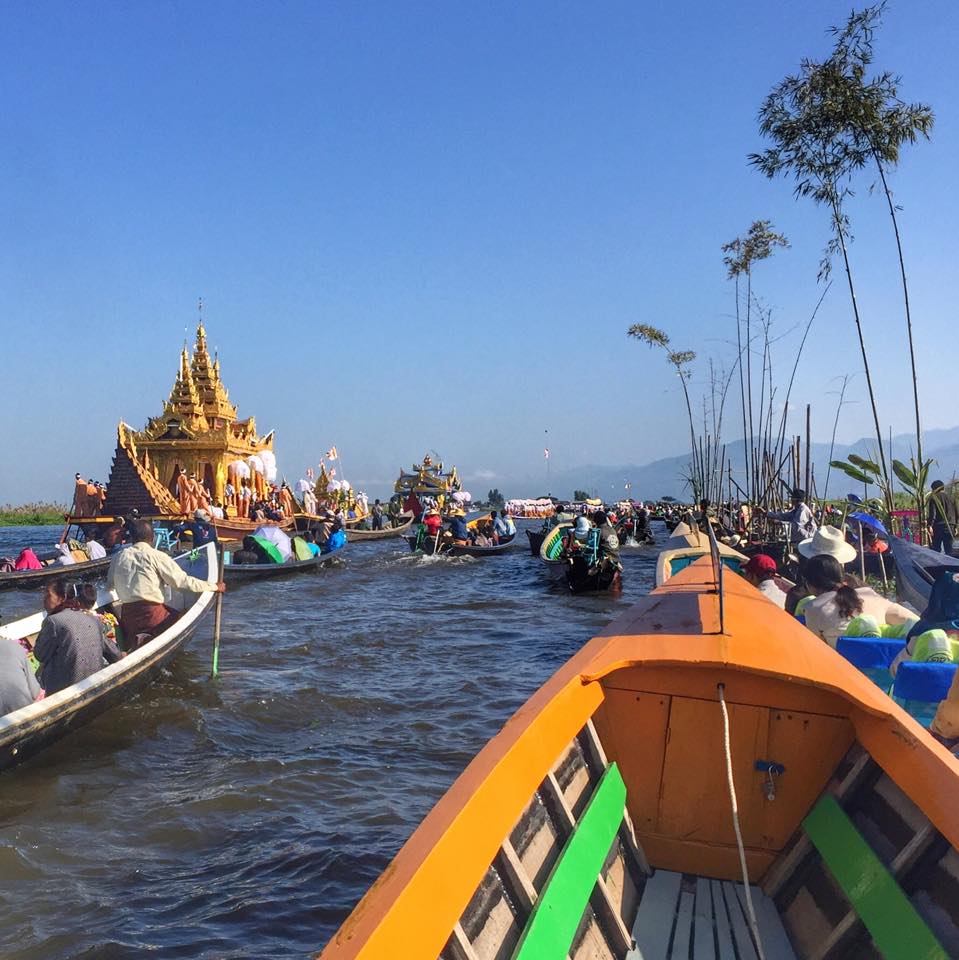
The excitement was palpable as we met up with a procession of 20 long boats each with 100 rowers for the Phaung Daw Oo Pagoda Festival in Inle Lake, Myanmar.
This religious festival takes place around the villages of Inle Lake for 18 days leading up to the full moon in October and the lighting festival known as Thadingyut.
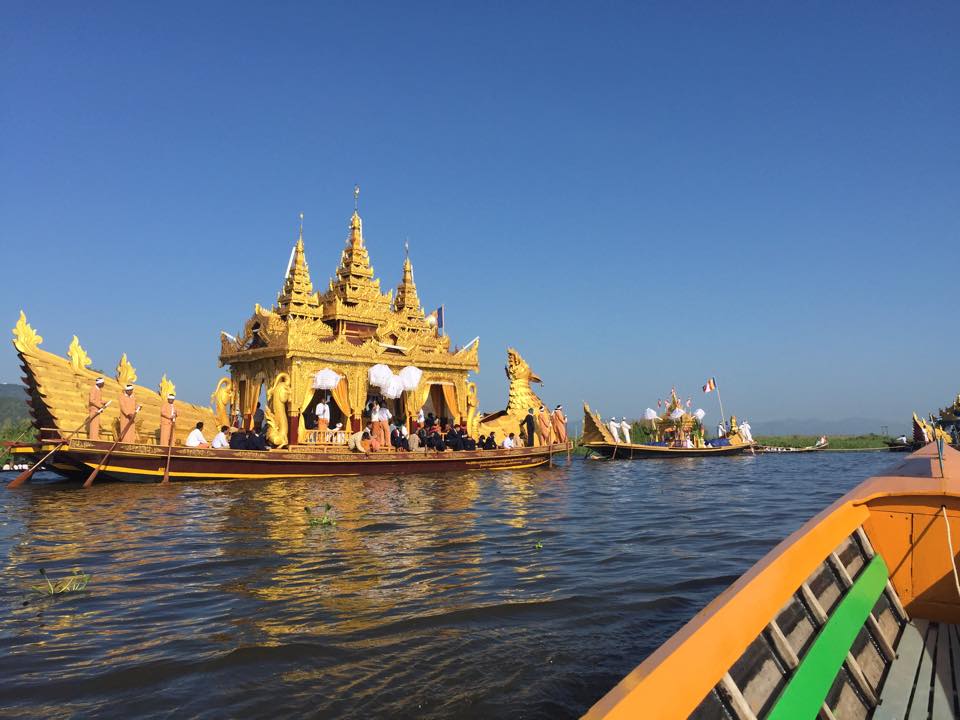
Four holy images of Buddha from the highly revered Phaung Daw Oo Pagoda travel on the Royal Karaweik (mythological bird) barge and are towed by rowers from village to village, spending a night or two in each village’s monastery. In October 2015, I had the opportunity to witness this unique festival.
After travelling by longtail boat for an hour from the jetty in Nyaung Shwe, we came upon several other teak wood boats waiting along the banks, each filled with Buddhist devotees with gifts of flowers and food for Buddha. It was 7:30 am, and we had made it to a smaller part of the lake. The people in the homes that lined the water’s edge watched from their windows, sat on the stairs that led to the water or on their small docks. They also had food and gifts, and many dressed in their best longyis.
Just after we arrived at the first boat with 100 male, Intha rowers appeared. Each boat had music, and the men wore the same colour of traditional Shan clothing. They rowed with their leg wrapped around their oar sometimes switching to row with their hands. Some stood on the upper part of the boat and danced.
It was a festive celebration but the people waiting for the barge appeared solemn. They bowed as the Royal Golden Karaweik passed.
Many boats joined the procession and followed as it made its way to the nearest monastery. We did too and soon found ourselves in the heart of it all, sandwiched between boats and at times we bumped.
We followed a few boats to a narrow channel just off the main traversing part of Inle Lake to watch as the procession passed through the small village. It was unlike anything I had ever experienced before and a wonderful way to bring in Thadingyut.
The lead boat in the Phaung Daw Oo Pagoda Festival procession on Inle Lake, October 2015
A boat of 100 rowers at the Phaung Daw Oo Pagoda Festival parade on Inle Lake, October 2015
Intha leg rowers at the Phaung Daw Oo Pagoda Festival in Inle Lake, Myanmar
The Karaweik barge carrying four images of Buddha during the Phaung Daw Oo Pagoda Festival in Inle Lake, Myanmar
Royal Karaweik barge
Joining the procession at the Phaung Daw Oo Pagoda Festival in Inle Lake, Myanmar
THADINGYUT – INLE LAKE, MYANMAR
Thadingyut, the Festival of Lights is celebrated the day before, after and on the full moon day, usually in October, in Myanmar. It is in the seventh month of the Myanmar calendar, and the end of the Buddhist Lent. Do check for the exact dates if you plan to attend.
Young people pay respect to their parents and older relatives. My father, grandparents, great and great great grandparents are from Myanmar. For three years I had planned to visit Myanmar to coincide with Thadingyut as a way to honour my Burmese relatives and ancestors.
In October 2015, I finally got to visit the country for the first time with my dad and cousins. We celebrated Thadingyut in Naung Shwe (Inle Lake).
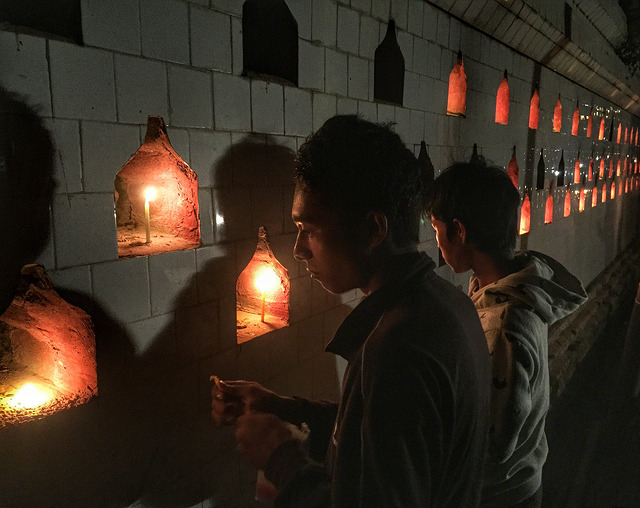
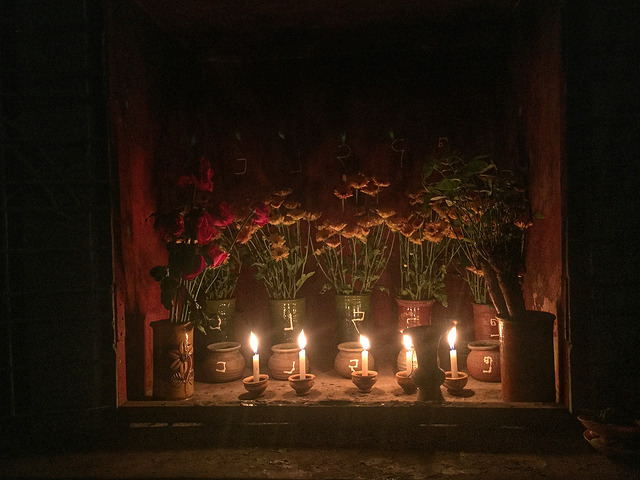
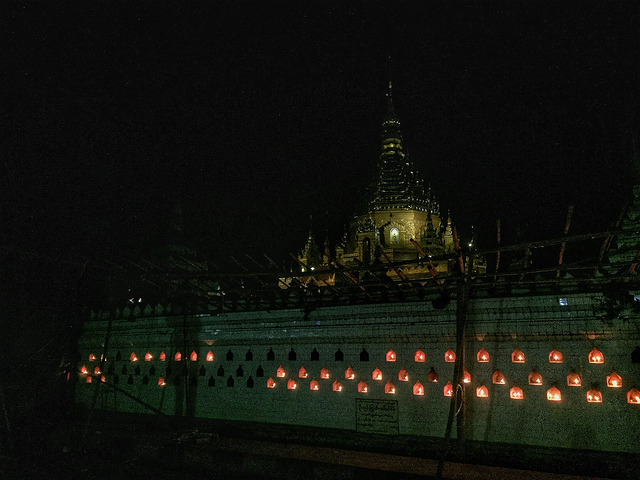
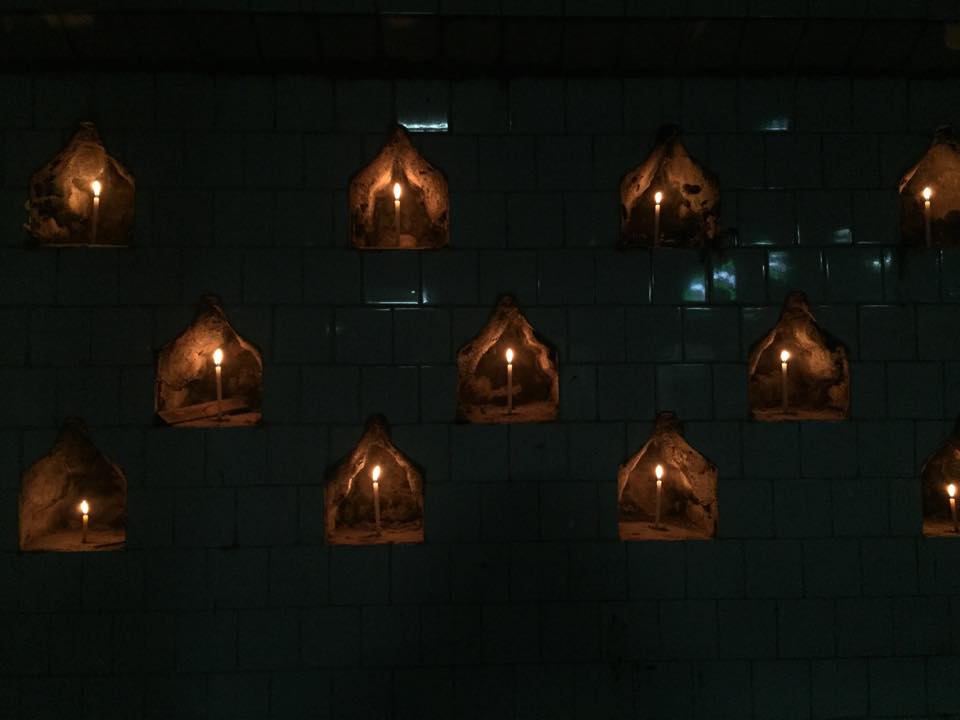
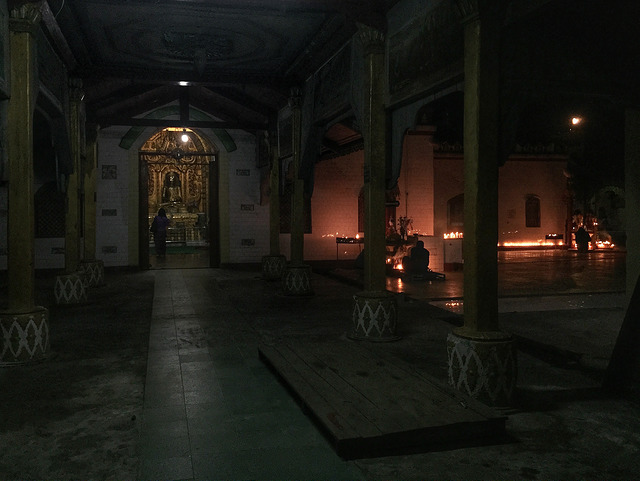
Homes, pagodas, monasteries and open market shops were lit with candles, and a few paper lanterns dotted the sky. There was a constant sound of fireworks and firecrackers going off. My father bought some as well and asked the shop owner to light them. He also popped a few off as he remembered doing as a teenager in Yangon.
I watched as two young men lit candles to put into the wall surrounding the Yadanar Manaung Pagoda and asked to take their photo. They agreed and gave me a candle to light too.
More:
Watch my view of Phaung Daw Oo Pagoda Festival from inside a longtail boat
.
THADINGYUT IN YANGON
A street fair takes place in downtown Yangon. I’ve seen photos of the event from relatives there. It seems like it’s a good time to be in the city. Unfortunately, it was raining when we arrived late from Inle Lake on the last night of the festival
Lifeguard station at Cherry Beach in Toronto, Canada.
Cherry Beach in Toronto, Ontario is my go-to beach for it’s laid back atmosphere. It’s my favourite place to sit by the lake and take some time out. It is much less crowded
than the other Toronto beaches.
There are toilet facilities, a food truck and an off-leash dog park. You’ll often see kite boarders, kayakers, stand up paddle boarders and wind surfers. There are barbeque facilities as well, just bring the charcoal.
It was the last day of our 3-country intergenerational family trip and our final day in Milan. I love nature and any chance to be near an ocean, lake, river or any body of water; I take it. In this case, the body of water was Lake Como, and it was calling. After visiting Amsterdam, Dusseldorf and spending a day in Milan, I was yearning to get away from concrete and city chaos.
I didn’t have a plan, but I knew Lake Como was reasonably close. I chose Varenna because it was a 65-minute train ride to Varenna Esino station, picturesque and not as touristy (busy) as other destinations on Lake Como.
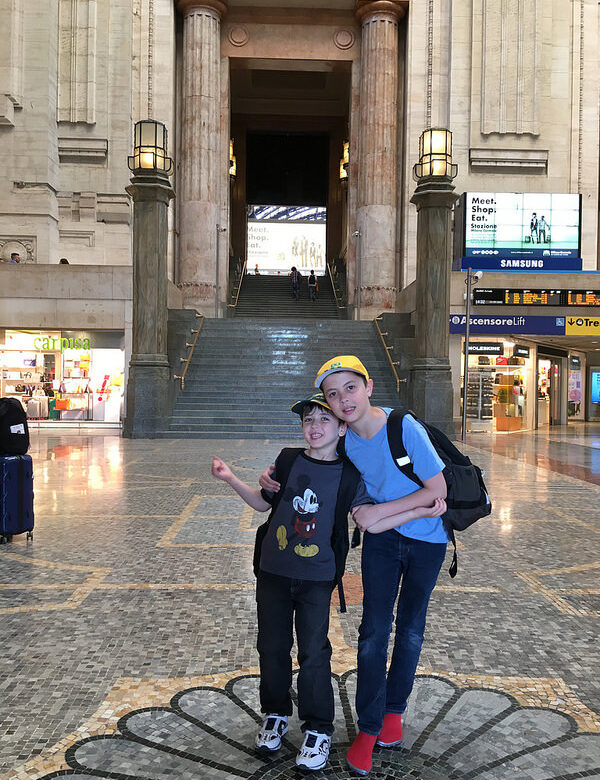
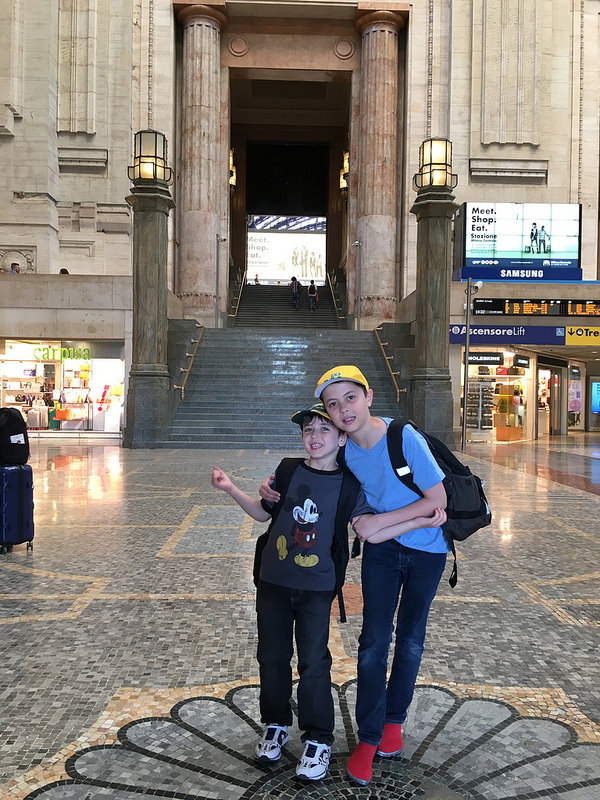
My two boys (10 and 6) and I headed to the Milan Central station which was one stop away on the Metro from our rental apartment in Piazza Della Repubblica. The Milan Metro has several lines which can be a little confusing but with my very limited Italian, hand gesturing and helpful Milanese, we were on our way.
We arrived at the station with time to spare. We did some window shopping on the lower levels then grabbed some pizza on level two where the platforms are. After lunch, we joined the other travellers in the waiting area near Gate A where we were to board our train.
My sons at Milano Centrale
It was an easy train ride and the last twenty minutes were spectacular as the lake and mountains came into view. We took a taxi to Piazza San Giorgio, the main square, as I didn’t know how far of a walk it would be. It turns out it’s a quick 4-5 minute taxi ride and a flat rate of ten euros to get there.
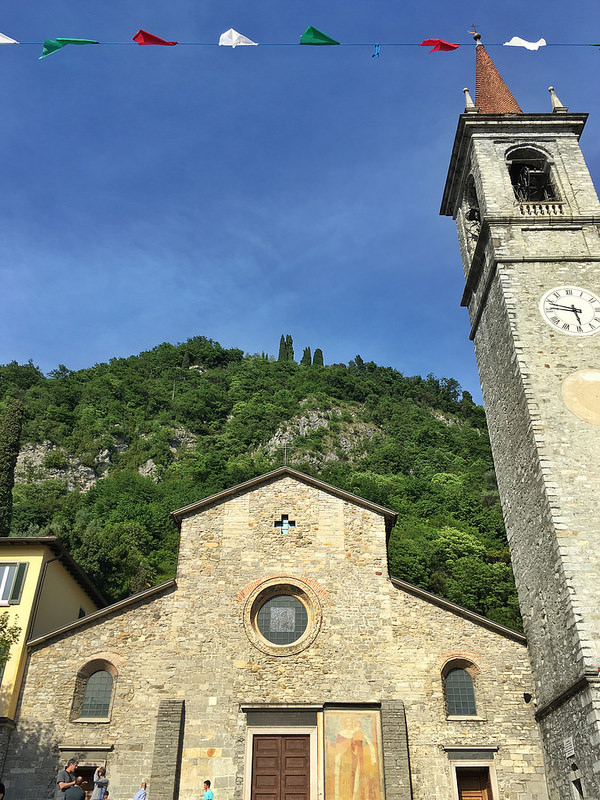
The first thing you notice upon arrival is the stone church and tower on your left, the Church of San Giorgio, consecrated in 1313. The bells chimed just after we arrived and again as we got back to the Piazza before departing Varenna.
Church of San Giorgio in Varenna, Italy
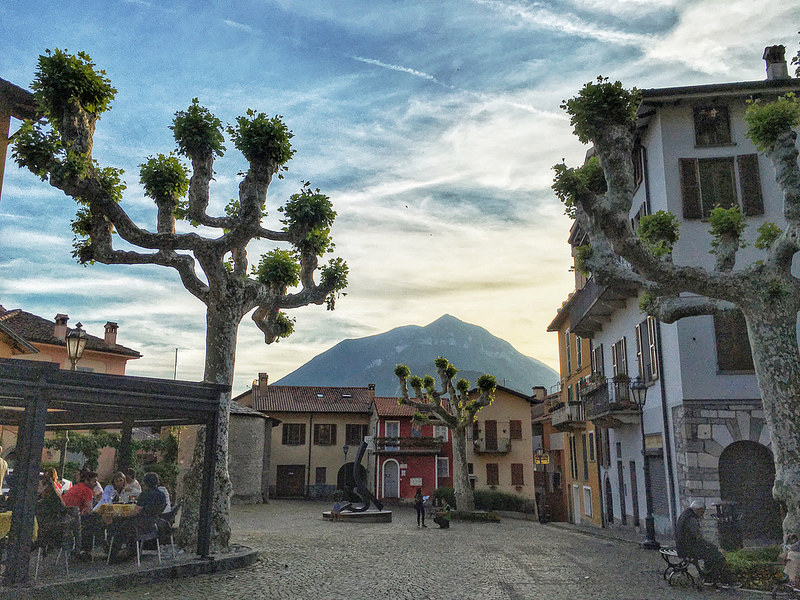
Piazza San Giorgia in Varenna, Italy.
The first glimpse of Lake Como beside Hotel Royal Victoria as you walk through the piazza.
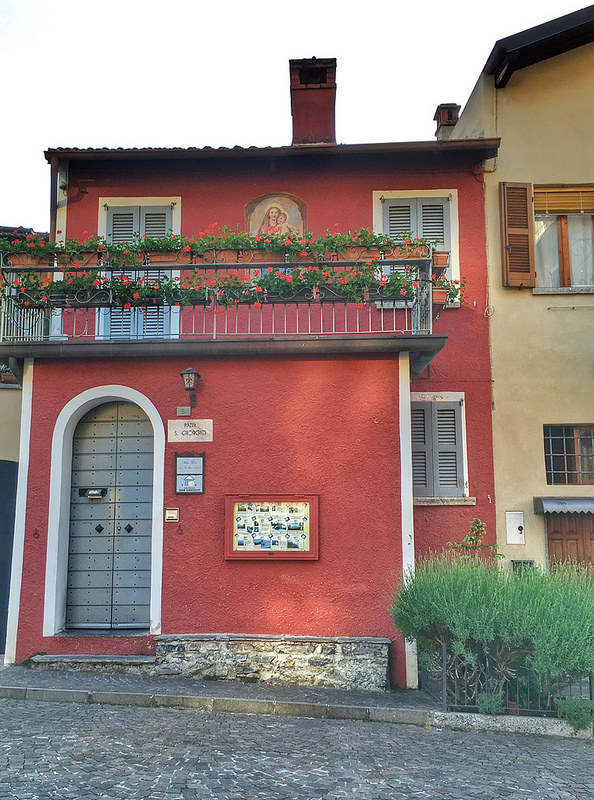
We weren’t sure which way to go to get to the waterfront, but the lane sloped downward, so we followed it. As we walked away from the church, there was a red house straight ahead; the path continued right.
A house in Varenna, Italy
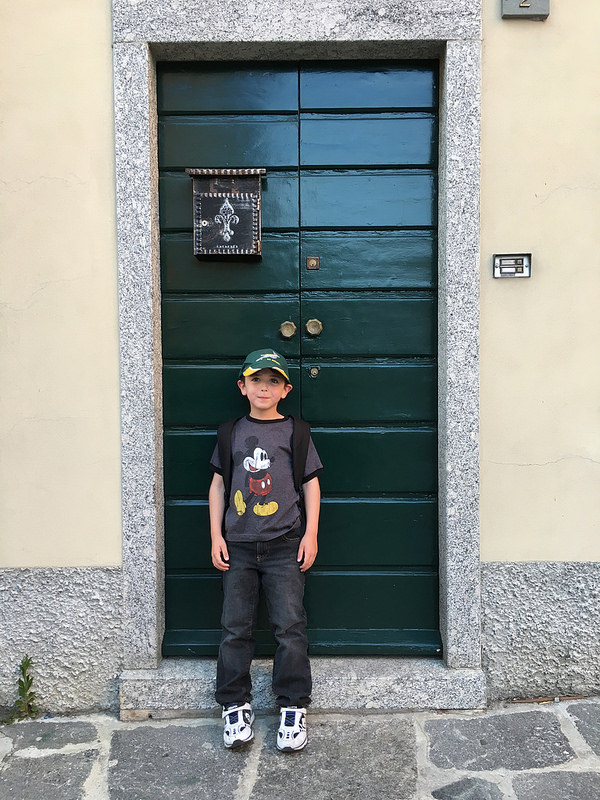
Then, a house with green doors and shutters next to a house with terra cotta/orange-ish coloured walls and a window with flower pots in front of us; a mailbox was on the left corner.
My six-year-old son in Varenna, Italy
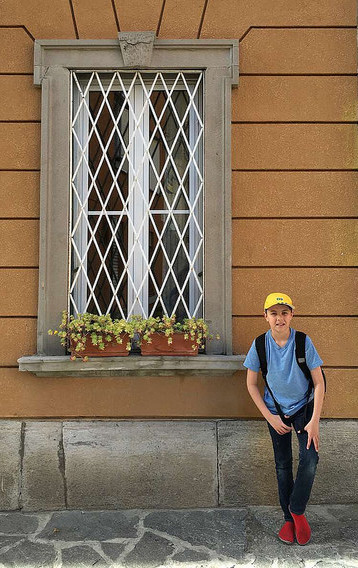
My 10-year-old son in Varenna, Italy (snapchat image)
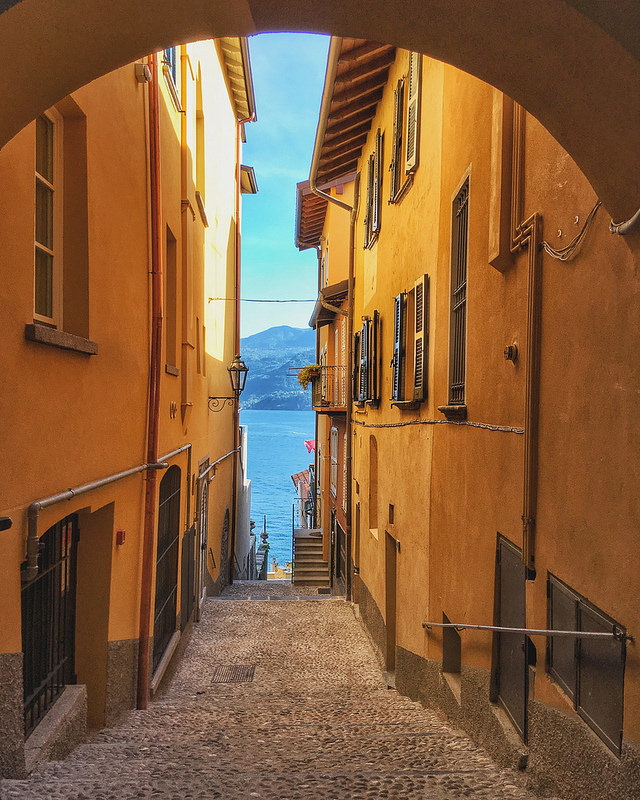
A narrow lane continued left and offered another glimpse of the water and mountains. We could either continue to walk down the continuous path or take the steep steps on the right which led down to the lake. We chose the longer way down so we could enjoy all the little details and colours along the way.
The gradual pathway down to Lake Como in Varenna, Italy
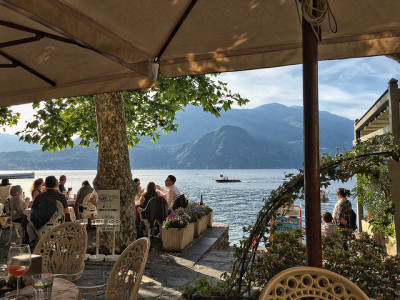
At the end of the cobblestone path, there was a restaurant on the right with a choice to go left or right; we went right. As we continued, there was a small outdoor patio with a view of the lake on the left and then another and another. There were restaurants and more seating across the pathway on the right. We passed the restaurants in search of a gelateria.
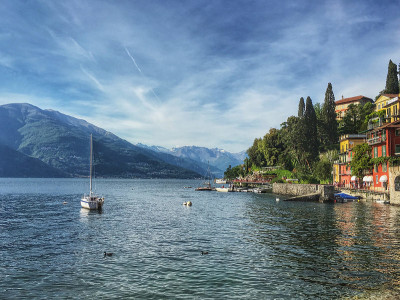
Just after we passed the restaurants there was a stone ‘beach’, children were laughing and playing in the lake, and anchored boats were in the harbour. There were benches with views of the lake and mountains with the Alps in the distance behind them. Shops, galleries and gelaterias were also to be found. There was a pier with a water taxi service which also offered tours around the lake. Signs pointed to the ferry boat that takes passengers to Bellagio.
Lake Como from the waterfront promenade in Varenna, Italy
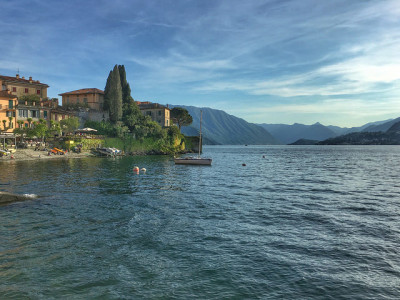
A view back to the photo above and the stone beach in Varenna, Italy
After a while, we turned back to Gelateria Riva di Riva Duilio, one of the gelato shops we had passed. My youngest son is a big fan of gelato, my oldest son, not so much. We both had the mint gelato; it was so fresh, creamy and minty and we were in gelato heaven. We sat on the stone steps beside the gelateria which had seat cushions for its patrons to enjoy their gelato with a view. After our gelato, we continued walking back in the direction we originally came from and made our way to one of the waterfront restaurants, Bar Il Molo. The patio nearer to the lake was full, but we managed to snag the last table across the pathway.
Lakeside patio views from Bar Il Molo in Varenna, Italy.
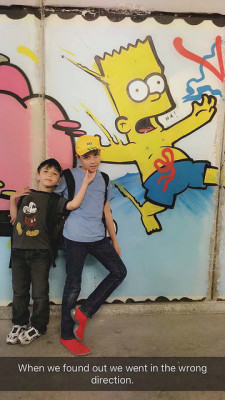
We were enjoying our time in Varenna so we opted for one of the latest trains back to Milano Centrale, one that got us back to Milan just after 9:30 pm. We had a minor blip on our trip back as we ended up on a train going in the wrong direction. No big deal I thought, we’ll just get off at the next stop. Luckily it was only a few minutes away; we were about 6-7 minutes ahead of our schedule, and the right train was delayed for ten minutes.
Note: If you’re at Varenna Esino train station and are going to Milan, take the stairs to the lower level and go through a short tunnel under the tracks to get to the other side. ‘Getting lost made for an adventure and thanks to helpful people that pointed us in the right direction. There is some street art in the tunnel, mostly The Simpsons.
Street art in the tunnel at Varenna Esino station. (Snapchat image).
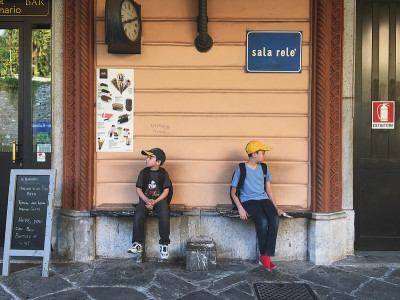
Waiting for the train to Milano Centrale at the Varenna Esino station in Italy
It was an uneventful ride back to Milan and a short trip back to our apartment. It was the perfect day trip with my two sons. They loved both Varenna and Milan, though I think it was the pizza and gelato that sealed the deal.